# Overview
Source: https://docs.codeium.com/autocomplete/overview
[Tab to Jump](/supercomplete/overview#tab-to-jump) functionality is now available in Windsurf!
**Codeium Autocomplete** is powered by our own models, trained in-house from scratch to optimize for speed and accuracy.
Our autocomplete makes in-line and multi-line suggestions based on the context of your code.
Suggestions appear in grey text as you type. You can press `esc` to cancel a suggestion.
Suggestions will also disappear if you continue typing or navigating without accepting them.
## Keyboard Shortcuts
Here are shortcuts that apply for MacOS.
Replace `⌘` with `Ctrl` and `⌥` with `Alt` to get the corresponding shortcuts on Windows/Linux.
* **Accept suggestion**: `⇥`
* **Cancel suggestion**: `esc`
* **Accept suggestion word-by-word**: `⌘+→` (VS Code), `⌥+⇧+\` (JetBrains)
* **Next/previous suggestion**: `⌥+]`/`⌥+[`
* **Trigger suggestion**: `⌥+\`
## Autocomplete Speeds
You can set the speed of the Autocomplete in your settings.
Fast Autocomplete is currently only available to our Pro, Teams, and Enterprise Users.
# Tips
Source: https://docs.codeium.com/autocomplete/tips
## Inline Comments
You can instruct autocomplete with the use of comments in your code.
Codeium will read these comments and suggest the code to bring the comment to life.
This method can get you good mileage, but if you're finding value in writing natural-language instructions and having the AI execute them,
consider using [Codeium Command](/command/overview).
## Fill In The Middle (FIM)
Codeium's Autocomplete can Fill In The Middle (FIM).
Read more about in-line FIM on our blog [here](https://codeium.com/blog/inline-fim-code-suggestions).
## Snooze
Click the Codeium widget in the status bar towards the bottom right of your editor to see the option to switch Autocomplete off,
either temporarily or until you reenable it.
# Prompt Engineering
Source: https://docs.codeium.com/best-practices/prompt-engineering
If you're reading this, you're probably someone that already understands some of the use cases and limitations of LLMs. The better prompt and context that provide to the model, the better the outcome will be.
Similarly with Codeium, there are best practices for crafting more effective prompts to get the most out of the tool, and get the best quality code possible to help you accelerate your workflows.
For more complex tasks that may require you to [@-Mention](/chat/overview/#mentions) specific code blocks, use [Chat](/chat/overview) instead of [Command](/command/overview).
## Components of a high quality prompt
* ***Clear objective or outcome***
* What are you asking the model to produce?
* Are you asking the model for a plan? For new code? Is it a refactor?
* ***All relevant context to perform the task(s)***
* Have you properly used @-Mentions to ensure that the proper context is included?
* Is there any context that is customer specific that may be unclear to Codeium?
* ***Necessary constraints***
* Are there any specific frameworks, libraries, or languages that must be utilized?
* Are there any space or time complexity constraints?
* Are there any security considerations?
## Examples
***Example #1:***
* **Bad**: Write unit tests for all test cases for an Order Book object.
* **Good**: Using `@class:unit-testing-module` write unit tests for `@func:src-order-book-add` testing for exceptions thrown when above or below stop loss
***Example #2***:
* **Bad**: Refactor rawDataTransform.
* **Good**: Refactor `@func:rawDataTransform` by turning the while loop into a for loop and using the same data structure output as `@func:otherDataTransformer`
***Example #3***:
* **Bad**: Create a new Button for the Contact Form.
* **Good**: Create a new Button component for the `@class:ContactForm` using the style guide in `@repo:frontend-components` that says “Continue”
# Common Use Cases
Source: https://docs.codeium.com/best-practices/use-cases
Codeium, especially now with Windsurf, can serve a great variety of use cases at a high level. However, we see certain use cases to be more common than others, especially among our enterprise customers within their production codebases.
## Code generation
**Guidance:** Codeium should work well for this use case. Codeium features including single-line suggestions, multi-line suggestions, and fill-in-the-middle (FIM) completions.
**Best Practices:** Ensuring usage of Next Completion (`⌥ + ]`), Context Pinning, @ Mentions, and Custom Context will provide best results.
## Unit Test generation
**Guidance:** Basic usage of Codeium for generating unit tests should reliably generate 60-70% of unit tests. Edge case coverage will only be as good as the user prompting the model is.
**Best Practices:** Use @ Mentions. Prompt Engineering best practices. Examples include:
Write unit test for `@function-name` that tests all edge cases for X and for Y (e.g. email domain).
Use `@testing-utility-class` to write a unit test for `@function-name`.
**Guidance:** Good for low-hanging fruit use cases. For very specific API specs or in-house libraries, Codeium will not know the intricacies well enough to ensure the quality of generated sample data.
**Best Practices:** Be very specific about the interface you expect. Think about the complexity of the task (and if a single-shot LLM call will be sufficient to address).
## Internal Code Commentary
**Guidance:** Codeium should work well for this use case. Use Codeium Command or Codeium Chat to generate in-line comments and code descriptions.
**Best Practices:** Use @ Mentions and use Code Lenses as much as possible to ensure the scope of the LLM call is correct.
**Guidance:** Generally the Refactor button / Codeium Command would be the best ways to prompt for improvements. Codeium Chat is the best place to ask for explanations or clarifications. This is a little vague but Codeium should be good at doing both.
Codeium Chat is the best place to ask for explanations or clarifications.
This is a little vague but Codeium should be good at doing both.
**Best Practices**: Use the dropdown prompts (aka Codeium's Refactor button) - we have custom prompts that are better engineered to deliver the answer you'd more likely expect.
**Guidance**: The best way to do this would be to create the header file, open chat, @ mention the function in the cpp file, and ask it to write the header function. Then do this iteratively for each in the cpp file. This is the best way to ensure no hallucinations along the way.
**Best Practices**: Generally avoid trying to write a whole header file with one LLM call. Breaking down the granularity of the work makes the quality of the generated code significantly higher.
## API Documentation and Integration
**Guidance**: This is similar to test coverage where parts of the API spec that are common across many libraries Codeium would be able to accurately decorate. However, things that are built special for your in-house use case Codeium might struggle to do at the quality that you expect.
**Best Practices**: Similar to test coverage, as much as possible, walk Codeium's model through the best way to think about what the API is doing and it will be able to decorate better.
**Guidance**: Codeium's context length for a single LLM call is 16,000 tokens. Thus, depending on the scope of your search, Codeium's repo-wide search capability may not be sufficient. Repo-wide, multi-step, multi-edit tasks will be supported in upcoming future Codeium products.
This is fundamentally a multi-step problem that single-shot LLM calls (i.e. current functionality of all AI code assistants) are not well equipped to address. Additionally, accuracy of result must be much higher than other use cases as integrations are especially fragile.
**Best Practices**: Codeium is not well-equipped to solve this problem today. If you'd like to test the extent of Codeium's existing functionality, build out a step-by-step plan and prompt Codeium individually with each step and high level of details to guide the AI.
## Code Refactoring
**Guidance**: Ensure proper scoping using Codeium Code Lenses or @ Mentions to make sure all of the necessary context is passed to the LLM.
Context lengths for a single LLM call are finite. Thus, depending on the scope of your refactor, this finite context length may be an issue (and for that matter, any single-shot LLM paradigm). Repo-wide, multi-step, multi-edit tasks are now supported in Windsurf's [Cascade](/windsurf/cascade).
**Best Practices**: Try to break down the prompt as much as possible. The simpler and shorter the command for refactoring the better.
**Guidance**: Ensure proper scoping using Codeium Code Lenses or @ Mentions to make sure all of the necessary context is passed to the LLM.
Codeium's context length for a single LLM call is 16,000 tokens. Thus, depending on the scope of your refactor, Codeium's context length may be an issue (and for that matter, any single-shot LLM paradigm). Repo-wide, multi-step, multi-edit tasks will be supported in upcoming future Codeium products.
**Best Practices**: Try to break down the prompt as much as possible. The simpler and shorter the command for refactoring the better.
# Models
Source: https://docs.codeium.com/chat/models
While we provide and train our own dedicated models for Chat, we also give you the flexibility choose your favorites.
It's worth noting that the Codeium models are tightly integrated with our reasoning stack, leading to better quality suggestions than external models for coding-specific tasks.
Model selection can be found directly under the chat.
## Base Model ⚡
**Access:** All users
Available for unlimited use to all users is a fast, high-quality Codeium Chat model based on Meta's [Llama 3.1 70B](https://ai.meta.com/blog/meta-llama-3-1/).
This model is optimized for speed, and is the **fastest** model available in Codeium Chat. This is all while still being extremely accurate.
## Codeium Premier 🚀
**Access:** Any paying users (Pro, Teams, Enterprise, etc.)
Available in our paid tier is unlimited usage of our premier Codeium Chat model based on Meta's [Llama 3.1 405B](https://ai.meta.com/blog/meta-llama-3-1/).
This is the **highest-performing model** available for use in Codeium, due to its size and integration with Codeium's reasoning engine and native workflows.
## Other Models (GPT-4o, Claude 3.5 Sonnet)
**Access:** Any paying users (Pro, Teams, Enterprise, etc.)
Codeium provides access to OpenAI's and Anthropic's flagship models, available for use in any of our paid tiers.
# Overview
Source: https://docs.codeium.com/chat/overview
Converse with a codebase-aware AI
Chat and its related features are only supported in: VS Code, JetBrains IDEs, Eclipse, X-Code, and Visual Studio.
Chat in Windsurf is integrated within [Cascade](/windsurf/cascade). Set to "Chat" mode to replicate the original experience.
**Codeium Chat** enables you to talk to your codebase from within your editor.
Chat is powered by our [context awareness](/context-awareness/overview.mdx) engine.
It combines built-in context retrieval with optional user guidance to provide accurate and grounded answers.
In VS Code, Codeium Chat can be found by default on the left sidebar.
If you wish to move it elsewhere, you can click and drag the Codeium icon and relocate it as desired.
You can use `⌘+⇧+A` on Mac or `Ctrl+⇧+A` on Windows/Linux to open the chat panel and toggle focus between it and the editor.
You can also pop the chat window out of the IDE entirely by clicking the page icon at the top of the chat panel.
In JetBrains IDEs, Codeium Chat can be found by default on the right sidebar.
If you wish to move it elsewhere, you can click and drag the Codeium icon and relocate it as desired.
You can use `⌘+⇧+L` on Mac or `Ctrl+⇧+L` on Windows/Linux to open the chat panel while you are typing in the editor.
You can also open the chat in a popped-out browser window by clicking `Tools > Codeium > Open Codeium Chat in Browser` in the top menu bar.
## @-Mentions
An @-mention is a deterministic way of bringing in context, and is guaranteed to be part of the context used to respond to a chat.
In any given chat message you send, you can explicitly refer to context items from within the chat input by prefixing a word with `@`.
Context items available to be @-mentioned:
* Functions & classes
* Only functions and classes in the local indexed
* Also only available for languages we have built AST parsers for (Python, TypeScript, JavaScript, Go, Java, C, C++, PHP, Ruby, C#, Perl, Kotlin, Dart, Bash, COBOL, and more)
* Directories and files in your codebase
* Remote repositories
* The contents of your in-IDE terminal (VS Code only).
You can also try `@diff`, which lets you chat about your repository's current `git diff` state.
The `@diff` feature is currently in beta.
If you want to pull a section of code into the chat and you don't have @-Mentions available, you can: 1. highlight the code -> 2. right click -> 3. select 'Codeium: Explain Selected Code Block'
## Persistent Context
You can instruct the chat model to use certain context throughout a conversation and across different converstions
by configuring the `Context` tab in the chat panel.
In this tab, you can see:
* **Custom Chat Instructions**: a short prompt guideline like "Respond in Kotlin and assume I have little familiarity with it" to orient the model towards a certain type of response.
* **Pinned Contexts**: items from your codebase like files, directories, and code snippets that you would like explicitly for the model to take into account.
See also [Context Pinning](/context-awareness/overview#context-pinning).
* **Active Document**: a marker for your currently active file, which receives special focus.
* **Local Indexes**: a list of local repositories that the Codeium context engine has indexed.
## Slash Commands
You can prefix a message with `/explain` to ask the model to explain something of your choice.
Currently, `/explain` is the only supported slash command.
[Let us know](https://codeium.canny.io/feature-requests/) if there are other common workflows you want wrapped in a slash command.
## Copy and Insert
Sometimes, Chat responses will contain code blocks. You can copy a code block to your clipboard or insert it directly into the editor
at your cursor position by clicking the appropriate button atop the code block.
If you would like the AI to enact a change directly in your editor based on an instruction,
consider using [Codeium Command](/command/overview).
## Inline Citations
Chat is aware of code context items, and its responses often contain linked references to snippets of code in your files.
## Regenerate with Context
By default, Codeium makes a judgment call whether any given question is general or if it requires codebase context.
You can force the model to use codebase context by submitting your question with `⌘⏎`.
For a question that has already received a response, you rerun with context by clicking the sparkle icon.
## Stats for Nerds
Lots of things happen under the hood for every chat message. You can click the stats icon to see these statistics for yourself.
## Chat History
To revisit past conversations, click the history icon at the top of the chat panel.
You can click the `+` to create a new conversation, and
you can click the `⋮` button to export your conversation.
## Settings
Click on the `Settings` tab to update your theme preferences (light or dark) and font size.
The settings panel also gives you an option to download diagnostics, which are debug logs that can be helpful
for the Codeium team to debug an issue should you encounter one.
## Telemetry
You may encounter issues with Chat if Telemetry is not enabled.
To enable telemetry, open your VS Code settings and navigate to User > Application > Telemetry. In the following dropdown, select "all".
To enable telemetry in JetBrains IDEs, open your Settings and navigate to Appearance & Hehavior > System Settings > Data Sharing.
# Overview
Source: https://docs.codeium.com/command/overview
AI-powered in-line edits
**Codeium Command** generates new or edits existing code via natural language inputs, directly in the editor window.
Command does NOT consume any premium model credits.
To invoke Command, press `⌘+I` on Mac or `Ctrl+I` on Windows/Linux.
From there, you can enter a prompt in natural language and hit the Submit button (or `⌘+⏎`/`Ctrl+⏎`) to forward the instruction to the AI.
Codeium will then provide a multiline suggestion that you can accept or reject.
If you highlight a section of code before invoking Command, then the AI will edit the selection spanned by the highlighted lines.
Otherwise, it will generate code at your cursor's location.
You can accept, reject, or follow-up a generation by clicking the corresponding code lens above the generated diff,
or by using the appropriate shortcuts (`Cmd/Ctrl+Enter`/`Cmd/Ctrl+Delete`)
In Windsurf, you can select your desired model to use for Command from the dropdown.
Codeium Fast is the fastest, most accurate model available.
### Terminal Command
You can use Command in the terminal (`Cmd/Ctrl+I`) to generate the proper CLI syntax using prompts in natural language.
To invoke Command, press `⌘+I` on Mac or `Ctrl+I` on Windows/Linux.
From there, you can enter a prompt in natural language and hit the Submit button (or `⌘+⏎`/`Ctrl+⏎`) to forward the instruction to the AI.
Codeium will then provide a multiline suggestion that you can accept or reject.
If you highlight a section of code before invoking Command, then the AI will edit the selection spanned by the highlighted lines.
Otherwise, it will generate code at your cursor's location.
You can accept, reject, or follow-up a generation by clicking the corresponding code lens above the generated diff,
or by using the appropriate shortcuts (`⌥+A`/`Alt+A`, `⌥+R`/`Alt+R`, and `⌥+F`/`Alt+F`, respectively).
To invoke Command, press `⌘+I` on Mac or `Ctrl+I` on Windows/Linux.
Some users have reported keyboard conflicts with this shortcut, so `⌘+⇧+I` and `⌘+\`on Mac (`Ctrl+⇧+I` and `Ctrl+\` on Windows/Linux)
will also work.
The Command invocation will open an interactive popup at the appropriate location in the code.
You can enter a prompt in natural language and Codeium will provide a multiline suggestion that you can accept or reject.
If you highlight a section of code before invoking Command, then the AI will edit the selection spanned by the highlighted lines.
Otherwise, it will generate code at your cursor's location.
The Command popup will persist in the editor if you scroll around or focus your cursor elsewhere in the editor.
It will act on your most recently highlighted selection of code or your most recent cursor position.
While it is active, the Command popup gives you the following options:
* **Cancel** (`Esc`): this will close the popup and undo any code changes that may have occured while the popup was open.
* **Accept generation** (`⌘+⏎`): this option appears after submitting an instruction and receiving a generation.
It will write the suggestion into the code editor and close the popup.
* **Undo generation** (`⌘+⌫`): this option appears after submitting an instruction and receiving a generation.
It will restore the code to its pre-Command state without closing the popup, while reinserting your most recent instruction
into the input box.
* **Follow-up**: this option appears after submitting an instruction and receiving a generation.
You can enter a second (and third, fourth, etc.) instruction and submit it,
which will undo the currently shown generation and rerun Command using your comma-concatenated instruction history.
# Best Practices
Command is great for file-scoped, in-line changes that you can describe as an instruction in natural language.
Here are some pointers to keep in mind:
* The model that powers Command is larger than the one powering autocomplete.
It is slower but more capable, and it is trained to be especially good at instruction-following.
* If you highlight a block of code before invoking Command, it will edit the selection. Otherwise, it will do a pure generation.
* Using Command effectively can be an art. Simple prompts like "Fix this" or "Refactor" will likely work
thanks to Codeium's context awareness.
A specific prompt like "Write a function that takes two inputs of type `Diffable` and implements the Myers diff algorithm"
that contains a clear objective and references to relevant context may help the model even more.
# Refactors, Docstrings, and More
Source: https://docs.codeium.com/command/related-features
Features powered by Command
Command enables streamlined experiences for a few common operations.
## Function Refactors and Docstring Generation
Above functions and classes, Codeium renders *code lenses*,
which are small, clickable text labels that invoke Codeium's AI capabilities on the labeled item.
You can disable code lenses by clicking the `✕` to the right of the code lens text.
The `Refactor` and `Docstring` code lenses in particular will invoke Command.
* If you click `Refactor`, Codeium will prompt you with a dropdown of selectable, pre-populated
instructions that you can choose from. You can also write your own. This is equivalent to highlighting the function and invoking Command.
* If you click `Docstring`, Codeium will generate a docstring for you above the function header.
(In Python, the docstring will be correctly generated *underneath* the function header.)
## Smart Paste
This feature allows you to copy code and paste it into a file in your IDE written in a different programming language.
Use `⌘+⌥+V` (Mac) or `Ctrl+Alt+V` (Windows/Linux) to invoke Smart Paste.
Behind the scenes, Codeium will detect the language of the destination file and use Command to translate the code in your clipboard.
Codeium's context awareness will try to write it to fit in your code, for example by referencing proper variable names.
Some possible use cases:
* **Migrating code**: you're rewriting JavaScript into TypeScript, or Java into Kotlin.
* **Pasting from Stack Overflow**: you found a utility function online written in Go, but you're using Rust.
* **Learning a new language**: you're curious about Haskell and want to see what your would look like if written in it.
# Local Indexing
Source: https://docs.codeium.com/context-awareness/local-indexing
The **Indexing Engine** is Codeium's codebase awareness service that powers:
* Codebase-Aware [Chat](/chat/overview)
* Codebase-Aware [Autocomplete](/autocomplete/overview)
Compared to regular context-aware Autocomplete and Chat, the Indexing Engine is able to retrieve context from across the entire codebase, not just files that you have recently interacted with. This significantly improves the quality of autocomplete and chat responses.
Local Indexing is on by default for all Extension users, and always on for Windsurf Users.
## How It Works
The Indexing Engine works in part by generating embeddings for your codebase that capture the underlying meaning. These embeddings can queried using both Natural Language and related code snippets.
Codeium Indexing does send snippets of code to a remote server to generate embeddings. However, no code or embeddings are stored remotely -- all your data is stored on your own device.
## How to Toggle Indexing Engine
To toggle Indexing Engine in VS Code, go to your "Settings (UI)" page, and search for "Codeium Search". You should see an option to enable search, and set the Max Workspace Size.
Then restart your IDE and the change should be reflected.
You can see if your workspace is indexed by checking the "Context" pane in the "Chat" panel. If there is a green dot next to your workspace, then it is indexed and searchable.
In the Preferences menu, navigate to Tools > Codeium Settings.
Click "Enable/Disable Codeium Indexing", and set the appropriate value for "Indexing Max Workspace Size (File Count)" then restart your IDE.
## CodeiumIgnore
By default, Codeium Indexing will ignore:
* Paths specified in `gitignore`
* Files in `node_modules`
* Hidden pathnames (starting with ".")
When a file is ignored, it will not be indexed, and also does not count against the Indexing Max Workspace Size file counts.
If you want to further configure files that Codeium Indexing ignores, you can add a `.codeiumignore` file to your repo root, with the same syntax as `.gitignore`
## System Requirements
When first enabled, Codeium will consume a fraction of CPU while it indexes the workspace. Depending on your workspace size, this should take 5-10 minutes, and only needs to happen once per workspace. CPU usage will return to normal automatically. Codeium Indexing also requires RAM (\~300MB for a 5000-file workspace).
The "Max Workspace Size (File Count)" setting determines the largest workspace for which Codeium Indexing will try to index a particular workspace / module. If your workspace does not appear to be indexed, please try adjusting this number higher. For users with \~10GB of RAM, we recommend setting this no higher than 10,000 files.
# Overview
Source: https://docs.codeium.com/context-awareness/overview
On codebase context and related features
Codeium's context engine builds a deep understanding of your codebase, past actions, and next intent.
Historically, code-generation approaches focused on fine-tuning large language models (LLMs) on a codebase,
which is difficult to scale to the needs of every individual user.
A more recent and popular approach leverages retrieval-augmented generation (RAG),
which focuses on techniques to construct highly relevant, context-rich prompts
to elicit accurate answers from an LLM.
We've implemented an optimized RAG approach to codebase context,
which produces higher quality suggestions and fewer hallucinations.
Codeium offers full fine-tuning for enterprises, and the best solution
combines fine-tuning with RAG.
## Default Context
Out of the box, Codeium takes multiple relevant sources of context into consideration.
* The current file and other open files in your IDE, which are often very relevant to the code you are currently writing.
* The entire local codebase is then indexed (including files that are not open),
and relevant code snippets are sourced by Codeium's retrieval engine as you write code, ask questions, or invoke commands.
* For Pro users, we offer expanded context lengths increased indexing limits, and higher limits on custom context and pinned context items.
* For Teams and Enterprise users, Codeium can also index remote repositories.
This is useful for companies whose development organization works across multiple repositories.
## Context Pinning
Developers have the option to offer additional guidance by pinning custom context.
You can find this option under the [context tab of the chat panel](/chat/overview#persistent-context).
You can choose to pin directories, files, repositories, or code context items (functions, classes, etc.) as persistent context.
Models reference these items for every suggestion, across Autocomplete, Chat, and Command.
### Best Practices
Context Pinning is great when your task in your current file depends on information from other files.
Try to pin only what you need. Pinning too much may slow down or negatively impact model performance.
Here are some ideas for effective context pinning:
* Module Definitions: pinning class/struct definition files that are inside your repo but in a module separate from your currently active file.
* Internal Frameworks/Libraries: pinning directories with code examples for using frameworks/libraries.
* Specific Tasks: pinning a file or folder defining a particular interface (e.g., `.proto` files, abstract class files, config templates).
* Current Focus Area: pinning the "lowest common denominator" directory containing the majority of files needed for your current coding session.
* Testing: pinning a particular file with the class you are writing unit tests for.
## Chat-Specific Context Features
When conversing with Codeium Chat, you have various ways of leveraging codebase context,
like [@-mentions](/chat/overview/#mentions) or custom guidelines.
See the [Chat page](/chat/overview) for more information.
## Frequently Asked Questions (FAQs)
### Does Codeium index my codebase?
Yes, Codeium does index your codebase. It also uses LLMs to perform retrieval-augmented generation (RAG) on your codebase using our own [M-Query](https://youtu.be/DuZXbinJ4Uc?feature=shared\&t=606) techniques.
Indexing performance and features vary based on your workflow and your Codeium plan. For more information, please visit our [context awareness page](https://codeium.com/context).
# Remote Indexing
Source: https://docs.codeium.com/context-awareness/remote-indexing
This feature is only available to Codeium Teams and Enterprise users.
While Local Indexing works great, the user may want to index codebases that they do not have stored locally for our models to take in as context.
For this use case, organizations on Teams and Enterprise plans can use Codeium's Indexing Service to globally import all the relevant repositories. The indexing and embedding is then performed by Codeium's servers (on an isolated tenant), and once the index is created, it is available to be queried by any member of the Team.
## Adding a repository
From [https://codeium.com/indexing](https://codeium.com/indexing) you can add a repository to index. Currently we support Git repositories from GitHub, GitLab, and BitBucket.
You can choose to index a particular branch and to automatically re-index the repository after some number of days.
## Security Guarantees
We clone the repository in order to create the index, but once we finish creating embeddings for the codebase we delete all the code and code snippets **assuming that the Store Snippets setting is unchecked.** We don't persist anything other than the embeddings themselves, from which you cannot derive the original code.
Furthermore, all indexing and embedding is performed on a single-tenant instance—nothing about the indexing process is shared between multiple Codeium Teams customers.
# Profile & Analytics (Teams)
Source: https://docs.codeium.com/extensions/analytics
## User Analytics
User analytics are available for viewing and sharing on your own [profile](https://codeium.com/profile) page.
See your completion stats, [refer](https://codeium.com/referral) your friends, look into your language breakdown,
and unlock achievement badges by using Codeium in your daily workflow.
## Team Analytics
You will need team admin privileges in order to view the following team links.
Codeium makes managing your team easy from one [dashboard](https://codeium.com/team/).
Team leads and managers can also see an aggregate of their team members' analytics.
Click [here](https://codeium.com/team/analytics) to view.
We extrapolate from the data to provide you a quick view of the value that Codeium is providing to your team.
This includes metrics like "percent of code written by Codeium" as well as time and money saved.
Team admins can access these stats by clicking `Time Saved (All Time)` from the team page.
## Adding Team members
You must be a team admin to add team members.
To add members to your team, first navigate to your [team's page](https://codeium.com/team).
Simply click on the "invite" button and select the team member to invite.
Then just invite by email or share the unique invite link!
## User Groups
This feature is only available to Teams and Enterprise users.
Codeium now supports creating user groups. For each group you can now view analytics per group. You can also configure group administrators who can view analytics for the specific groups they manage.
## Profile Settings
There are a number of settings available for your profile page. This includes: name, email (for accounts with email authentication), profile picture, username (for your public profile), public profile visibility settings, telemetry settings, email subscription settings, and more.
You can also change and update your password if you used email-and-password authentication.
# Compatibility
Source: https://docs.codeium.com/extensions/compatibility
Visit our [download page](https://codeium.com/download) for a list of supported IDEs and installation instructions.
If you are a Codeium Enterprise user, visit your enterprise portal URL for download and installation instructions.
Contact your internal Codeium administrator if you have questions.
# Supported IDEs and Versions
**VS Code**: All versions
**JetBrains IDEs**: Version 2022.3+
Note: JetBrains IDEs with remote SSH support require versions 2023.3+.
**Visual Studio**: 17.5.5+
**NeoVim**: Version 0.6+
**Vim**: 9.0.0185+
**Emacs**: All versions compiled with lbxml
**Xcode**: All versions
**Sublime Text**: Version 3+
**Eclipse**: Version 4.25+ (2022-09+)
# Getting Started
Source: https://docs.codeium.com/extensions/getting-started
Welcome to Codeium
**Codeium** is an AI toolkit that empowers developers to dream bigger and write more code using tools like Autocomplete, Supercomplete, Chat, Command, and more.
Our models and features have been optimized to build a deep understanding of your codebase in order to provide the highest quality code suggestions.
## Extension Set Up 🧩
Our extension for Visual Studio Code and our plugin for JetBrains are our most popular services.
The installation steps for these two are given below.
For other IDEs and editors like Eclipse, Visual Studio, Neovim, Google Colab, and more, visit [our download page](https://codeium.com/download) to get started.
These steps do not apply for enterprises on a self-hosted plan.
If you are an enterprise user, please refer to the instructions in your enterprise portal.
Find the Codeium extension in the VS Code Marketplace and install it.
After installation, VS Code with prompt you with a notification in the bottom right corner to log in to Codeium.
Equivalently, you can log in to Codeium via the profile icon at the bottom of the left sidebar.
If you get an error message indicating that the browser cannot open a link from Visual Studio Code, you may need to update your browser and restart the authorization flow.
If you do not have an account or otherwise are not already logged in online, you will be prompted to create an account or login.
Once you sign in, you will be redirected back to Visual Studio Code via pop-up.
If you are using a browser-based VS Code IDE like GitPod or Codespaces, you will be routed to instructions on how to complete authentication by providing an access token.
Once you are signed in, Codeium will start downloading a language server.
This is the program that communicates with our APIs to let you use Codeium's AI features.
The download usually takes ten to twenty seconds, but the download speed may depend on your internet connection.
In the meantime, you are free to use VS Code as usual.
You should see a notification on the bottom right to indicate the progress of the download.
You can now enjoy Codeium's rich AI featureset: Autocomplete, Chat, Command, and more.
Open the `Plugins` menu in your JetBrains IDE. The shortcut for this is `⌘+,` on Mac and `Ctrl+,` on Linux/Windows. It is also accessible from the settings menu.
Search for Codeium, and install the plugin. The plugin loader will prompt you to restart the IDE.
Open a project. Codeium should prompt you to log in with a notification popup at the bottom right linking you to an online login page.
Equivalently, click the widget at the right of the bottom status bar and select the login option there.
If you do not have an account or otherwise are not already logged in online, you will be prompted to login.
Once you have logged in online, the webpage will indicate that you can return to your IDE.
Upon successful login, Codeium will begin downloading a language server.
This is the program that communicates with our APIs to let you use Codeium's AI features.
The download usually takes ten to twenty seconds, but the download speed may depend on your internet connection.
In the meantime, you are free to use your IDE as usual.
You should see a notification on the bottom right to indicate the progress of the download.
You can now enjoy Codeium's rich AI featureset: Autocomplete, Chat, Command, and more.
At any point, you can check your status by clicking the status bar widget at the bottom right.
If logged in, you will have access to your Codeium settings and other controls.
# Welcome to Codeium
Source: https://docs.codeium.com/getstarted/overview
Codeium creates highly contextual, intuitive, and trustworthy AI-powered tools to help developers dream bigger.
If you are an Enterprise user on a Hybrid or Self-Hosted plan, please refer to the instructions in your enterprise portal.
## Get started
If you're new to Codeium, start here to embark on your AI-powered coding journey.
Tomorrow's editor, today. The world's first truly agentic IDE.
Available in 40+ different IDEs with support for 70+ programming languages
## Breakthrough functionalities
Codeium's context engine builds a deep understanding of your
codebase.
}
href="/windsurf/cascade"
>
Your agentic chatbot that can collaborate with you like never before.
## Meet the modalities
Contextually aware in-line and multi-line suggestions while you type.
Talk to your codebase directly within the editor.
Generate new or edit existing code directly in the editor.
Multi-line suggestions based on intent, regardless of cursor position.
## Support
Contact us for help through our support platform.
Let us know what you'd like to see!
Stay up-to-date with the latest news and updates from Codeium.
Join our community to ask questions and engage with other users.
Stay up-to-date with the latest news and updates from Codeium.
# Setting up SSO & SCIM
Source: https://docs.codeium.com/getstarted/sso-scim
This feature is only available to Enterprise users.
Codeium Enterprise now supports sign in with Single Sign-On (SSO) via SAML. If your organization uses Microsoft Entra, Okta, Google Workspaces, or some other identity provider that supports SAML, you will be able to use SSO with Codeium.
Codeium only supports SP-initiated SSO; IDP-initiated SSO is NOT currently supported.
### Configure IDP Application
On the google admin console (admin.google.com) click **Apps -> Web and mobile apps** on the left.
Click on **Add app**, and then **Add custom SAML app**.
Fill out **App name** with `Codeium`, and click **Next**.
The next screen (Google Identity Provider details) on Google’s console page has data you’ll need to copy to Codeium’s SSO settings on [www.codeium.com/team/team\_settings](http://www.codeium.com/team/team_settings).
* Copy **SSO URL** from Google’s console page to Codeium’s settings under **SSO URL**
* Copy **Entity ID** from Google’s console page to Codeium’s settings under **Idp Entity ID**
* Copy **Certificate** from Google’s console page to Codeium’s settings under **X509 Certificate**
* Click **Continue** on Google’s console page
The next screen on Google’s console page requires you to copy data from Codeium’s settings page
* Copy **Callback URL** from Codeium’s settings page to Google’s console page under **ACS URL**
* Copy **SP Entity ID** from Codeium’s settings page to Google’s console page under **SP Entity ID**
* Change **Name ID** format to **EMAIL**
* Click **Continue** on Google’s console page
The next screen on Google’s console page requires some configuration
* Click on **Add Mapping**, select **First name** and set the **App attributes** to **firstName**
* Click on **Add Mapping**, select **Last name** and set the **App attributes** to **lastName**
* Click **Finish**
On Codeium’s settings page, click **Enable Login with SAML**, and then click **Save**. Make sure to click on **Test Login** to make sure login works as expected. All users now will have SSO login enforced.
Codeium Enterprise now supports sign in with Single Sign-On (SSO) via SAML. If your organization uses Microsoft Azure AD, you will be able to use SSO with Codeium.
that Codeium only supports SP-initiated SSO; IDP-initiated SSO is NOT currently supported.
### Configure IDP Application
Create an Enterprise Application with your identity provider. Click on **Add**, and then **Enterprise Application**.
Click on **Create your own application**.
Name your application **Codeium**, select *Integrate any other application you don’t find in the gallery*, and then click **Create**.
Configure your enterprise application with SAML
* Click on Set up single sign on in the new Codeium application, and then Click on SAML
* Click on Edit under Basic SAML Configuration, and open up the Codeium Teams SSO settings at [https://www.codeium.com/team/team\_settings](https://www.codeium.com/team/team_settings)
* On Entra’s SAML configuration form and Codeium SSO settings page
* For Identifier (Entity ID), copy the SP Entity ID value in the SSO settings page
* For Reply URL (Assertion Consumer Service URL), copy the Callback URL value in the SSO settings page
* Click Save at the top
* Pick the SSO ID you want to use, which creates a login portal for your team. Note that this is not changeable after this is saved.
* Fill out IdP Entity ID in the settings page with the value in Entra ID under Set up Codeium -> Microsoft Entra Identifier
* Fill out SSO URL in the settings page with the value in Entra ID under Login URL
* Download the SAML certificate (Base64), get the text content of the file, and paste it to X509 Certificate on the Codeium settings page
* Click on Enable Login with SAML
* Click Save in the Codeium settings page
* We also need to set up name claims. This step is important in order for Codeium to know the display name of the user.
* Under Attributes & Claims under Entra ID, click on Edit
* Create 2 new claims. You can do so by clicking on Add new claim
* The first claim should have ‘firstName’ as the Name, and ‘user.givenname’ as the Source attribute
* The second claim should have ‘lastName’ as the Name, and ‘user.surname’ as the Source attribute
* At this point you should have successfully configured SSO. Under Save in the settings page, click on Test Login to make sure everything works as expected.
Codeium Enterprise now supports sign in with Single Sign-On (SSO) via SAML. If your organization uses Microsoft Entra, Okta, Google Workspaces, or some other identity provider that supports SAML, you will be able to use SSO with Codeium.
Codeium only supports SP-initiated SSO; IDP-initiated SSO is NOT currently supported.
### Configure IDP Application
Click on Applications on the left sidebar, and then Create App Integration
Select SAML 2.0 as the sign-in method
Set the app name as Codeium (or to any other name), and click Next
Configure the SAML settings as
* Single sign-on URL to [https://auth.codeium.com/\_\_/auth/handler](https://auth.codeium.com/__/auth/handler)
* Audience URI (SP Entity ID) to [www.codeium.com](http://www.codeium.com)
* NameID format to EmailAddress
* Application username to Email
Configure the attribute statements as following, and then click **Next**.
In the feedback section, select “This is an internal app that we have created”, and click **Finish**.
### Register Okta as a SAML provider
You should be redirected to the Sign on tab under your custom SAML application. Now you’ll want to take the info in this page and fill it out in Codeium’s SSO settings.
* Open [www.codeium.com/team/team\_settings](http://www.codeium.com/team/team_settings), and click on Configure SAML
* Copy the text after ‘Issuer’ in Okta’s application page and paste it under Idp Entity ID
* Copy the text after ‘Sign on URL’ in Okta’s application page and paste it under SSO URL
* Download the Signing Certificate and paste it under X509 certificate
* Check Enable Login with SAML and then click Save
* Test the login with the Test Login button. You should see a success message:
At this point everything should have been configured, and can now add users to the new Codeium Okta application.
You should share your organization's custom Login Portal URL with your users and ask them to sign in via that link.
Users who login to Codeium via SSO will be auto-approved into the team.
### Caveats
Note that Codeium does not currently support IDP-initiated login flows.
We also do not yet support OIDC.
# Troubleshooting
### Login with SAML config failed: Firebase: Error (auth/operation-not-allowed)
This points to your an invalid SSO ID, or your SSO URL being incorrect, make sure it is alphanumeric and has no extra spaces or invalid characters. Please go over the steps in the guide again and make sure you use the correct values.
### Login with SAML config failed: Firebase: SAML Response \ mismatch. (auth/invalid-credential)
This points to your IdP entity ID being invalid, please make sure you copy it correctly from the Okta portal, without any extra characters or spaces before or after the string.
### Failed to verify the signature in samlresponse
This points to an incorrect value of your X509 certificate, please make sure you copy the correct key, and that it is formatted as:
```
-----BEGIN CERTIFICATE-----
value
------END CERTIFICATE------
```
Codeium supports SCIM synchronization for users and groups with Microsoft Entra ID / Azure AD. It isn't necessary to setup SSO to use SCIM synchronization, but it is highly recommended.
You'll need:
* Admin access to Microsoft Entra ID / Azure AD
* Admin access to Codeium
* An existing Codeium Application on Entra ID (normally from your existing SSO application)
## Step 1: Navigate to the existing Codeium Application
Go to Microsoft Entra ID on Azure, click on Enterprise applications on the left sidebar, and then click on the existing Codeium application in the list.
## Step 2: Setup SCIM provisioning
Click on Get started under Provision User Accounts in the middle (step 3), and then click on Get started again.
Under the Provisioning setup page, select the following options.
Provisioning Mode: Automatic
Admin Credentials > Tenant URL: [https://server.codeium.com/scim/v2](https://server.codeium.com/scim/v2)
Leave the Azure provisioning page open, now go to the Codeium enterprise portal, and click on Settings in the NavBar on the top of the page. Under SCIM, click on Add API Key. Enter any key name (such as 'Azure Provisioning Key') and click Create API Key. Copy the output key, go back to the Azure page, paste it to Secret Token.
(What you should see after creating the key on Codeium)
On the Provisioning page, click on Test Connection and that should have verified the SCIM connection.
Now above the Provisioning form click on Save.
## Step 3: Configure SCIM Provisioning
After clicking on Save, a new option Mappings should have appeared in the Provisioning page. Expand Mappings, and click on Provision Microsoft Entra ID Users
Under attribute Mappings, delete all fields under displayName, leaving only the fields userName, active, and displayName.
For active, now click on Edit. Under Expression, modify the field to
```
NOT([IsSoftDeleted])
```
Then click Ok.
Your user attributes should look like
In the Attribute Mapping page, click on Save on top, and navigate back to the Provisioning page.
Now click on the same page, under Mappings click on Provision Microsoft Entra ID Groups. Now only click delete for externalId, and click Save on top. Navigate back to the Provisioning page.
On the Provisioning page at the bottom, there should also be a Provisioning Status toggle. Set that to On to enable SCIM syncing. Now every 40 minutes your users and groups for the Entra ID application will be synced to Codeium.
Click on Save to finish, you have now enabled user and group syncing for SCIM. Only users and groups assigned to the application will be synced to Codeium. Note that removing users only disables them access to Codeium (and stops them from taking up a seat) rather than deleting users due to Azure's SCIM design.
Codeium supports SCIM synchronization for users and groups with Okta. It isn't necessary to setup SSO to use SCIM synchronization, but it is highly recommended.
You'll need:
* Admin access to Okta
* Admin access to Codeium
* An existing Codeium Application on Okta (normally from your existing SSO application)
## Step 1: Navigate to the existing Codeium Application
Go to Okta, click on Applications, Applications on the left sidebar, and then click on the existing Codeium application in the application list.
## Step 2: Enable SCIM Provisioning
Under the general tab, App Settings click on Edit on the top right. Then tick the 'Enable SCIM Provisioning' checkbox, then click Save. A new provisioning tab should have showed up on the top.
Now go to provisioning, click Edit and input in the following fields:
SCIM connector base URL: [https://server.codeium.com/scim/v2](https://server.codeium.com/scim/v2)
Unique identifier field for users: email
Supported provisioning actions: Push New Users, Push Profile Updates, Push Groups
Authentication Mode: HTTP Header
For HTTP Header - Authorization, you can generate the token from
* [https://codeium.com/team/team\_settings](https://codeium.com/team/team_settings) and go to the SCIM tab on the left
* Click on Add API Key, and give your API key a name
* Copy the API key, go back to Okta and paste it to HTTP Header - Authorization
Click on Save after filling out Provisioning Integration.
## Step 3: Setup Provisioning
Under the provisioning tab, on the left there should be two new tabs. Click on To App, and Edit Provisioning to App. Tick the checkbox for Create Users, Update User Attributes, and Deactivate Users, and click Save.
After this step, all users assigned to the group will now be synced to Codeium.
## Step 4: Setup Group Provisioning (Optional)
In order to sync groups to Codeium, you will have to specify which groups to push. Under the application, click on the Push Groups tab on top. Now click on + Push Groups -> Find Groups by name. Filter for the group you would like to add, make sure Push group memberships immediately is checked, and then click Save. The group will be created and group members will be synced to Codeium. Groups can then be used to filter for group analytics in the analytics page.
This guide shows how to create and maintain groups in Codeium with the SCIM API.
There are reasons one may want to provision groups manually rather than with their Identity Provider (Azure/Okta). Companies may want Groups provisioned from a different internal source (HR website, Sourcecode Management Tool etc.) that Codeium doesn't have access to, or companies may finer control to Groups than what their Idendity Provider provides. Groups can thus be created with an API via HTTP request instead. The following provides examples on the HTTP request via CURL.
There are 5 main APIs here, Create Group, Add group members, Replace group members, Delete Group, and List Users in a Group.
### Create Group
```
curl -k -X POST https://server.codeium.com/scim/v2/Groups -d '{
"displayName": "",
"schemas": ["urn:ietf:params:scim:schemas:core:2.0:Group"]
}' -H "Authorization: Bearer " -H "Content-Type: application/scim+json"
```
### Add Group Members
```
curl -X PATCH https://server.codeium.com/scim/v2/Groups/ -d '{"schemas": ["urn:ietf:params:scim:api:messages:2.0:PatchOp"],
"Operations":[
{
"op": "add",
"path":"members",
"value": [{"value": ""}, {"value": ""}]
}]}' -H "Authorization: Bearer " -H "Content-Type: application/scim+json"
```
### Replace Group Members
```
curl -X PATCH https://server.codeium.com/scim/v2/Groups/ -d '{"schemas": ["urn:ietf:params:scim:api:messages:2.0:PatchOp"],
"Operations":[
{
"op": "replace",
"path":"members",
"value": [{"value": ""}, {"value": ""}]
}]}' -H "Authorization: Bearer " -H "Content-Type: application/scim+json"
```
### Delete Group
```
curl -X DELETE https://server.codeium.com/scim/v2/Groups/ -H "Authorization: Bearer " -H "Content-Type: application/scim+json"
```
### List Group
```
curl -X GET -H "Authorization: Bearer " "https://server.codeium.com/scim/v2/Groups"
```
### List Users in a Group
```
curl -X GET -H "Authorization: Bearer " "https://server.codeium.com/scim/v2/Groups/"
```
You'll have to at least create the group first, and then replace group to create a group with members in them. You'll also need to URL encode the group names if your group name has a special character like space, so a Group name such as 'Engineering Group' will have to be 'Engineering%20Group' in the URL.
Note that users need to be created in Codeium (through SCIM or manually creating the account) before they can be added to a group.
## User APIs
There are also APIs for users as well. The following are some of the common SCIM APIs that Codeium supports.
Disable a user (Enable by replacing false to true):
```
curl -X PATCH \
https://server.codeium.com/scim/v2/Users/ \
-H 'Content-Type: application/scim+json' \
-H 'Authorization: Bearer ' \
-d '{
"schemas": ["urn:ietf:params:scim:api:messages:2.0:PatchOp"],
"Operations": [
{
"op": "replace",
"path": "active",
"value": false
}
]
}'
```
Create a user:
```
curl -X POST \
https://server.codeium.com/scim/v2/Users \
-H 'Content-Type: application/scim+json' \
-H 'Authorization: Bearer ' \
-d '{
"schemas": ["urn:ietf:params:scim:schemas:core:2.0:User"],
"userName": "",
"displayName": "",
"active": true,
}'
```
Update name:
```
curl -X PATCH \
'https:///_route/api_server/scim/v2/Users/' \
-H 'Authorization: Bearer ' \
-H 'Content-Type: application/scim+json' \
-d '{
"schemas": ["urn:ietf:params:scim:api:messages:2.0:PatchOp"],
"Operations": [
{
"op": "Replace",
"path": "displayName",
"value": ""
}
]
}'
```
## Creating Api Secret Key
Go to [https://www.codeium.com/team/team\_settings](https://www.codeium.com/team/team_settings). Under Service Key, click on Add Service Key. Enter any key name (such as 'Azure Provisioning Key') and click Create Service Key. Copy the output key and save it, you can now use the key to authorize the above APIs.
# Reporting Security Concerns
Source: https://docs.codeium.com/security/reporting
Codeium takes the security of our products and services seriously. If you believe you have found a security vulnerability in any Codeium-owned services, please report it to us as described below.
## Reporting Security Issues
**Please do not report security vulnerabilities through public GitHub issues.**
Instead, please report them via email to [security@codeium.com](mailto:security@codeium.com)
Please include the following information in your report including as much technical detail as possible:
* Type of issue (e.g., buffer overflow, SQL injection, cross-site scripting, etc.)
* The location of the affected source code (if applicable)
* Any special configuration required to reproduce the issue
* Step-by-step instructions to reproduce the issue
* Proof-of-concept or exploit code (if possible)
* Impact of the issue, including how an attacker might exploit it
* Any other relevant information
This information will help us triage your report more quickly.
Please compile all information into a single email, encrypted with our public GPG key, include the name of the affected product, and the version of the product affected (if known).
### Public GPG Key
```
-----BEGIN PGP PUBLIC KEY BLOCK-----
mQINBGdY0gcBEACvhmeoodWK5OUNluDytvc6W2/ahzh334qaYgYOoYxBkN9/6BBW
WTdJJ4Hu//XdAw8G/5ISy6tV17JMWOI59acAehKh8NqBSVhrlR7tHxGiJN2fXTtH
TDGOoyMFbWaSQIRI44E3lQZMyQBScGKxDiXQjIlholmrS3JicrqG85dUgB6got9l
da/3bp8BuydcVib7NGcuRZKS2BEVc8UCvpsP/p+VWiSNtB3kT8PTt782mSmnp6rR
HqL8H6ERlMEgQ9M4iWWZhq4g3qsSeg5x9UtU2ANH/escFNM6Wbzg6hyy3CZtXzw6
2BRnXpF63dqhPiigy+ifVCs/YqGacToaUNhN4I8kt274yW0dX+U/15wvlJchsnsi
RVQwB5FRxIxcPsZAWFBg7P5um15HGpKGS0LFJsB5aUfJFHPFmUAvPUreOjv1rGTO
1FdkAERLHsI7jJA70vTAdOM2WwaeGa55EMwefNJ69LpN2elboFbz5hpAa7w+8Y5w
y1J6knyOA4JFnVI824ZiQIGloECGZOlOxM4Ru+jjkcroO+l+frmvvggqBjvKPHGs
VmrMSNjf7aE/7NDnyKZJ9fvUiLf+WclAcIUySbYQr8xv/aV76xDUH1PT59f/ntp7
jxRA0rVvIThakvV3MPMbdrR78uLbc6Bwc0MdtEIGw+QAQ4YzAX4yeV9LHQARAQAB
tCtzZWN1cml0eUBjb2RlaXVtLmNvbSA8c2VjdXJpdHlAY29kZWl1bS5jb20+iQJO
BBMBCgA4FiEEE5wZ6tOci0CBdec0DoNVUHCWVAkFAmdY0gcCGwMFCwkIBwIGFQoJ
CAsCBBYCAwECHgECF4AACgkQDoNVUHCWVAnT0w//ZVKF9Yz9So8ZeeIVcMz0CrFZ
jWFQMTvQvEQ5jP9VpiXe7z5pwSVvv3SpqvkNX+Y6HtjXdnv5Q+QZGzIZKc6NqbDz
vYGwL0UJCXEdEhdNMKOI0FWLiOl/NPdCqIwSeeUNsKZCZE7LWqDbfDoivStGcKWS
UYqqbrv8FB2BQrqem0YL+da6i24uhghL0NHCk8x3+qR/Cp+xWJyL27nHHRD7OVLO
3UhsEQEVoiZWp2TpZNyO4AjIFjHSQPw/kBOFdP9bZVcL9rmpZMbyhPnG6Xal3Jmn
0epXQcfvNUd/GwP0Oi22y2CoezuGL8/xKkQoRJ0XHhLAFyJTNIEWPxx4Ki5WVVbZ
PSUwc51CL0PKg2GbKF0g8Zy6JNwMciLh59R79gMK9eGZnSdoOe8d8EzV+AWaqPsO
qgxv4adYytLEIuLylLtPlEIni17E/yKIEibnlSS9P7EUBTNXJFmrLUPArEPhQGrS
EPid8mRJCCo47Htn6YH3Tzt0lSr8mfqOwWs1ww/rbDT/1N3Wq+EmEe9hwHjHQCyl
xfn+7yDRcJ4C2C/fuF2cg4JA2QsX8eTpvChSnXnQIhvG+7NISqFUAf1YXuy+cNJa
rJs2CRCrz3rmM1dpQ+miII9Z14/ZSy6wg0f2BXaANZNIKutmPTFWxOyc6RiBMIor
EeYWbajRg5vCJmQNeSW5Ag0EZ1jSBwEQALffVPaMgIsv3vyoDZivVjr4ArkPWuWM
rQMhDRaos11vzWlVEviihdSn9rUP/nx3t6TsvvwMhqTk9yfnRCn5jmE2dSFfT4Wz
kdYkQ8xWLI4Ku8Cu6MK5iemG5JMyL03eaaSqlbjg7IUmNr+PF/poX0c+PCoNVbIC
YbHYtTwTJ52G+DuVQThZI0qnebNc/3CfvDAfMGqyDezIPqoqPRfLolwT6N+zip8O
bDuom7DlcyRjRAeB36dbEPRkqzdkP8ZA4tKWRO2HBhDe4Jg4srZlCs8BiveNK6mM
lOv+EZpSwvuikfga41bk+A08EFojKkg7XuCN+LSBUxKWdl9UDg5eibYiy1uRM8kP
taFzP89tNanQeAU3BBcJRgDqOkl/5KQnPLU8Dn8Iq2nUUg3rdYhRTT7PiSlkuK8f
tWXctlN7AsTtvrKaJGP89oETs5ks/umdep7fmYlJlLO2VZE63itQHGUpE2P0hRSH
itoC7acWdXYY7M/wi1kPl5CvMyStaXfqmgXoRF2ea2N9kP6ioQ5piAvNLmHVc4l9
ID5kDUB4k0Tv5XSE8eXc35fT5JFV8J/Rlk66CDR5DKciBteRqQ97Ojc2CkJ92tCO
/nTnnV8IYLP3yTCmFvABxJLk8qi3UJXo4ySKMzZ48OjDfvr91pr9xjgWyLj0R44O
1S2Tq6eFyy7xABEBAAGJAjYEGAEKACAWIQQTnBnq05yLQIF15zQOg1VQcJZUCQUC
Z1jSBwIbDAAKCRAOg1VQcJZUCd6dD/9iyRnoPBrIiBre1BmXCdx7SJCy3P659dGS
35/KCx9S5oEwjQX11BCembZ7R1rhthpTwj/uCSzaV2mZgdxDg5+IPUSjBafbnHih
gE7RqEOTD6rH3+2NlMJvDJYykucSgjzhAbF2oXTbQneGzA1z5ljn6OKtu+sr0upY
HRjk24x6zm6X3Y95PVoinXmafHfS12oYqM560uhmjE66LylB6ihxwThNDWPDQQ4F
8ZdVrNIqyE5rt+Mdo8XndGnbcRNvAaJ7syqNPzZl8XL7+IvVbMCnM0v5wCuO896w
ngxqTf9UDf6tRZ4bzt0wzvtSa1TtMbbgqeQ4JL75W0iRwGtW2VFqsLJdLvCeoeJS
/oN7ZRjsBpe7Mi7yJHGsKffosFL4U2Xb02FMyQXwUCQuI1kT7Je5a2mOJZZC6Rxs
CaJ5B+H2tq8Vu8eHqWU6HFQgN5A9tRDxWaLSA0s7ClzCbVHVXJ0rlfVG5cGGX5NN
bTHSQ3RAeMIWpgguViogcQTS8H+eJau7ObSrjAH+vyUDZUBZk3wK6TWWERAknRTs
NXGMK99G5TnFMB/BhCcZJcupyFJf2RU0dcrmtSEZsXR1TXZP81TnIRIxrrzhAxHC
TG4WjJ9IfJITK+RZwf0ng5LRnMfDkMOP3JtmnAYqUXSWe4WzaPXoE0TxE1BmtdR4
avMueyobpA==
=X35T
-----END PGP PUBLIC KEY BLOCK-----
```
## Policy
Codeium follows the principle of [Coordinated Vulnerability Disclosure](https://en.wikipedia.org/wiki/Coordinated_vulnerability_disclosure).
## Safe Harbor
Codeium supports safe harbor for security researchers who:
* Make a good faith effort to avoid privacy violations, destruction of data, and interruption or degradation of our services
* Only interact with accounts you own or with explicit permission of the account holder
* Do not exploit a security issue you discover for any reason other than testing
* Report any vulnerability you've discovered promptly
* Follow the guidelines outlined in this document
We will not take legal action against you or administrative action against your account if you act according to this policy.
*Last updated: December 10, 2024*
# Overview
Source: https://docs.codeium.com/supercomplete/overview
Just how our Autocomplete passively predicts text, **Codeium Supercomplete** passively predicts your next intent.
You can see an example of Supercomplete below, which suggests a multi-line edit directly in the editor. Just press `tab` to accept the suggestion!
Supercomplete makes suggestions based on the context of your code and your prior actions, and is able to make edits *both before and after* your current cursor position.
You can press `esc` to cancel a suggestion.
## Tab to Jump
Currently only available to paid users.
After you accept a suggestion, Windsurf can also anticipate your next cursor position and prompt you with a `Tab to Jump` label at a certain line in the editor.
If you accept by simply pressing `tab`, then you will be taken to that next position.
## Use cases to trigger Supercomplete
Supercomplete and Autocomplete work in harmony to provide you with the smoothest experience to optimize your flow state.
That being said, Supercomplete will only trigger in certain scenarios where it is most beneficial to the developer. Below, you can find a few examples of helpful Supercomplete use cases.
# General Issues
Source: https://docs.codeium.com/troubleshooting/common-issues
### I subscribed to Pro but I'm stuck on the Free tier
First, give it a few minutes to update. If that doesn't work, try logging out of Codeium on the website, restarting your IDE, and logging back into Codeium. Additionally, please make sure you have the latest version of Codeium installed.
### How do I cancel my Pro/Teams subscription?
You can cancel your paid plan by going to your Profile (top right of the [Codeium website](https://codeium.com/profile)) -> Billing -> Cancel Plan
### How do I disable code snippet telemetry?
As mentioned in our [security page](https://codeium.com/security), you can opt out of code snippet telemetry by going to your settings [account settings](https://codeium.com/settings). For more information, please visit our [Terms of Service](https://codeium.com/terms-of-service-individual).
### How do I delete my account?
You can delete your account by going to your settings [account settings](https://codeium.com/settings), scrolling down and clicking on "Delete Account".
If you are a member within an organization, please reach out to your administrator.
### How do I request a feature?
You can vote, comment, and request features on our [feature request forum](https://codeium.canny.io/feature-requests).
You can also reach out to us on Twitter/X! [@codeiumdev](https://x.com/codeiumdev) or [@windsurf\_ai](https://x.com/windsurf_ai)
# Windsurf/Extension Specific Issues
Due to the fact that Windsurf has only recently launched, we're subject to rate limits and unfortunately are hitting capacity for the premium models we work with. We are actively working on getting these limits increased and fairly distributing the capacity that we have!
This should not be an issue forever. If you get this error, please wait a few moments and try again.
We've gone ahead and developed a [Pyright extension specifically for Windsurf](/windsurf/advanced/#windsurf-extensions). Please search for "Windsurf Pyright" or paste `@id:codeium.windsurfPyright` into the extension search.
You can download diagnostic logs by going to your Cascade Panel, tapping the three dots in the top right corner, and then clicking "Download Diagnostics".
Please delete the following folder:
Windows: `C:\Users\\.codeium\windsurf\cascade`
Linux/Mac: `~/.codeium/windsurf/cascade`
and try restarting the IDE.
An example:
> Updates are disabled because you are running the user-scope installation of Windsurf as Administrator.
It is not recommended you install Windsurf as Administrator on Windows.
Please reach out to us if this happens! A screen recording would be much appreciated. This can often be solved by clearing your chat history (`~/.codeium/windsurf/cascade`).
Please reach out to us if this happens! A screen recording would be much appreciated. This can often be solved by clearing your chat history.
Please see the intructions for various extensions [here](/troubleshooting/gathering-logs)
# Gathering Logs
Source: https://docs.codeium.com/troubleshooting/gathering-logs
If you're having issues, the first step in the troubleshooting process is to retrieve the logs from your IDE. Here's how you can get Codeium logs for each of the major IDEs:
## Windsurf
1. Open the Command Palette (`Ctrl/Cmd + Shift + P` or go to View > Command Palette)
2. Type in "Open Windsurf Logs" and select the option that reads "Open Windsurf Logs File"
3. Export or copy the logs and attach the file to your ticket.
Alternatively, you can also click on the three dots in the top right corner of the Cascade panel and select "Download Diagnostics".
## VS Code
1. Go to the Command Palette (`Ctrl/Cmd + Shift + P` or go to View > Command Palette)
2. Type in "Show logs" and select the option that reads "Developer: Show Logs"
3. From the dropdown, select "Extension Host"
4. You should see something similar to the image below:
5. Change the dropdown in the top right that reads "Extension Host" and select "Codeium"
6. Export or copy the logs
## JetBrains IDEs
Starting in extension version 1.10.0, the Chat Panel has an Extension Diagnostics button on the Settings page. This button will automatically collect relevant logs and parameters into a text file that can be downloaded.
1. Logs are written to the idea.log file. To locate this file, go to the Help > Show Log in Finder/Explorer menu option
2. Export or copy the logs
## Eclipse
In Eclipse, logs are written to the following paths:
* **Mac/Linux**: \~/.codeium/codeium.log
* **Windows**: C:\Users\.codeium\codeium.log
## Visual Studio
Go to **view > output**, select "Codeium" in the dropdown, and copy the logs.
## NeoVim
Set `g:codeium_log_file` to a path to a file in their vimrc and then relaunch vim.
Then the logs should be written to that file.
# Advanced
Source: https://docs.codeium.com/windsurf/advanced
## SSH Support
The usual SSH support in VSCode is licensed by Microsoft, so we have implemented our own just for Windsurf. It does require you to have [OpenSSH](https://www.openssh.com/) installed, but otherwise has minimal dependencies, and should "just work" like you're used to. You can access SSH under `Remote-SSH` in the Command Palette, or via the `Open a Remote Window` button in the bottom left.
This extension has worked great for our internal development, but there are some known caveats and bugs:
* We currently only support SSHing into Linux-based remote hosts.
* The usual Microsoft "Remote - SSH" extension (and the [open-remote-ssh](https://github.com/jeanp413/open-remote-ssh) extension) will not work—please do not install them, as they conflict with our support.
* We don't have all the features of the Microsoft SSH extension right now. We mostly just support the important thing: connecting to a host. If you have feature requests, let us know!
* Connecting to a remote host via SSH then accessing a devcontainer on that remote host won't work like it does in VSCode. (We're working on it!) For now, if you want to do this, we recommend instead manually setting up an SSH daemon inside your devcontainer. Here is the set-up which we've found to work, but please be careful to make sure it's right for your use-case.
1. Inside the devcontainer, run this once (running multiple times may mess up your `sshd_config`):
```
sudo -s -- <> /etc/ssh/sshd_config
ssh-keygen -A
HERE
```
2. Inside the devcontainer, run this in a terminal you keep alive (e.g. via tmux):
```
sudo /usr/sbin/sshd -D
```
3. Then just connect to your remote host via SSH in windsurf, but using the port 2222.
* SSH agent-forwarding is on by default, and will use Windsurf's latest connection to that host. If you're having trouble with it, try reloading the window to refresh the connection.
* On Windows, you'll see some `cmd.exe` windows when it asks for your password. This is expected—we'll get rid of them soon.
* If you have issues, please first make sure that you can ssh into your remote host using regular `ssh` in a terminal. If the problem persists, include the output from the `Output > Remote SSH (Windsurf)` tab in any bug reports!
### Notes
* SSH + Dev Containers is not currently supported in Windsurf, but we plan to support it in the future.
* You can only SSH into Linux-based remote hosts at the moment (though you should be able to SSH from all platforms.) We plan to support Windows and macOS in the future.
## Dev Containers (Beta)
Windsurf has beta support for dev containers for Mac, Windows, and Linux. To use this feature, Docker must be installed on your machine and be accessible from the Windsurf terminal.
If you would like to run a development container locally, you can use the following commands:
1. `Open Folder in Container`
* Open a new workspace with a specified devcontainer.json file
2. `Reopen in Container`
* Reopen the current workspace in a new container, specifying a devcontainer.json file to configure the container.
3. `Attach to Running Container`
* If you already have a Docker container running, you can attach a remote server to the container and connect your current workspace to it. If the container does not follow the [Development Container Specificaton](https://containers.dev/implementors/spec/), we will try our best effort to infer the remote user and set things up accordingly.
4. `Reopen Folder Locally`
* If currently connected to a development container, you can disconnect from the container and reopen the current workspace locally.
These will also appear if you click on the `Open a Remote Window` button in the bottom left.
## WSL (Beta)
As of version 1.1.0, Windsurf has beta support for Windows Subsystem for Linux. You must already have WSL set up and configured on your Windows machine.
You can access WSL by clicking on the `Open a Remote Window` button in the bottom left, or under `Remote-WSL` in the Command Palette.
## Extension Marketplace
You can change the marketplace you use to download extensions from. To do this, go to **View** -> **Extensions**, click the "Change in Settings" link, and modify the settings accordingly.
### Windsurf Extensions
Search "Windsurf Pyright" or paste in `@id:codeium.windsurfPyright` in the extensions search bar.
# Overview
Source: https://docs.codeium.com/windsurf/cascade
Cascade allows us to expose [AI Flows](https://codeium.com/flows), a new way of coding with AI.
To open Cascade, press `Cmd/Ctrl+L`click the Cascade icon in the top right corner of the Windsurf window.
Selected text in the editor or terminal will automatically be included.
### Quick links to features
Add images to your prompt to be referenced in Cascade's suggestions.
Search the web for information to be referenced in Cascade's suggestions.
Codeium's context engine builds a deep understanding of your
codebase.
Run commands in your terminal.
# Model selection
Select your desired model from the selection menu below the chat input.
# Write/Chat Modes
Cascade comes in two modes: **Write** and **Chat**.
Write mode allows Cascade to create and make modifications to your codebase, while Chat mode is optimized for questions around your codebase or general coding principles.
# Real-time collaboration
A unique capability of Windsurf and Cascade is that it is aware of your real-time actions.
No longer do you have to prompt the AI with context on your prior actions, as Cascade and Windsurf are already aware.
In the following video, you will see how a recent variable name change was automatically detected within Cascade, simply by prompting it with `continue` to rename the other instances.
# Access to Tools and Terminal
Cascade has a variety of tools at its disposal, such as Search, Analyze, [Web Search](/windsurf/web-search), [MCP](/windsurf/mcp), and even the [terminal](/windsurf/terminal).
It can detect which packages and tools that you're using, which ones need to be installed, and even install them for you. Just ask Cascade how to run your project and press Accept.
Try asking Cascade to install packages for you! It can read the stacktraces and error messages to make sure everything is installed correctly.
# Revert to previous steps
You have the ability to revert changes that Cascade has made if you want to. Hover your mouse over the prompt and click on the arrow on the right. This will revert all code changes back to the state of your codebase at the desired step. Note: reverts are currently irreversible, so be careful!
# Send Problems to Cascade
When you have problems in your code which show up in the Problems panel at the bottom of the editor, simply click the "Send to Cascade" button to bring them into the Cascade panel as an @ mention.
# Explain and Fix
For any errors that you run into from within the editor, you can simply highlight the error and click "Explain and Fix" to have Cascade fix it for you.
# Ignoring files
If you'd like Cascade to ignore files, you can add your files to `.codeiumignore` at the root of your workspace. This will prevent Cascade from viewing, editing or creating files inside of the paths designated. You can declare the file paths in a format similar to `.gitignore`.
# Getting Started
Source: https://docs.codeium.com/windsurf/getting-started
Tomorrow's editor, today.
Windsurf is Codeium's next-generation AI IDE built to keep you in the flow. On this page, you'll find instructions on how to install Windsurf on your computer, navigate the onboarding flow, and get started with your first AI-powered project.
}
href="/windsurf/cascade"
>
Your agentic chatbot that can collaborate with you like never before.
Codeium's context engine builds a deep understanding of your
codebase.
Run commands in your terminal.
Codeium's context engine builds a deep understanding of your
codebase.
Run commands in your terminal.
See what's new with Windsurf in our [changelog](https://codeium.com/changelog)!
## Set Up 🏄
To get started, please ensure that your device meets the requirements, click the download link, and follow the instructions to install and run Windsurf.
[Click here](#update-windsurf) if you're looking for how to update Windsurf.
Minimum OS Version: OS X Yosemite
Minimum OS Version: Windows 10
Minimum OS Version: >= 20.04 (or glibc >= 2.31, glibcxx >= 3.4.26)
Minimum OS Version: glibc >= 2.28, glibcxx >= 3.4.25
## Onboarding
Once you have Windsurf running, you will see the page below. Let's get started! Note that you can always restart this onboarding flow with the "Reset Onboarding" command.
### 1. Select setup flow
If you're coming from VS Code or Cursor, you can easily import your configurations. Otherwise, select "Start fresh". You can also optionally install `windsurf` in PATH such that you can run `windsurf` from your command line.
Choose your keybindings here, either default VS Code bindings or Vim bindings.
You can migrate your settings, extensions, or both here.
You can migrate your settings, extensions, or both here.
### 2. Choose editor theme
Choose your favorite color theme from these defaults! Don't worry, you can always change this later. Note that if you imported from VS Code, your imported theme will override this.
### 3. Sign up / Log in
To use Windsurf, you need to use your Codeium account or create one if you don't have one. Signing up is completely free!
Once you've authenticated correctly, you should see this page. Hit "Open Windsurf" and you're good to go!
#### Having Trouble?
If you're having trouble with this authentication flow, you can also log in and manually provide Windsurf with an authentication code.
Click the "Copy link" button to copy an authentication link to your clipboard and enter this link into your browser.
Copy the authentication code displayed in the link and enter it into Windsurf.
### 4. Let's Surf! 🏄
## Update Windsurf
To update Windsurf, you can click on the "Restart to Update ->" button in the top right corner of the menu bar.
If you are not seeing this button, you can:
1. Click on your Profile icon dropdown > Check for Updates
2. In the Command Palette (`Cmd/Ctrl+Shift+P`) > "Check for Updates"
## Things to Try
Now that you've successfully opened Windsurf, let's try out some of the features! These are all conveniently accessible from the starting page. :)
On the right side of the IDE, you'll notice a new panel called "Cascade". This is your AI-powered code assistant! You can chat, write code, and run code with Cascade! Learn more about how it works [here](/windsurf/cascade).
You can create brand new projects with Cascade! Click the "New Project" button to get started.
You can open a folder or connect to a remote server via SSH or a local dev container. Learn more [here](/windsurf/advanced).
Configure some of Windsurf's AI settings here. Want to slow down autocomplete speed or disable some features? You can do that here.
You can open the command palette with the `⌘+⇧+P` (on Mac) or `Ctrl+Shift+P` (on Windows/Linux) shortcut. Explore the available commands!
## Forgot to Import VS Code Configurations?
You can easily import your VS Code/Cursor configuration into Windsurf if you decide to do so after the onboarding process.
Open the command palette (Mac: `⌘+⇧+P`, Windows/Linux: `Ctrl+Shift+P`) and type in the following:
## Incompatible Extensions
There are a few extensions that are incompatible with Windsurf. These include other AI code complete extensions and proprietary extensions. You cannot install extensions through any marketplace on Windsurf.
## Custom App Icons (beta)
For paying users of Windsurf, you can choose between different Windsurf icons while it sits in your dock. Currently, this feature is only available for Mac OS, with other operating systems coming soon.
To change your app icon, simply click the profile/settings icon in the top right corner of the editor and select "Customize App Icon".
## Windsurf Next
Windsurf Next is prerelease version of Windsurf which users can choose to opt-in to access the newest features and capabilities as early as possible, even if the features are not fully polished. Features will typically be rolled out to Windsurf Next first, and then into the stable release shortly after.
You can opt-in to Windsurf Next simply by [downloading it here](https://codeium.com/windsurf/download-next).
# Image Upload
Source: https://docs.codeium.com/windsurf/image-upload
Add images to your prompt to be referenced in Cascade's suggestions. Things like screenshots of your Figma designs, wireframes, etc are all fair game!
Currently only available for use with GPT-4o and Claude 3.5 Sonnet models.
Simply drag in or paste an image, click on the "Add image" button below the input text box to include it in your message.
May not work if you drag an image into Cascade from Windsurf's File Explorer.
# MCP Integration
Source: https://docs.codeium.com/windsurf/mcp
This feature is currently only available for paying *individual* users. It is currently not available for Free, Teams, or Enterprise users.
**MCP (Model Context Protocol)** is a protocol that enables LLMs to access custom tools and services.
Put briefly, an MCP client (Cascade, in this case) can choose to make requests to MCP servers to access tools that they provide.
Cascade now natively integrates with MCP, allowing you to bring your own selection of MCP servers for Cascade to use.
See the [official MCP docs](https://modelcontextprotocol.io/) for more information.
## Configuring MCP with Cascade
To set up MCP with Cascade, you will need to specify a list of MCP servers
along with any necessary arguments and environment variables that Cascade will need to run the servers.
This list should be specified as a JSON file at `~/.codeium/windsurf/mcp_config.json`.
The JSON should follow the same schema as the config file for Claude Desktop.
For quick access to this file, you can find the toolbar above the Cascade input, click the hammer icon,
and then click the "Configure" button that appears.
Clicking "Configure" will open the `mcp_config.json` file in the IDE.
Here's an example configuration, which sets up a single server for Google Maps:
```json
{
"mcpServers": {
"google-maps": {
"command": "npx",
"args": [
"-y",
"@modelcontextprotocol/server-google-maps"
],
"env": {
"GOOGLE_MAPS_API_KEY": ""
}
}
}
}
```
Be sure to provide the required arguments and environment variables for the servers that you want to use.
Once you have configured the JSON file, click "Refresh" in the toolbar.
If the integration is successful, the toolbar should indicate that you have MCP servers available.
See the [official MCP server reference repository](https://github.com/modelcontextprotocol/servers) or [OpenTools](https://opentools.com/) for some example servers.
## Notes
* Since MCP tool calls can invoke code written by arbitrary server implementers, we do not assume liability
for MCP tool call failures. To reiterate:
MCP tool calls will consume credits regardless of success or failure.
* We currently only support [tools](https://modelcontextprotocol.io/docs/concepts/tools), not [prompts](https://modelcontextprotocol.io/docs/concepts/prompts) nor [resources](https://modelcontextprotocol.io/docs/concepts/resources).
In other words, Cascade will be able to request and use a server's tools, but not the other endpoints that a server exposes.
* We do not support tools that output images.
* We only support servers using the `stdio` [transport type](https://modelcontextprotocol.io/docs/concepts/transports).
# Memories
Source: https://docs.codeium.com/windsurf/memories
`Memories` is the system for sharing and persisting context across conversations.
There are two types of memories: those generated by the user (commonly referred to as `rules`) and those that are automatically generated by Cascade.
## User-generated Memories (aka Rules)
Users can explicitly define their own Memories, or rules, for Cascade to follow. For example, you can create rules to get Cascade to respond in a certain language, communicate in a specific style, or use a specific API.
Rules are defined in designated rule files:
`.windsurfrules` - rules for the local workspace
`global_rules.md` - rules applied across all workspaces
No specific formatting is required; Cascade will understand markdown and raw text.
To ensure that the rules are only applied to your local project, add `.windsurfrules` to your project’s `.gitignore`.
### Multiple workspaces
If your window has multiple workspaces, all local rules will be used. If the total of your global rules and local rules exceed 12,000 characters, priority will be given to the global rules, followed by the workspace rules. Any rules beyond 12,000 characters will be truncated.
## Auto-generated Memories
During the course of your conversation with Cascade, Cascade will automatically generate and store memories if the context or information is determined to be useful for future conversations. Additionally, you can ask Cascade to create a memory at any time; this can be especially helpful for referencing and capturing conversational context as it happens.
When a memory is successfully generated, you will see a "Memory has been updated" notification at the bottom of Cascade's response that generated the memory. Additionally, you can click on "Manage" to open the Memories panel — your one-stop shop for all memory related content — to view and delete Cascade's memories.
Auto-generated memories do NOT consume credits
## Managing Memories
The Memories panel can be accessed at any time by clicking on “Windsurf - Settings” in the bottom-right hand corner, selecting the “Settings” tab, and clicking “Manage” next to “Cascade-Generated Memories”. Alternatively, you can access the Memories panel by clicking the three dots in the top right corner of the Cascade window, and selecting "Manage Memories".
# Models
Source: https://docs.codeium.com/windsurf/models
Cascade has several different models for you to choose from.
In the Cascade panel `Ctrl/⌘ + L`, you can easily switch between different models of your choosing.
Under the text input box, you will see a model selection dropdown menu. You will see the following models available:
* GPT-4o
* Claude 3.5 Sonnet
* DeepSeek-V3
* DeepSeek-R1
* o3-mini (medium reasoning)
* Gemini 2.0 Flash
* Cascade Base ⚡ - Free!
# Premium Models
Due to the wide variation between the serving costs of each model, depending on the model you select, each of your input prompts will consume a different number of [User Prompt credits](/windsurf/usage#user-prompt-and-flow-action-credits).
Below you will find a breakdown of how many User Prompt credits you will be charged for each model:
| Model | User Prompt Credits | Free | Trial/Pro/Ultimate | Teams | Image Upload |
| :---------------: | :-----------------: | :--: | :----------------: | :---: | :----------: |
| GPT-4o | 1 | ✅ | ✅ | ✅ | ✅ |
| Claude 3.5 Sonnet | 1 | ✅ | ✅ | ✅ | ✅ |
| DeepSeek-V3 | 0.25 | ❌ | ✅ | ❌ | ❌ |
| DeepSeek-R1 | 0.5 | ❌ | ✅ | ❌ | ❌ |
| o3-mini (medium) | 1 | ❌ | ✅ | ✅ | ❌ |
| Gemini 2.0 Flash | 0.25 | ✅ | ✅ | ✅ | ❌ |
| Cascade Base ⚡ | 0 | ✅ | ✅ | ✅ | ❌ |
# Cascade Base ⚡
All users have unlimited access to Cascade Base, which does NOT consume any User Prompt OR Flow Action credits.
It is not quite as smart as the premium models, but it's fast, pretty accurate, and free.
# Terminal
Source: https://docs.codeium.com/windsurf/terminal
# Command in the terminal
Use our [Command](/command/overview) modality in the terminal (`Cmd/Ctrl+I`) to generate the proper CLI syntax from prompts in natural language.
# Send terminal selection to Cascade
Highlight a portion of of the stack trace and press `Cmd/Ctrl+L` to send it to Cascade, where you can reference this selection in your next prompt.
# Auto-executed Cascade commands
Cascade has the ability to run terminal commands on its own with user permission. However, certain terminal commands can be accepted or rejected automatically through the Allow and Deny lists.
By enabling Auto mode, it will rely on Cascade's judgement on whether the command requires the user's permission to be executed. This feature is only available for messages sent with premium models.
### Turbo Mode
Only available to paid individual users. Teams and Enterprise users currently do not have access.
In Turbo mode, Cascade will always execute the command, unless it is in the deny list.
You can toggle this via the Windsurf - Settings panel in the bottom right hand corner of the editor.
### Allow list
An allow list defines a set of terminal commands that will always auto-execute. For example, if you add `git`, then Cascade will always accept `git add -A`.
The setting can be via Command Palette → Open Settings (UI) → Search for `windsurf.cascadeCommandsAllowList`.
### Deny list
A deny list defines a set of terminal commands that will never auto-execute. For example, if you add `rm`, then Cascade will always ask for permission to run `rm index.py`.
The setting can be via Command Palette → Open Settings (UI) → Search for `windsurf.cascadeCommandsDenyList`.
# Paid Plan and Credit Usage
Source: https://docs.codeium.com/windsurf/usage
## Getting started
To get started, [complete Windsurf's onboarding](https://docs.codeium.com/windsurf/getting-started#onboarding) and authenticate into Windsurf. Upon authenticating into Windsurf, your 2-week Free Trial starts.
User Prompt credits are consumed whenever a message is sent to Cascade with a premium model while Flow Action credits are consumed when a premium model is used by the AI in Write and Chat mode for a tool call (e.g. search, analyze, write, terminal command, etc.).
Upon using all of your credits, premium models will no longer be accessible but you will still be able to use our Cascade Base model. To resume access with premium models, upgrade to a Pro or Pro Ultimate plan.
The [Free Trial](#using-a-free-trial) includes:
* 50 User Prompt credits
* 200 Flow Action credits
The [Pro](#using-pro-plan) plan includes:
* 500 User Prompt credits
* 1500 Flow Action credits
The [Pro Ultimate](#using-pro-ultimate-plan) plan includes:
* Infinite User Prompt credits
* 3000 Flow Action credits
And the [Free](#using-a-free-plan) plan includes:
* 5 User Prompt credits
* 5 Flow Action credits
If you run out of credits on the Pro or Pro Ultimate plans, you will have the option of [purchasing additional credits](#purchasing-additional-flex-credits).
After upgrading, your paid plan will start immediately and you'll have access to premium models again. To learn more about the quotas and features per pricing plan, [click here](https://codeium.com/pricing).
## User Prompt and Flow Action credits
**User Prompt credits are usage credits that get consumed for each message sent with a premium model (e.g. Sonnet or GPT-4o). Every message sent counts as 1 user prompt credit.**
**Flow Action credits are a usage credit that get consumed for each tool call (e.g. View file, Search, Write, Terminal, etc.). Every tool call counts as 1 flow action credit.**
For Flow Action credits, depending on the prompt, Cascade might not need to take any actions (e.g. explaining a block of code), while for others, Cascade might need to take a series of actions.
### Tool calls
One of the things that makes Cascade special is its ability to use tool calls. Here's are a few examples of tool calls that are currently supported:
* **Search**: Cascade will intelligently search through your codebase for snippets relevant to the task that it's trying to accomplish.
* **Analyze**: Cascade will analyze a file to gather more context to help it accomplish the task requested.
When analyzing large files, Cascade may split the file up and analyze it in separate chunks, which will each count as one tool call. Therefore, it is possible that it may cost more than 1 credit to analyze a large file.
* **Write**: Cascade will write changes for you in your file. Only available in Write mode which can be configured under and to the right the prompt input box.
* **Terminal**: Cascade has the ability to run both synchronous and background terminal processes. For example, it can generate and run install commands to set up a project as well as a background process to run the project.
### Errors
If a tool call errors or a user message is unsuccessful, flow action and User Prompt credits will not be consumed. For example, if Cascade attempts to write to a file but that file has unsaved changes, the tool call will fail and it will not consume a credit.
### Viewing your usage
There are a few ways to view your usage.
Go to the Cascade usage directly by clicking on the overflow menu, and then selecting "Cascade Usage".
View the settings panel by clicking on "Windsurf Settings" on the status bar, followed by selecting the "Plan Info" tab.
You can also view it on your plan page at [codeium.com/plan](https://codeium.com/plan) after you're authenticated.
### Upgrading to a paid plan
To learn more about paid features or to upgrade to a paid plan, [click here](https://codeium.com/plan). Paid plans include Pro and Pro Ultimate options for individuals as well as for teams.
We accept all major credit cards, Apple Pay, Cash App Pay, Google Pay, Link, WeChat Pay, and Alipay. If you have a payment method not listed, please reach out to us at [support](https://codeium.com/support). You may need to disable your VPN to view the relevant payment methods for your region.
### What happens when you run out of premium Flow Action credits but not premium User Prompt credits?
If you no longer have premium Flow Action credits, you have three options:
* You can purchase premium Flex credits to continue using Write and Chat mode with premium model tool calls (the premium Flex credits will be used as if premium Flow Action credits)
* You can use Legacy mode to continue to use your premium User Prompt credits without any additional premium Flow Action credits (i.e. premium model usage but no tool calls)
* You can use Write or Chat mode with the Cascade Base model. Note that no premium User Prompt credits will be used when on Cascade Base model
### What happens when you run out of premium User Prompt credits but not premium Flow Action credits?
If you no longer have premium User Prompt credits, you have two options:
* You can purchase premium Flex credits to continue using Write and Chat mode (the Flex credits will be used as if premium User Prompt credits)
* You can use Write or Chat mode with the Cascade Base model for prompts. In this case, perhaps unexpectedly, no premium Flow Action credits will be used either! This is because, at a technical quality level, it actually does not make sense to use premium models for tools if the original user prompt is not handled by a premium model, so we will automatically prevent you from burning premium Flow Action credits. Another way of putting it is that there is no way to spend premium Flow Action credits without using a premium User Prompt credit, which is one of the reasons why we give significantly more premium Flow Action credits than premium User Prompt credits at every tier.
### Purchasing additional Flex credits
If you run out of User Prompt or Flow Action credits, you can purchase Flex credits in the [billing website](https://codeium.com/plan). Flex credits are a credit that can be used as both User Prompt and Flow Action credits. For example, if you run out of tool calls but still have remaining User Prompt credits, your Flex credits will be consumed as Flow Action credits. If you run out of both User Prompt and Flow Action credits, Flex credits will be consumed as both. For example, if you are out of both User Prompt credits and Flow Action credits, send a message to Cascade with a premium model, and it performs tool calls as part of the response, you would consume 5 Flex credits, the equivalent of 1 User Prompt and 4 Flow Action credits.
For Team plans, Flex credits are purchased within and treated as a pool amongst all members of the team. Please contact your Teams admin to purchase more Flex credits to increase your amount of Flex credits. For more on the cost of Flex credits, visit our [pricing page](https://codeium.com/pricing).
## Usage examples
To explain how credits work, here are a few examples.
In this first example below, the user has both User Prompt and Flow Action credits available. In the scenario illustrated, 1 User Prompt credit was consumed and 4 Flow Action credits were consumed.
In this second example below, the user has User Prompt credits but no Flow Action credits available. They purchased additional Flex credits that can be used as a backup to Flow Action credits. In the scenario illustrated, 1 user action credit was consumed and 4 Flex credits were consumed.
In this third example below, the user has no user prompt but has Flow Action credits available. They purchased additional Flex credits that can also be used as a backup to User Prompt credits. In the scenario illustrated, 1 Flex credit was consumed and 4 Flex credits were consumed.
In this final example below, the user has no user prompt or Flow Action credits available but they've purchased Flex credits. Since Flex credits can be used for both User Prompt and Flow Action credits, they both count as Flex credits. In the scenario illustrated, 5 Flex credits were consumed.
## Plan Usage
### Using a Free Trial
The Free Trial comes with:
* 50 User Prompt credits
* 200 Flow Action credits
When you're on a Free Trial, you'll be given user prompts and flow actions credits for free! To get started, ask Cascade a question. In Write and Chat mode, Cascade is optimized to fully understand your codebase and leverages tool calls to assist you. By default, all of your requests will use premium models until you run out of credits.
If you end up low on credits, you'll be warned ahead of time so that you can upgrade and have access to more credits. Upon upgrading, your credits will reset to the monthly quota of the respective paid plan.
If you run out of credits, you'll still be able to use our Cascade Base Model in Write or Chat mode while in the Free Trial. If you didn't upgrade in the 2-week Free Trial, you'll be downgraded to our Free plan.
### Using Pro Plan
The Pro plan comes with:
* 500 User Prompt credits
* 1500 Flow Action credits
While on Pro, you'll have access to a monthly quota of User Prompt and Flow Action credits. Cascade usage will consume credits. You can view how many credits you have remaining in the Windsurf Settings panel that's accessible in the status bar.
If you're running low on credits, Cascade will notify you so that you can purchase additional Flex credits. To purchase additional Flex credits, visit the billing website and select “Purchase flex credits”. The Flex credits purchased will rollover to the following usage month if there are any remaining.
If you want to reduce your usage of Flow Action credits, you have two options:
* Use Legacy mode with a premium model. This will still consume User Prompt credits but will not consume any Flow Action credits. Legacy Chat does not use any tools.
* Use Cascade Base model in Write or Chat mode. Using Cascade Base model does not consume any user prompt or Flow Action credits.
If you want to reduce your consumption of User Prompt credits, select Cascade Base model in the model selection dropdown. Using Cascade Base model does not consume any user prompt or Flow Action credits.
In addition to increased Cascade credits, Pro comes with unlimited Fast Autocomplete and unlimited premium model requests with Command.
If you'd like to have access to unlimited prompt credits, more flow actions and better Flex credit pricing, you can upgrade to the Pro Ultimate plan. Upon upgrading to Pro Ultimate, your billing cycle will reset, you'll be refunded a pro-rated amount of your payment for Pro and your monthly quota will also reset. Any Flex credits will transfer over.
### Using Pro Ultimate Plan
The Pro Ultimate plan comes with:
* Infinite User Prompt credits
* 3000 Flow Action credits
While on Pro Ultimate, you'll have access to a monthly quota of Flow Action credits and an **unlimited number of User Prompt credits**. Tool calls within Cascade will consume your Flow Action credits. You can view how many credits you have remaining in the Windsurf Settings panel that's accessible in the status bar.
If you're running low on Flow Action credits, Cascade will notify you so that you can purchase additional Flex credits. To purchase additional Flex credits, visit the billing website and select “Purchase flex credits”. The Flex credits purchased will rollover to the following usage month if there are any remaining.
If you want to reduce your usage of Flow Action credits, you have two options:
* Use Legacy Chat mode with a premium model. On Pro Ultimate, you have unlimited prompt credits so Legacy Chat usage does not consume any credits.
* Use Cascade Base model in Write or Chat mode. Using Cascade Base model also does not consume any credits.
In addition to increased Cascade credits, Pro Ultimate comes with unlimited Fast Autocomplete and unlimited premium model requests with Command.
If you'd like to downgrade to Pro, visit the billing website. Upon downgrading, you'll remain in Pro Ultimate until the end of your billing cycle. At the end of your billing cycle, your plan will change to Pro. Any Flex credits will transfer over.
### Using a Free plan
The Free plan comes with:
* 5 User Prompt credits
* 5 Flow Action credits
Windsurf can still be used for free! While in Cascade, you'll be given limited number of User Prompt and Flow Action credits and have access to our Cascade Base model in read mode to ask questions. When editing code, you'll have access to unlimited autocomplete suggestions and AI command instructions. To learn more about features in Free and in paid tiers, [click here](https://codeium.com/pricing).
### Canceling your paid plan
To cancel your paid plan, visit the billing website. Upon canceling your paid plan, you'll still have access to all of your credits from your monthly quota and Flex credits until the end of the usage month. After the usage month, all Flex credits will be expired and you'll be downgraded to the Free plan where you'll be provided a limited number of User Prompt and tool action credits. If you change your mind and decide not to cancel before the end of the usage month, you can renew your plan by visiting the billing page.
# Web Search
Source: https://docs.codeium.com/windsurf/web-search
Cascade can now intuitively parse through and chunk up web pages and documentation, providing realtime context to the models. The key way to understand this feature is that Cascade will browse the Internet as a human would. What this means is that it will ask itself the following questions:
1. Do I need to use the Internet to help you with your query? (ie. time-based question, live docs, user pasted URL, etc.)
2. Which page(s) do I need to visit to get the right information and in what priority order?
3. What parts of the page do I need to read in order to get the right information in the fastest, most efficient way possible?
Our web tools are designed in such a way that gets only the information that is necessary in order to efficiently use your credits.
This feature can potentially use credits quickly because each URL is at least
1 credit. You can toggle this feature on and off in the Windsurf Settings in
the bottom right of the editor.
## Overview
To help you better understand how Web Search works, we've recorded a short video describing the best practices for reducing Flow Action credits.
### Quick Start
The fastest way to get started is to activate web search in your Windsurf Settings in the bottom right corner of the editor. You can activate it a couple of different ways:
1. Ask a question that probably needs the Internet (ie. "What's new in the latest version of React?").
2. Use `@web` to force a docs search.
3. Use `@docs` to query over a list of docs that we are confident we can read with high quality.
4. Paste a URL into your message.
## Search the web
Cascade can deduce that certain prompts from the user may require a real-time web search to provide the optimal response. In these cases, Cascade will perform a web search and provide the results to the user. This can happen automatically or manually using the `@web` mention.
It will construct the query for you using AI and then perform a web search. This costs 1 Flow Action credit.
## Reading Pages
Cascade can read individual pages for things like documentation, blog posts, and GitHub files. The page reads happen entirely on your device within your network so if you're using a VPN you shouldn't have any problems.
Pages are picked up either from web search results, inferred based on the conversation, or from URLs pasted directly into your message.
We break pages up into multiple chunks to efficiently use your Flow Action credits. It's very similar to how a human would read a page: for a long page we skim to the section we want then read the text that's relevant. This is how Cascade operates as well.
It's worth noting that not all pages can be parsed. We are actively working on improving the quality of our website reading. If you have specific sites you'd like us to handle better, feel free to file a feature request!
## Credit Usage with Web tools
Web Search uses 1 credit per search. It does not open up the search results, simply returns up to 5 links to consider reading.
Web URL reads use at least 1 credit each. If a page is long, we will break it up into chunks and present an outline to Cascade. If a section is deemed relevant, we will read that section. We try to merge chunks together as much as possible to reduce credit usage. For example, if there are 3 short neighboring chunks, we'll merge them together so that you only use one credit to read the chunks.
For a detailed explanation of credit usage, see [our video explanation](https://youtu.be/moIySJ4d0UY).
 Our autocomplete makes in-line and multi-line suggestions based on the context of your code.
Suggestions appear in grey text as you type. You can press `esc` to cancel a suggestion.
Suggestions will also disappear if you continue typing or navigating without accepting them.
## Keyboard Shortcuts
Here are shortcuts that apply for MacOS.
Replace `⌘` with `Ctrl` and `⌥` with `Alt` to get the corresponding shortcuts on Windows/Linux.
* **Accept suggestion**: `⇥`
* **Cancel suggestion**: `esc`
* **Accept suggestion word-by-word**: `⌘+→` (VS Code), `⌥+⇧+\` (JetBrains)
* **Next/previous suggestion**: `⌥+]`/`⌥+[`
* **Trigger suggestion**: `⌥+\`
## Autocomplete Speeds
You can set the speed of the Autocomplete in your settings.
Our autocomplete makes in-line and multi-line suggestions based on the context of your code.
Suggestions appear in grey text as you type. You can press `esc` to cancel a suggestion.
Suggestions will also disappear if you continue typing or navigating without accepting them.
## Keyboard Shortcuts
Here are shortcuts that apply for MacOS.
Replace `⌘` with `Ctrl` and `⌥` with `Alt` to get the corresponding shortcuts on Windows/Linux.
* **Accept suggestion**: `⇥`
* **Cancel suggestion**: `esc`
* **Accept suggestion word-by-word**: `⌘+→` (VS Code), `⌥+⇧+\` (JetBrains)
* **Next/previous suggestion**: `⌥+]`/`⌥+[`
* **Trigger suggestion**: `⌥+\`
## Autocomplete Speeds
You can set the speed of the Autocomplete in your settings.
 # Tips
Source: https://docs.codeium.com/autocomplete/tips
## Inline Comments
You can instruct autocomplete with the use of comments in your code.
Codeium will read these comments and suggest the code to bring the comment to life.
# Tips
Source: https://docs.codeium.com/autocomplete/tips
## Inline Comments
You can instruct autocomplete with the use of comments in your code.
Codeium will read these comments and suggest the code to bring the comment to life.
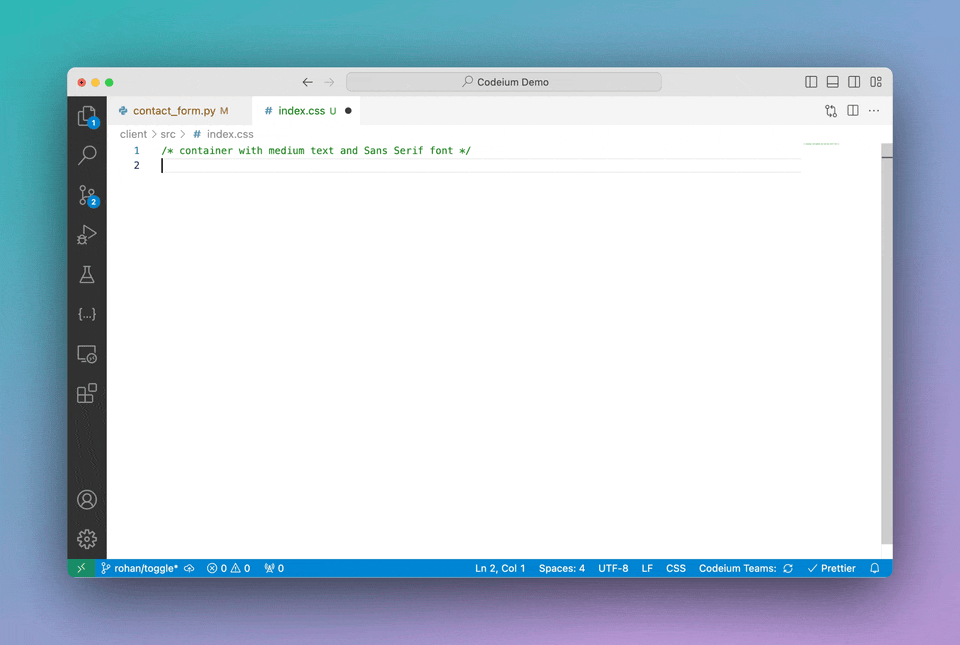 This method can get you good mileage, but if you're finding value in writing natural-language instructions and having the AI execute them,
consider using [Codeium Command](/command/overview).
## Fill In The Middle (FIM)
Codeium's Autocomplete can Fill In The Middle (FIM).
Read more about in-line FIM on our blog [here](https://codeium.com/blog/inline-fim-code-suggestions).
## Snooze
Click the Codeium widget in the status bar towards the bottom right of your editor to see the option to switch Autocomplete off,
either temporarily or until you reenable it.
# Prompt Engineering
Source: https://docs.codeium.com/best-practices/prompt-engineering
If you're reading this, you're probably someone that already understands some of the use cases and limitations of LLMs. The better prompt and context that provide to the model, the better the outcome will be.
Similarly with Codeium, there are best practices for crafting more effective prompts to get the most out of the tool, and get the best quality code possible to help you accelerate your workflows.
This method can get you good mileage, but if you're finding value in writing natural-language instructions and having the AI execute them,
consider using [Codeium Command](/command/overview).
## Fill In The Middle (FIM)
Codeium's Autocomplete can Fill In The Middle (FIM).
Read more about in-line FIM on our blog [here](https://codeium.com/blog/inline-fim-code-suggestions).
## Snooze
Click the Codeium widget in the status bar towards the bottom right of your editor to see the option to switch Autocomplete off,
either temporarily or until you reenable it.
# Prompt Engineering
Source: https://docs.codeium.com/best-practices/prompt-engineering
If you're reading this, you're probably someone that already understands some of the use cases and limitations of LLMs. The better prompt and context that provide to the model, the better the outcome will be.
Similarly with Codeium, there are best practices for crafting more effective prompts to get the most out of the tool, and get the best quality code possible to help you accelerate your workflows.
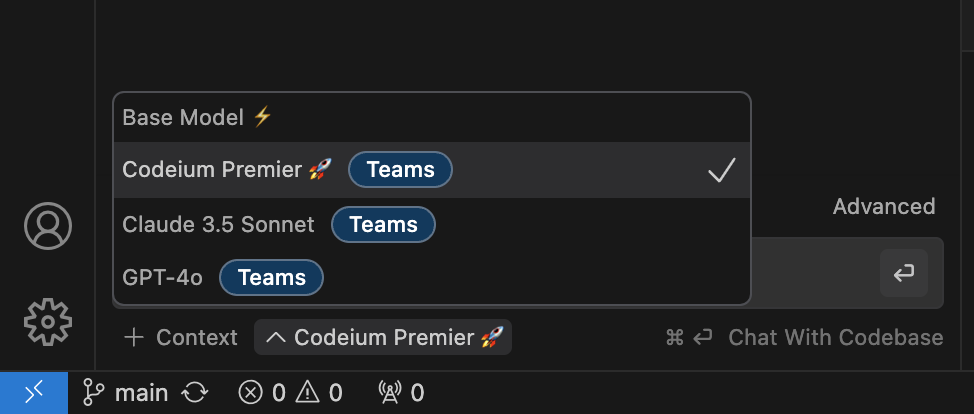 Model selection can be found directly under the chat.
## Base Model ⚡
**Access:** All users
Available for unlimited use to all users is a fast, high-quality Codeium Chat model based on Meta's [Llama 3.1 70B](https://ai.meta.com/blog/meta-llama-3-1/).
This model is optimized for speed, and is the **fastest** model available in Codeium Chat. This is all while still being extremely accurate.
## Codeium Premier 🚀
**Access:** Any paying users (Pro, Teams, Enterprise, etc.)
Available in our paid tier is unlimited usage of our premier Codeium Chat model based on Meta's [Llama 3.1 405B](https://ai.meta.com/blog/meta-llama-3-1/).
This is the **highest-performing model** available for use in Codeium, due to its size and integration with Codeium's reasoning engine and native workflows.
## Other Models (GPT-4o, Claude 3.5 Sonnet)
**Access:** Any paying users (Pro, Teams, Enterprise, etc.)
Codeium provides access to OpenAI's and Anthropic's flagship models, available for use in any of our paid tiers.
# Overview
Source: https://docs.codeium.com/chat/overview
Converse with a codebase-aware AI
Model selection can be found directly under the chat.
## Base Model ⚡
**Access:** All users
Available for unlimited use to all users is a fast, high-quality Codeium Chat model based on Meta's [Llama 3.1 70B](https://ai.meta.com/blog/meta-llama-3-1/).
This model is optimized for speed, and is the **fastest** model available in Codeium Chat. This is all while still being extremely accurate.
## Codeium Premier 🚀
**Access:** Any paying users (Pro, Teams, Enterprise, etc.)
Available in our paid tier is unlimited usage of our premier Codeium Chat model based on Meta's [Llama 3.1 405B](https://ai.meta.com/blog/meta-llama-3-1/).
This is the **highest-performing model** available for use in Codeium, due to its size and integration with Codeium's reasoning engine and native workflows.
## Other Models (GPT-4o, Claude 3.5 Sonnet)
**Access:** Any paying users (Pro, Teams, Enterprise, etc.)
Codeium provides access to OpenAI's and Anthropic's flagship models, available for use in any of our paid tiers.
# Overview
Source: https://docs.codeium.com/chat/overview
Converse with a codebase-aware AI
 You can use `⌘+⇧+A` on Mac or `Ctrl+⇧+A` on Windows/Linux to open the chat panel and toggle focus between it and the editor.
You can also pop the chat window out of the IDE entirely by clicking the page icon at the top of the chat panel.
You can use `⌘+⇧+A` on Mac or `Ctrl+⇧+A` on Windows/Linux to open the chat panel and toggle focus between it and the editor.
You can also pop the chat window out of the IDE entirely by clicking the page icon at the top of the chat panel.
 You can use `⌘+⇧+L` on Mac or `Ctrl+⇧+L` on Windows/Linux to open the chat panel while you are typing in the editor.
You can also open the chat in a popped-out browser window by clicking `Tools > Codeium > Open Codeium Chat in Browser` in the top menu bar.
You can use `⌘+⇧+L` on Mac or `Ctrl+⇧+L` on Windows/Linux to open the chat panel while you are typing in the editor.
You can also open the chat in a popped-out browser window by clicking `Tools > Codeium > Open Codeium Chat in Browser` in the top menu bar.
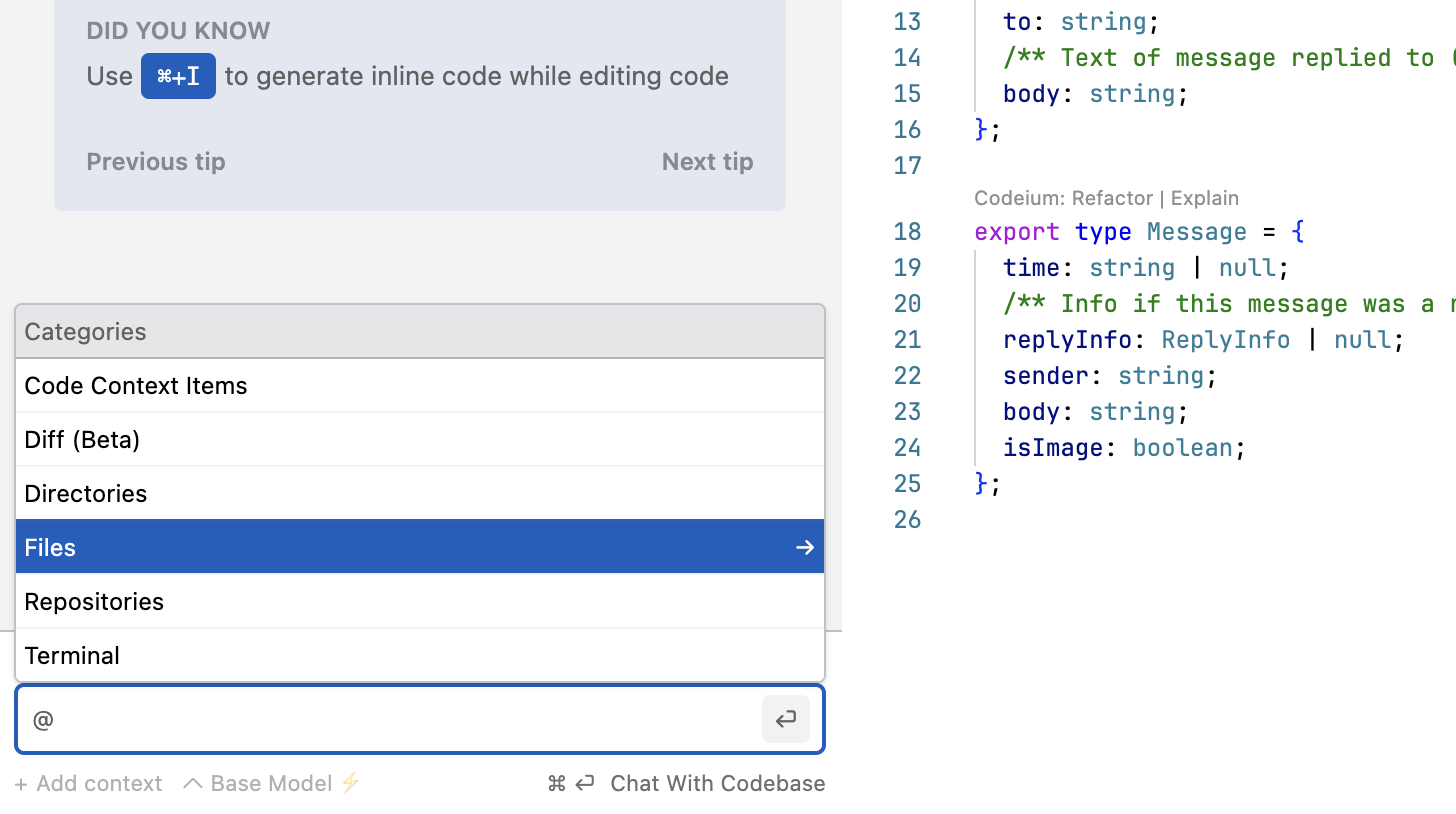 You can also try `@diff`, which lets you chat about your repository's current `git diff` state.
The `@diff` feature is currently in beta.
You can also try `@diff`, which lets you chat about your repository's current `git diff` state.
The `@diff` feature is currently in beta.
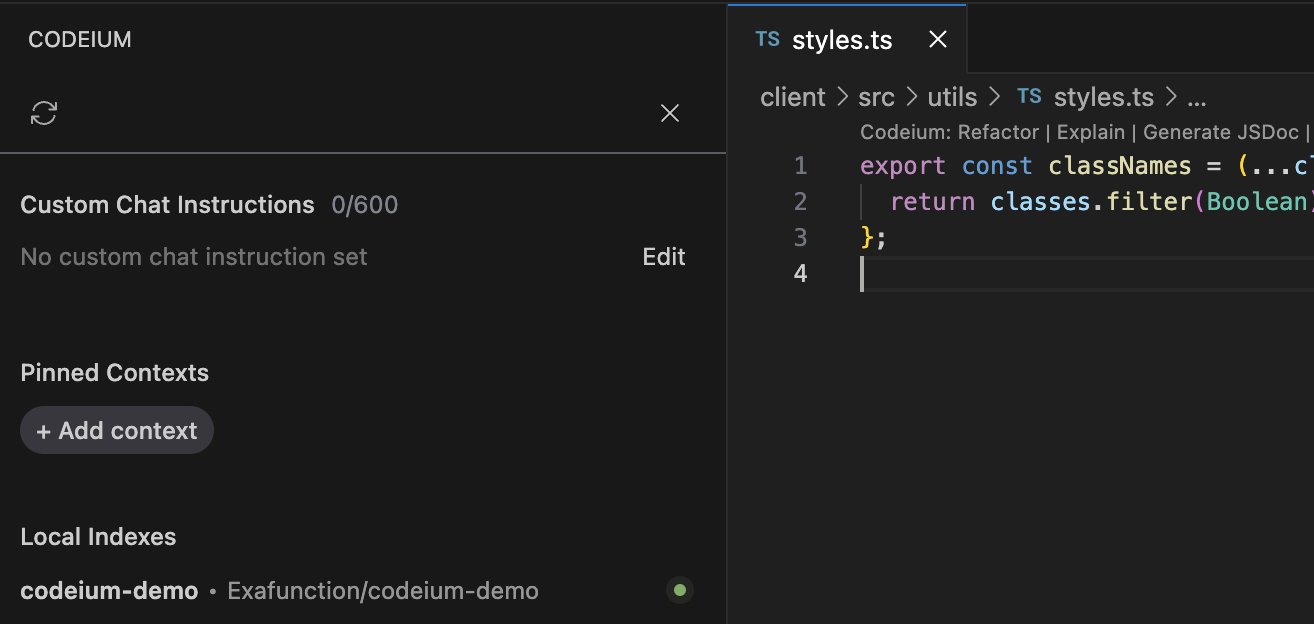 In this tab, you can see:
* **Custom Chat Instructions**: a short prompt guideline like "Respond in Kotlin and assume I have little familiarity with it" to orient the model towards a certain type of response.
* **Pinned Contexts**: items from your codebase like files, directories, and code snippets that you would like explicitly for the model to take into account.
See also [Context Pinning](/context-awareness/overview#context-pinning).
* **Active Document**: a marker for your currently active file, which receives special focus.
* **Local Indexes**: a list of local repositories that the Codeium context engine has indexed.
## Slash Commands
You can prefix a message with `/explain` to ask the model to explain something of your choice.
Currently, `/explain` is the only supported slash command.
[Let us know](https://codeium.canny.io/feature-requests/) if there are other common workflows you want wrapped in a slash command.
## Copy and Insert
Sometimes, Chat responses will contain code blocks. You can copy a code block to your clipboard or insert it directly into the editor
at your cursor position by clicking the appropriate button atop the code block.
In this tab, you can see:
* **Custom Chat Instructions**: a short prompt guideline like "Respond in Kotlin and assume I have little familiarity with it" to orient the model towards a certain type of response.
* **Pinned Contexts**: items from your codebase like files, directories, and code snippets that you would like explicitly for the model to take into account.
See also [Context Pinning](/context-awareness/overview#context-pinning).
* **Active Document**: a marker for your currently active file, which receives special focus.
* **Local Indexes**: a list of local repositories that the Codeium context engine has indexed.
## Slash Commands
You can prefix a message with `/explain` to ask the model to explain something of your choice.
Currently, `/explain` is the only supported slash command.
[Let us know](https://codeium.canny.io/feature-requests/) if there are other common workflows you want wrapped in a slash command.
## Copy and Insert
Sometimes, Chat responses will contain code blocks. You can copy a code block to your clipboard or insert it directly into the editor
at your cursor position by clicking the appropriate button atop the code block.
 ## Stats for Nerds
Lots of things happen under the hood for every chat message. You can click the stats icon to see these statistics for yourself.
## Stats for Nerds
Lots of things happen under the hood for every chat message. You can click the stats icon to see these statistics for yourself.
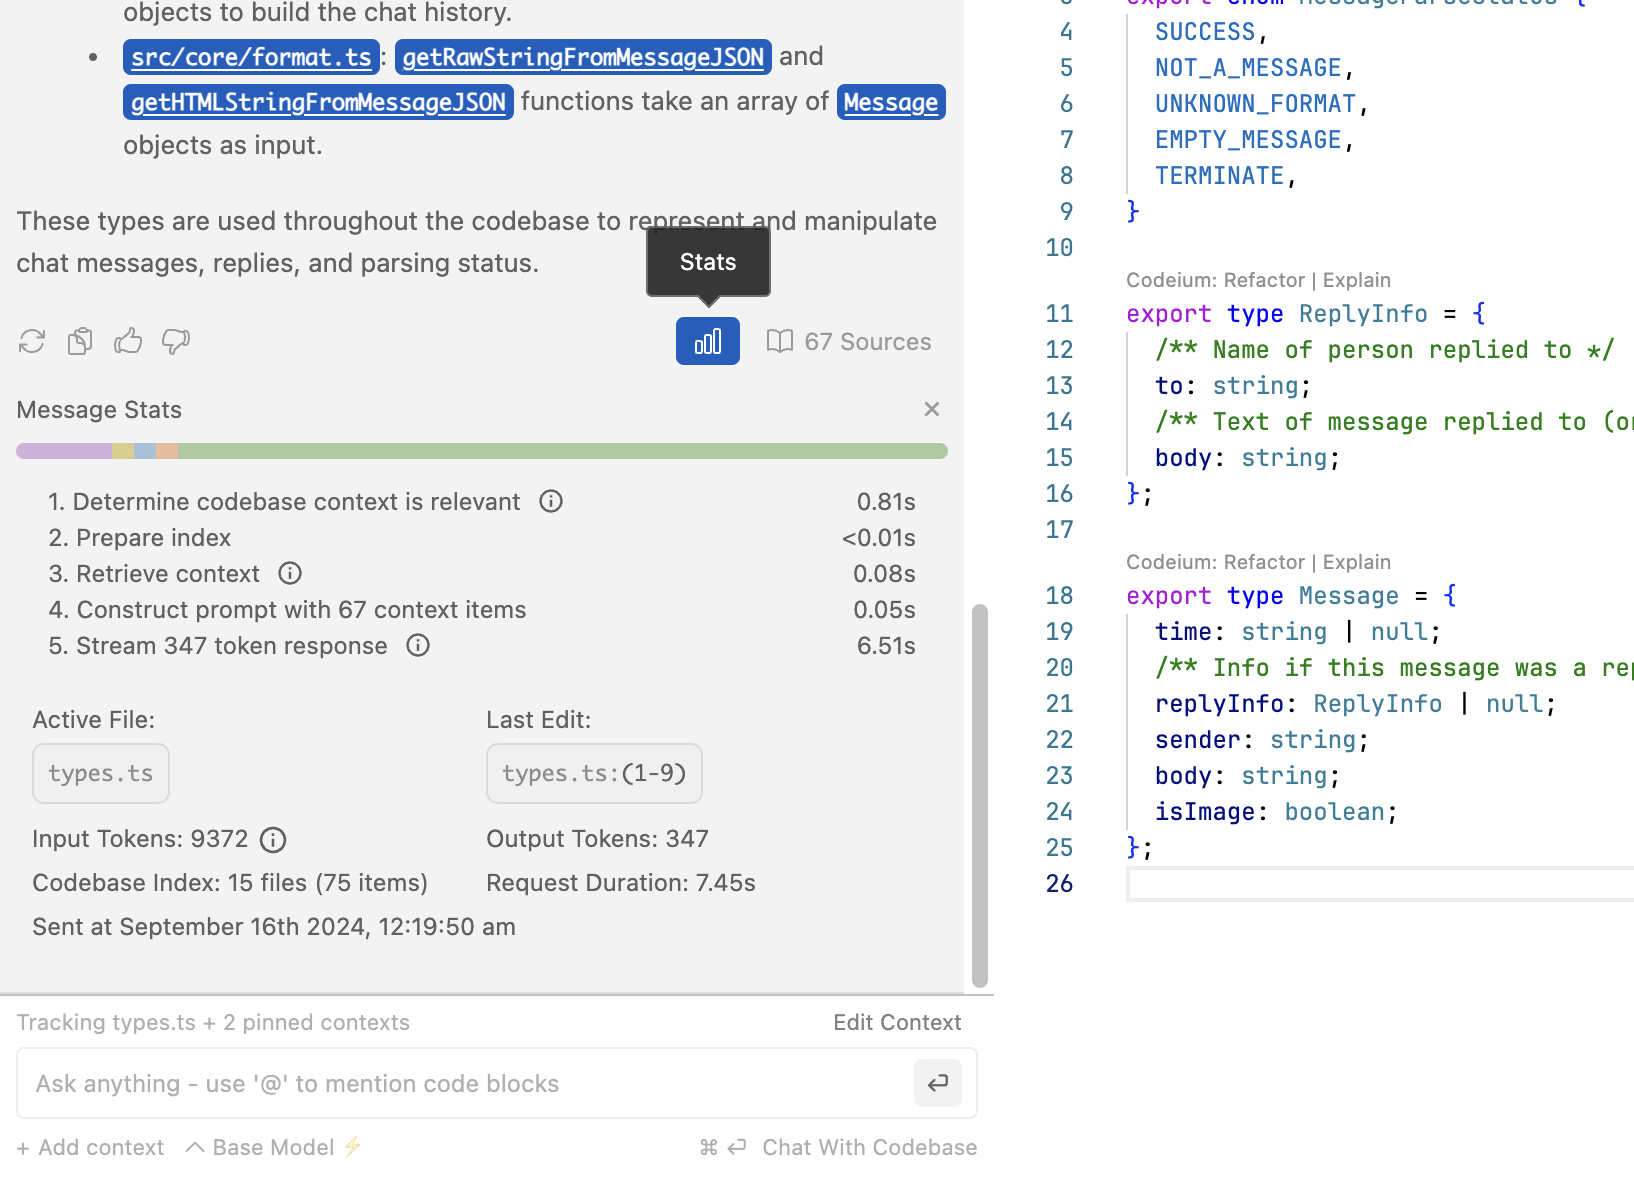 ## Chat History
To revisit past conversations, click the history icon at the top of the chat panel.
You can click the `+` to create a new conversation, and
you can click the `⋮` button to export your conversation.
## Chat History
To revisit past conversations, click the history icon at the top of the chat panel.
You can click the `+` to create a new conversation, and
you can click the `⋮` button to export your conversation.
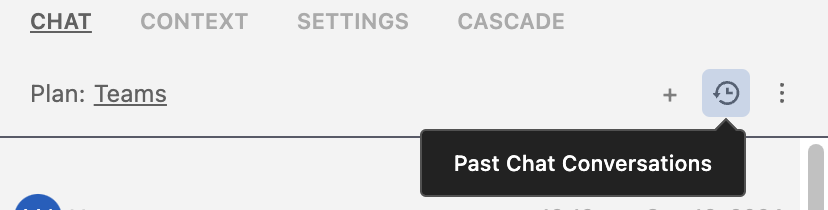 ## Settings
Click on the `Settings` tab to update your theme preferences (light or dark) and font size.
The settings panel also gives you an option to download diagnostics, which are debug logs that can be helpful
for the Codeium team to debug an issue should you encounter one.
## Settings
Click on the `Settings` tab to update your theme preferences (light or dark) and font size.
The settings panel also gives you an option to download diagnostics, which are debug logs that can be helpful
for the Codeium team to debug an issue should you encounter one.
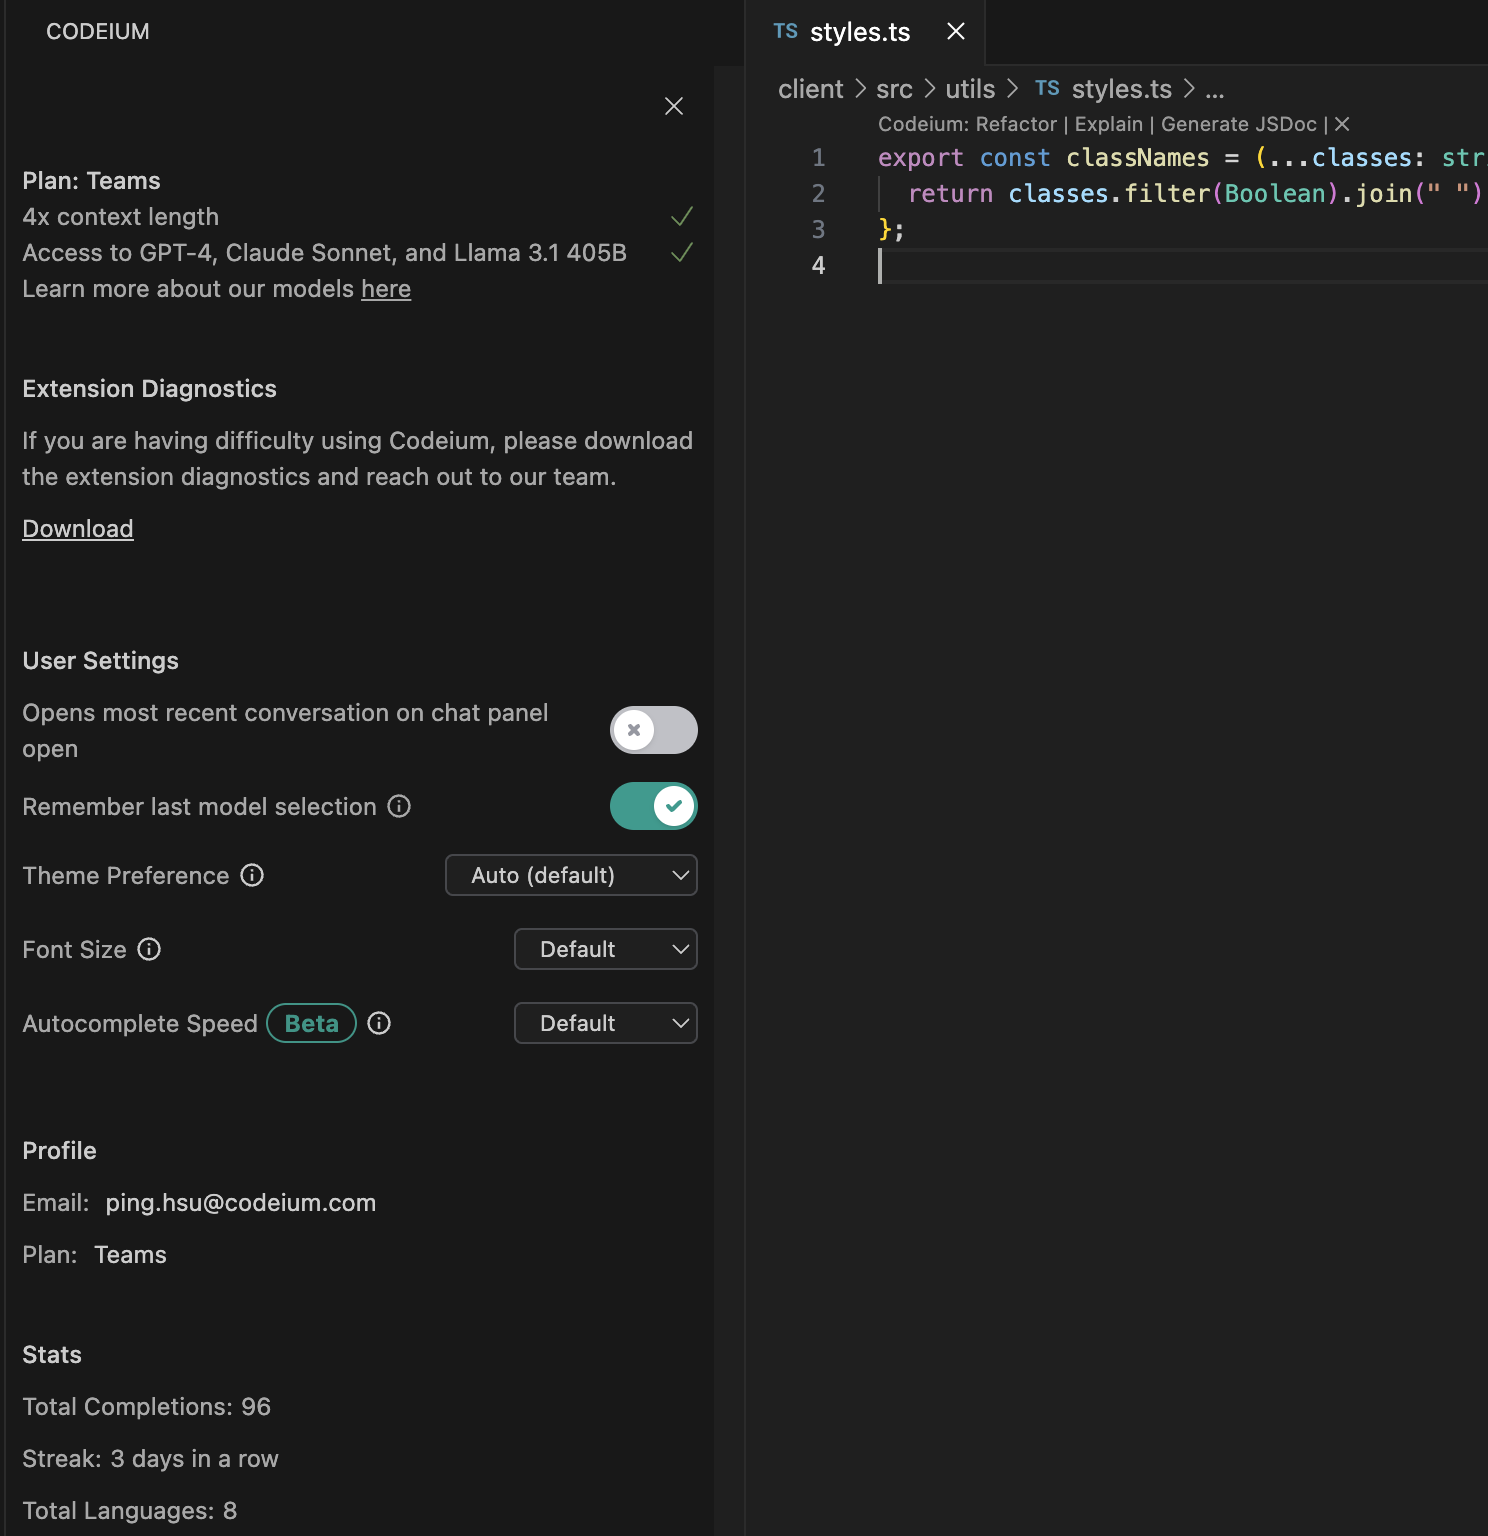 ## Telemetry


 You can accept, reject, or follow-up a generation by clicking the corresponding code lens above the generated diff,
or by using the appropriate shortcuts (`Cmd/Ctrl+Enter`/`Cmd/Ctrl+Delete`)
In Windsurf, you can select your desired model to use for Command from the dropdown.
You can accept, reject, or follow-up a generation by clicking the corresponding code lens above the generated diff,
or by using the appropriate shortcuts (`Cmd/Ctrl+Enter`/`Cmd/Ctrl+Delete`)
In Windsurf, you can select your desired model to use for Command from the dropdown.

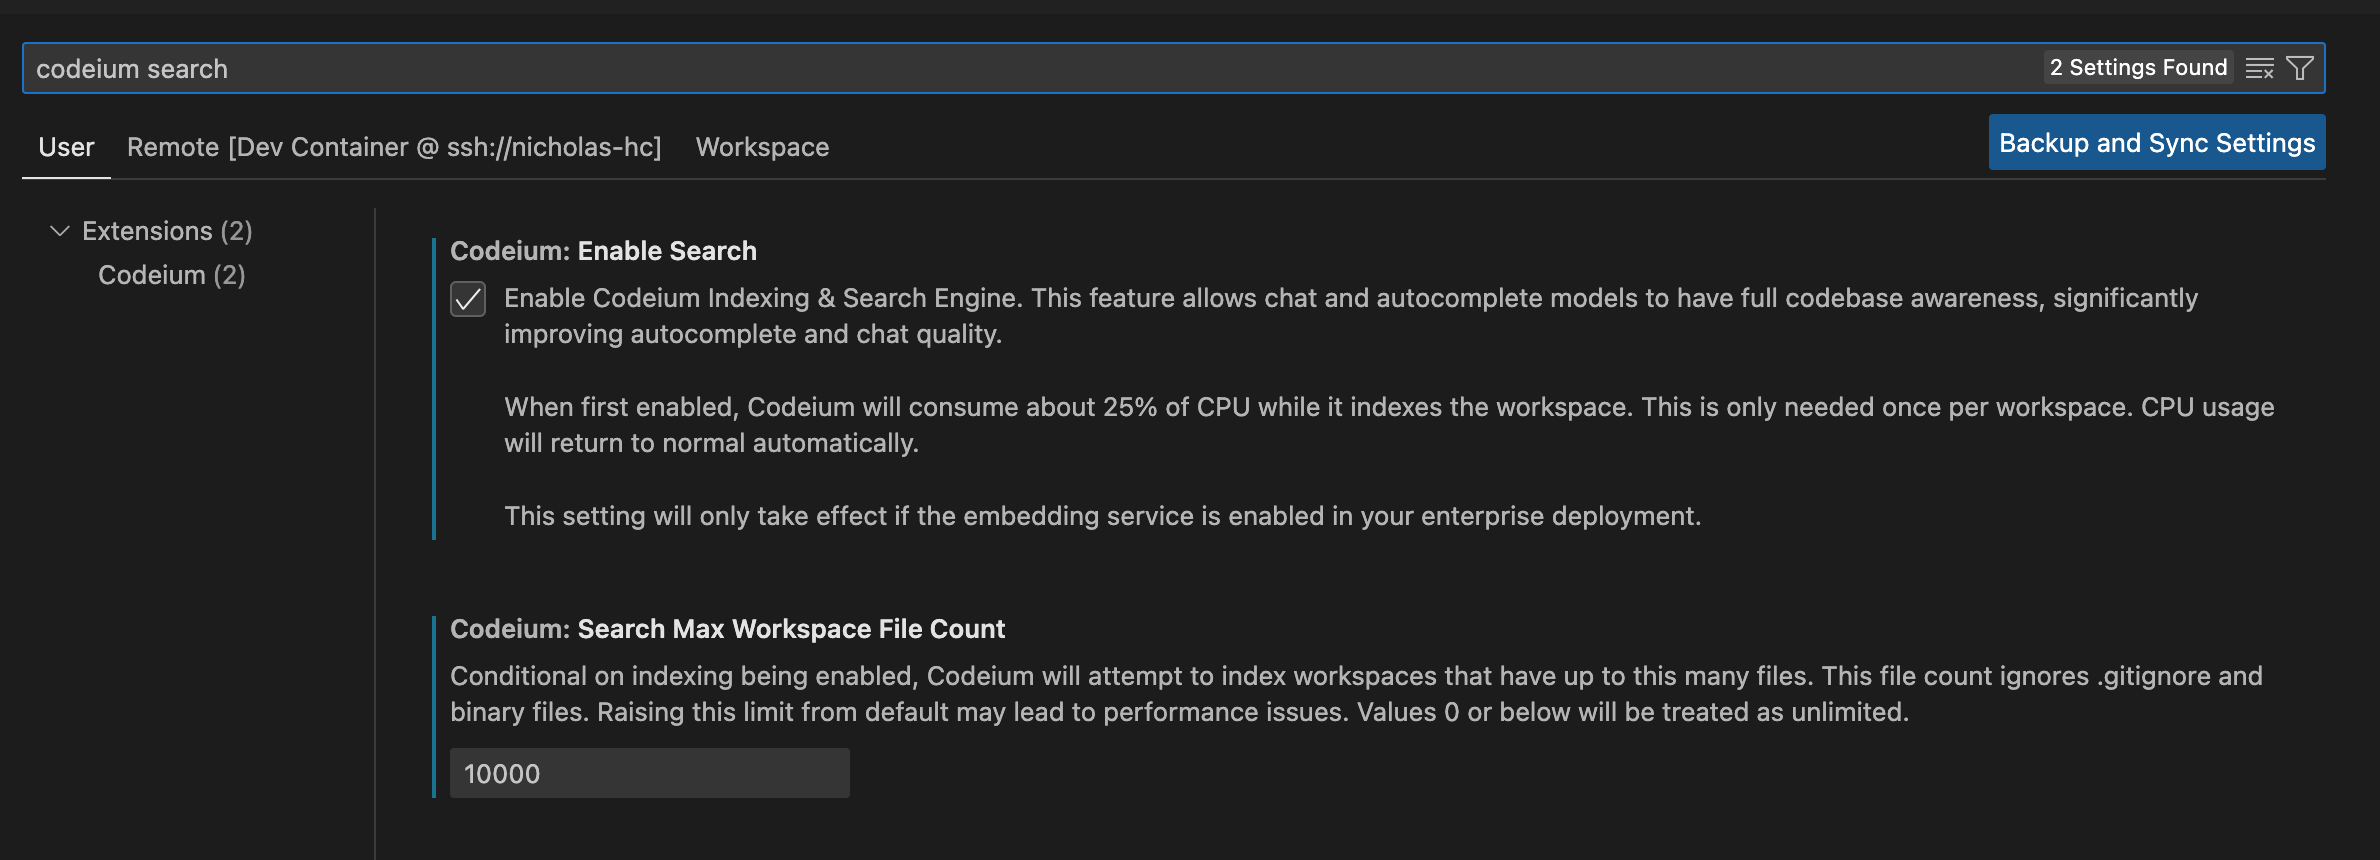 You can see if your workspace is indexed by checking the "Context" pane in the "Chat" panel. If there is a green dot next to your workspace, then it is indexed and searchable.
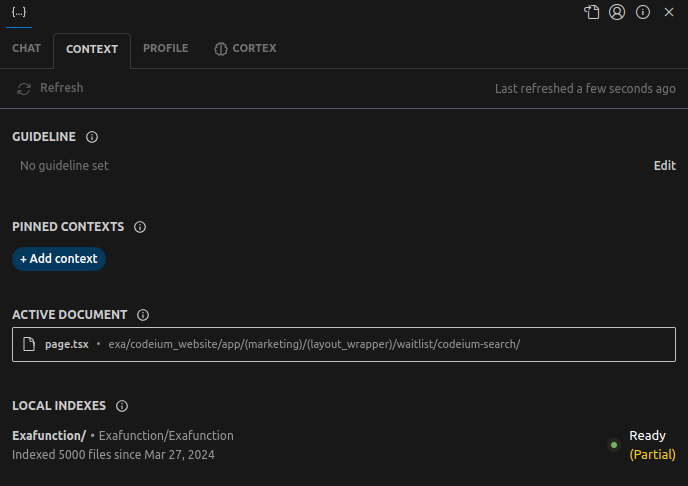

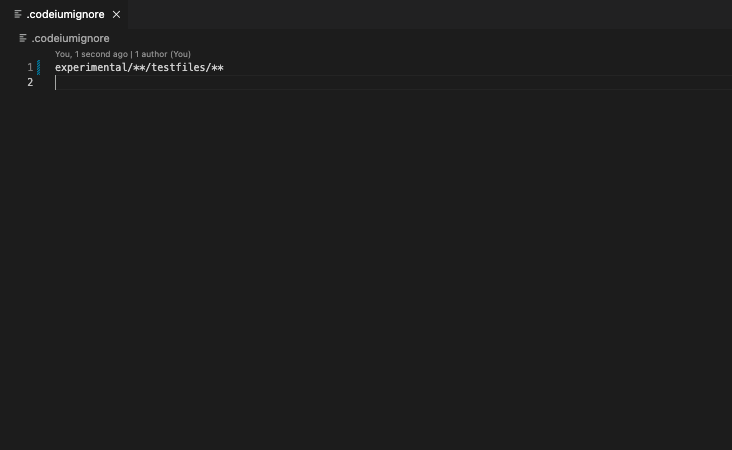 ## System Requirements
When first enabled, Codeium will consume a fraction of CPU while it indexes the workspace. Depending on your workspace size, this should take 5-10 minutes, and only needs to happen once per workspace. CPU usage will return to normal automatically. Codeium Indexing also requires RAM (\~300MB for a 5000-file workspace).
The "Max Workspace Size (File Count)" setting determines the largest workspace for which Codeium Indexing will try to index a particular workspace / module. If your workspace does not appear to be indexed, please try adjusting this number higher. For users with \~10GB of RAM, we recommend setting this no higher than 10,000 files.
# Overview
Source: https://docs.codeium.com/context-awareness/overview
On codebase context and related features
Codeium's context engine builds a deep understanding of your codebase, past actions, and next intent.
Historically, code-generation approaches focused on fine-tuning large language models (LLMs) on a codebase,
which is difficult to scale to the needs of every individual user.
A more recent and popular approach leverages retrieval-augmented generation (RAG),
which focuses on techniques to construct highly relevant, context-rich prompts
to elicit accurate answers from an LLM.
We've implemented an optimized RAG approach to codebase context,
which produces higher quality suggestions and fewer hallucinations.
## System Requirements
When first enabled, Codeium will consume a fraction of CPU while it indexes the workspace. Depending on your workspace size, this should take 5-10 minutes, and only needs to happen once per workspace. CPU usage will return to normal automatically. Codeium Indexing also requires RAM (\~300MB for a 5000-file workspace).
The "Max Workspace Size (File Count)" setting determines the largest workspace for which Codeium Indexing will try to index a particular workspace / module. If your workspace does not appear to be indexed, please try adjusting this number higher. For users with \~10GB of RAM, we recommend setting this no higher than 10,000 files.
# Overview
Source: https://docs.codeium.com/context-awareness/overview
On codebase context and related features
Codeium's context engine builds a deep understanding of your codebase, past actions, and next intent.
Historically, code-generation approaches focused on fine-tuning large language models (LLMs) on a codebase,
which is difficult to scale to the needs of every individual user.
A more recent and popular approach leverages retrieval-augmented generation (RAG),
which focuses on techniques to construct highly relevant, context-rich prompts
to elicit accurate answers from an LLM.
We've implemented an optimized RAG approach to codebase context,
which produces higher quality suggestions and fewer hallucinations.
 ### Best Practices
Context Pinning is great when your task in your current file depends on information from other files.
Try to pin only what you need. Pinning too much may slow down or negatively impact model performance.
Here are some ideas for effective context pinning:
* Module Definitions: pinning class/struct definition files that are inside your repo but in a module separate from your currently active file.
* Internal Frameworks/Libraries: pinning directories with code examples for using frameworks/libraries.
* Specific Tasks: pinning a file or folder defining a particular interface (e.g., `.proto` files, abstract class files, config templates).
* Current Focus Area: pinning the "lowest common denominator" directory containing the majority of files needed for your current coding session.
* Testing: pinning a particular file with the class you are writing unit tests for.
## Chat-Specific Context Features
When conversing with Codeium Chat, you have various ways of leveraging codebase context,
like [@-mentions](/chat/overview/#mentions) or custom guidelines.
See the [Chat page](/chat/overview) for more information.
## Frequently Asked Questions (FAQs)
### Does Codeium index my codebase?
Yes, Codeium does index your codebase. It also uses LLMs to perform retrieval-augmented generation (RAG) on your codebase using our own [M-Query](https://youtu.be/DuZXbinJ4Uc?feature=shared\&t=606) techniques.
Indexing performance and features vary based on your workflow and your Codeium plan. For more information, please visit our [context awareness page](https://codeium.com/context).
# Remote Indexing
Source: https://docs.codeium.com/context-awareness/remote-indexing
### Best Practices
Context Pinning is great when your task in your current file depends on information from other files.
Try to pin only what you need. Pinning too much may slow down or negatively impact model performance.
Here are some ideas for effective context pinning:
* Module Definitions: pinning class/struct definition files that are inside your repo but in a module separate from your currently active file.
* Internal Frameworks/Libraries: pinning directories with code examples for using frameworks/libraries.
* Specific Tasks: pinning a file or folder defining a particular interface (e.g., `.proto` files, abstract class files, config templates).
* Current Focus Area: pinning the "lowest common denominator" directory containing the majority of files needed for your current coding session.
* Testing: pinning a particular file with the class you are writing unit tests for.
## Chat-Specific Context Features
When conversing with Codeium Chat, you have various ways of leveraging codebase context,
like [@-mentions](/chat/overview/#mentions) or custom guidelines.
See the [Chat page](/chat/overview) for more information.
## Frequently Asked Questions (FAQs)
### Does Codeium index my codebase?
Yes, Codeium does index your codebase. It also uses LLMs to perform retrieval-augmented generation (RAG) on your codebase using our own [M-Query](https://youtu.be/DuZXbinJ4Uc?feature=shared\&t=606) techniques.
Indexing performance and features vary based on your workflow and your Codeium plan. For more information, please visit our [context awareness page](https://codeium.com/context).
# Remote Indexing
Source: https://docs.codeium.com/context-awareness/remote-indexing
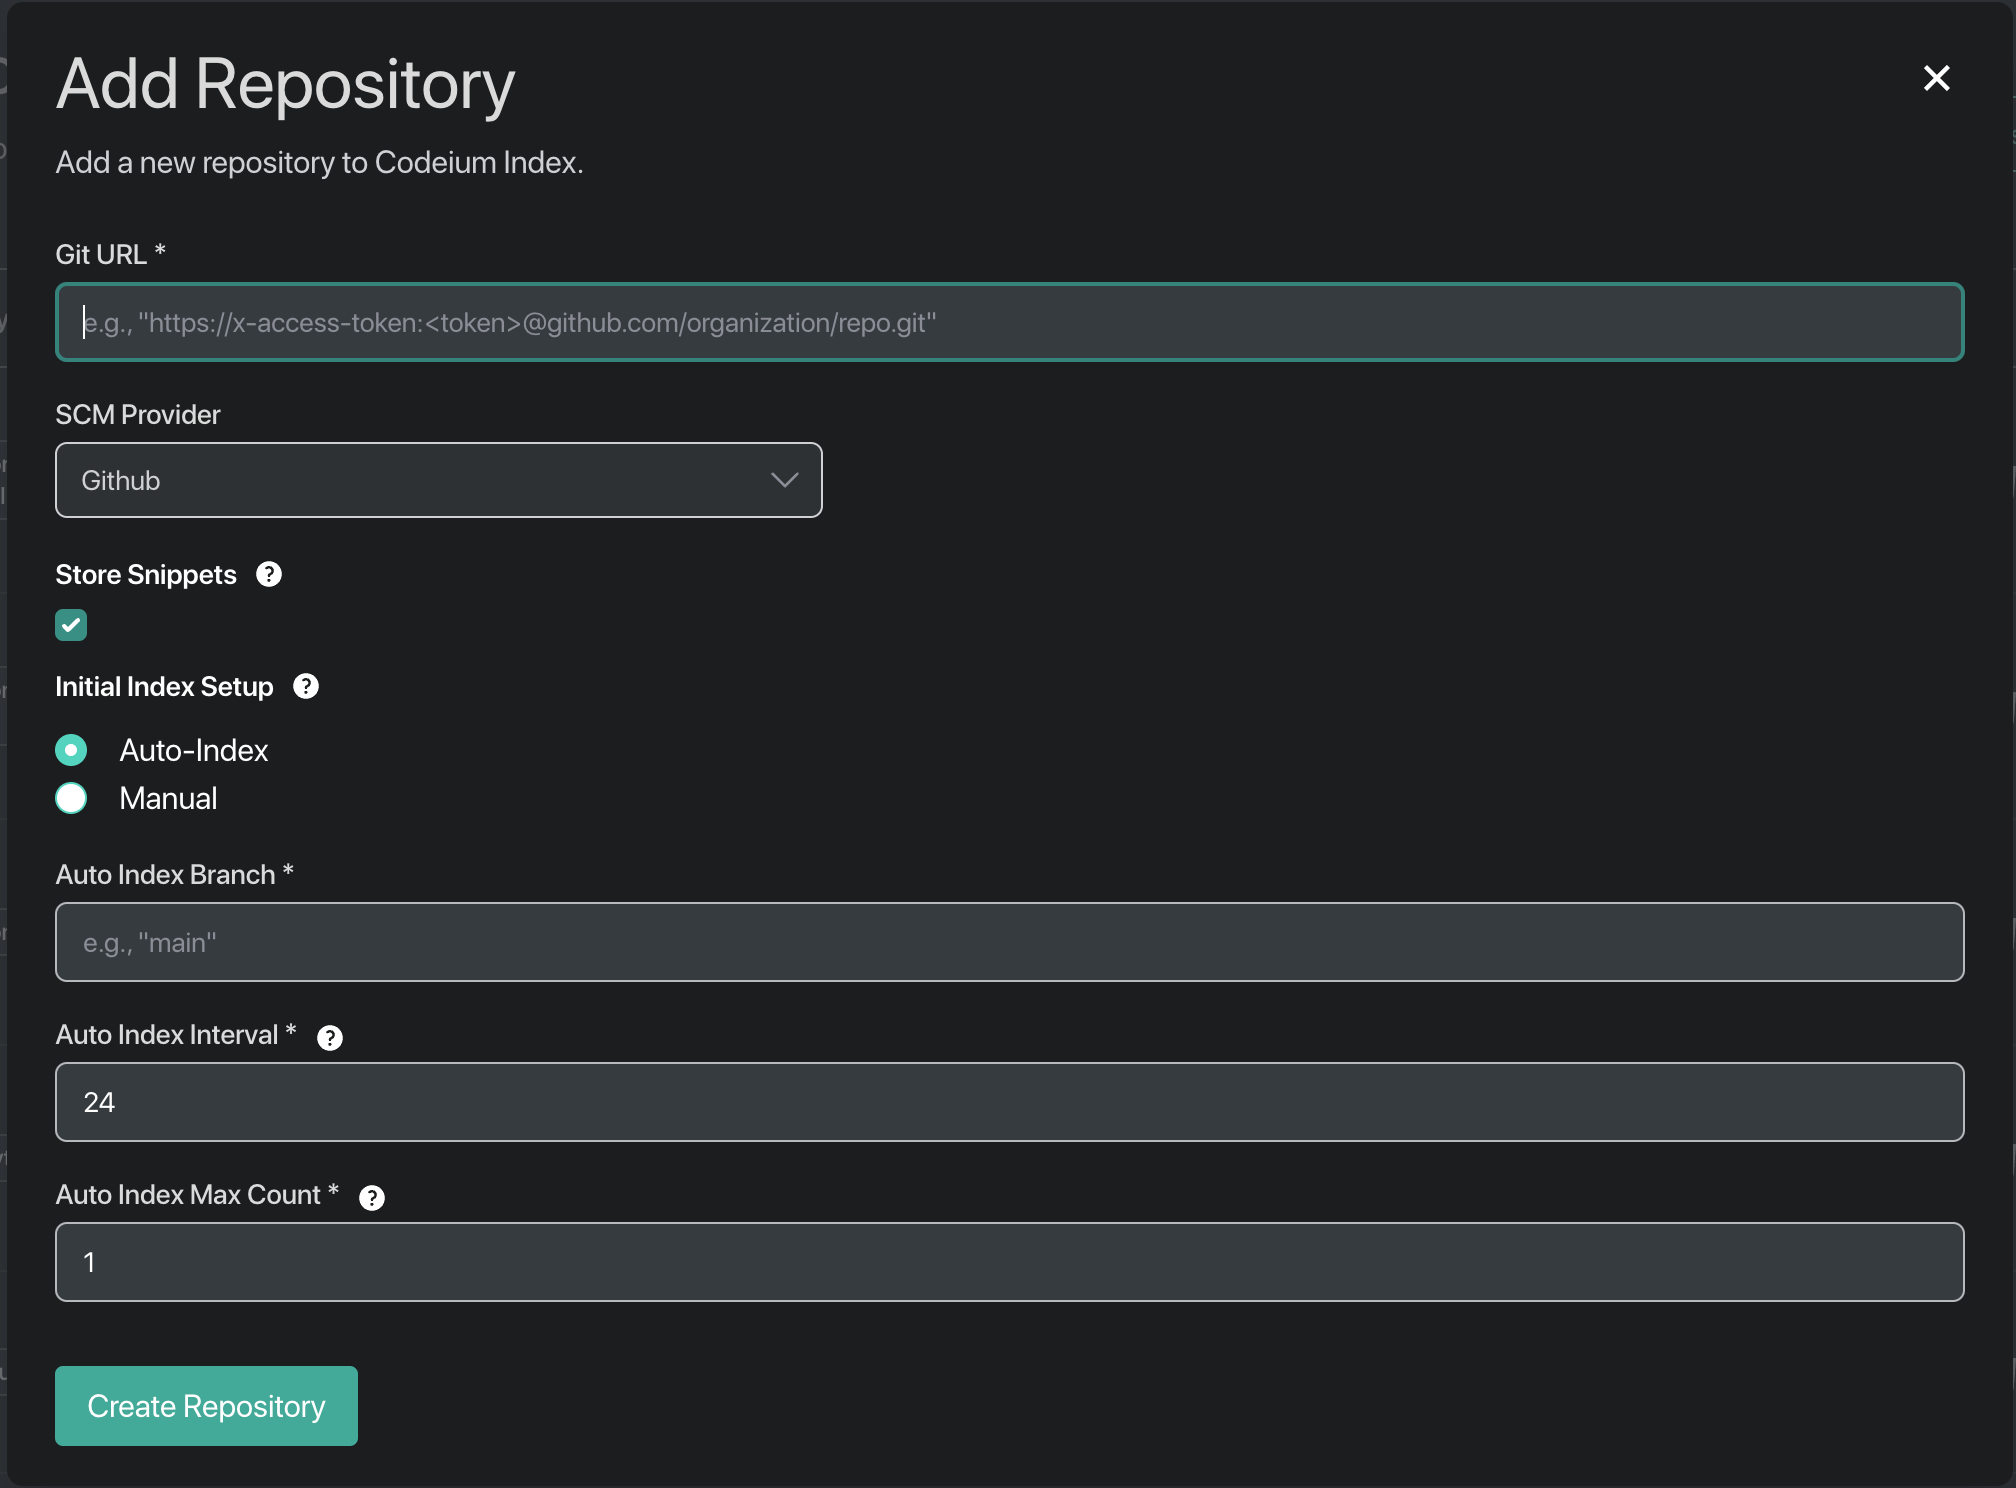 You can choose to index a particular branch and to automatically re-index the repository after some number of days.
## Security Guarantees
We clone the repository in order to create the index, but once we finish creating embeddings for the codebase we delete all the code and code snippets **assuming that the Store Snippets setting is unchecked.** We don't persist anything other than the embeddings themselves, from which you cannot derive the original code.
Furthermore, all indexing and embedding is performed on a single-tenant instance—nothing about the indexing process is shared between multiple Codeium Teams customers.
# Profile & Analytics (Teams)
Source: https://docs.codeium.com/extensions/analytics
## User Analytics
User analytics are available for viewing and sharing on your own [profile](https://codeium.com/profile) page.
See your completion stats, [refer](https://codeium.com/referral) your friends, look into your language breakdown,
and unlock achievement badges by using Codeium in your daily workflow.
## Team Analytics
You can choose to index a particular branch and to automatically re-index the repository after some number of days.
## Security Guarantees
We clone the repository in order to create the index, but once we finish creating embeddings for the codebase we delete all the code and code snippets **assuming that the Store Snippets setting is unchecked.** We don't persist anything other than the embeddings themselves, from which you cannot derive the original code.
Furthermore, all indexing and embedding is performed on a single-tenant instance—nothing about the indexing process is shared between multiple Codeium Teams customers.
# Profile & Analytics (Teams)
Source: https://docs.codeium.com/extensions/analytics
## User Analytics
User analytics are available for viewing and sharing on your own [profile](https://codeium.com/profile) page.
See your completion stats, [refer](https://codeium.com/referral) your friends, look into your language breakdown,
and unlock achievement badges by using Codeium in your daily workflow.
## Team Analytics
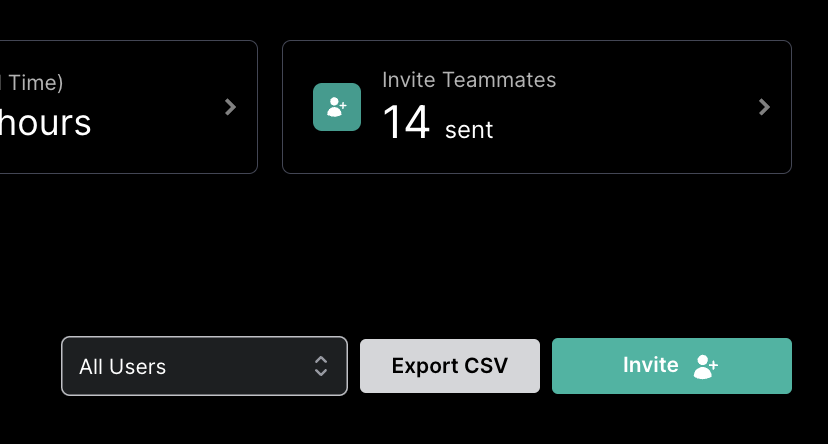 Then just invite by email or share the unique invite link!
## User Groups
Then just invite by email or share the unique invite link!
## User Groups
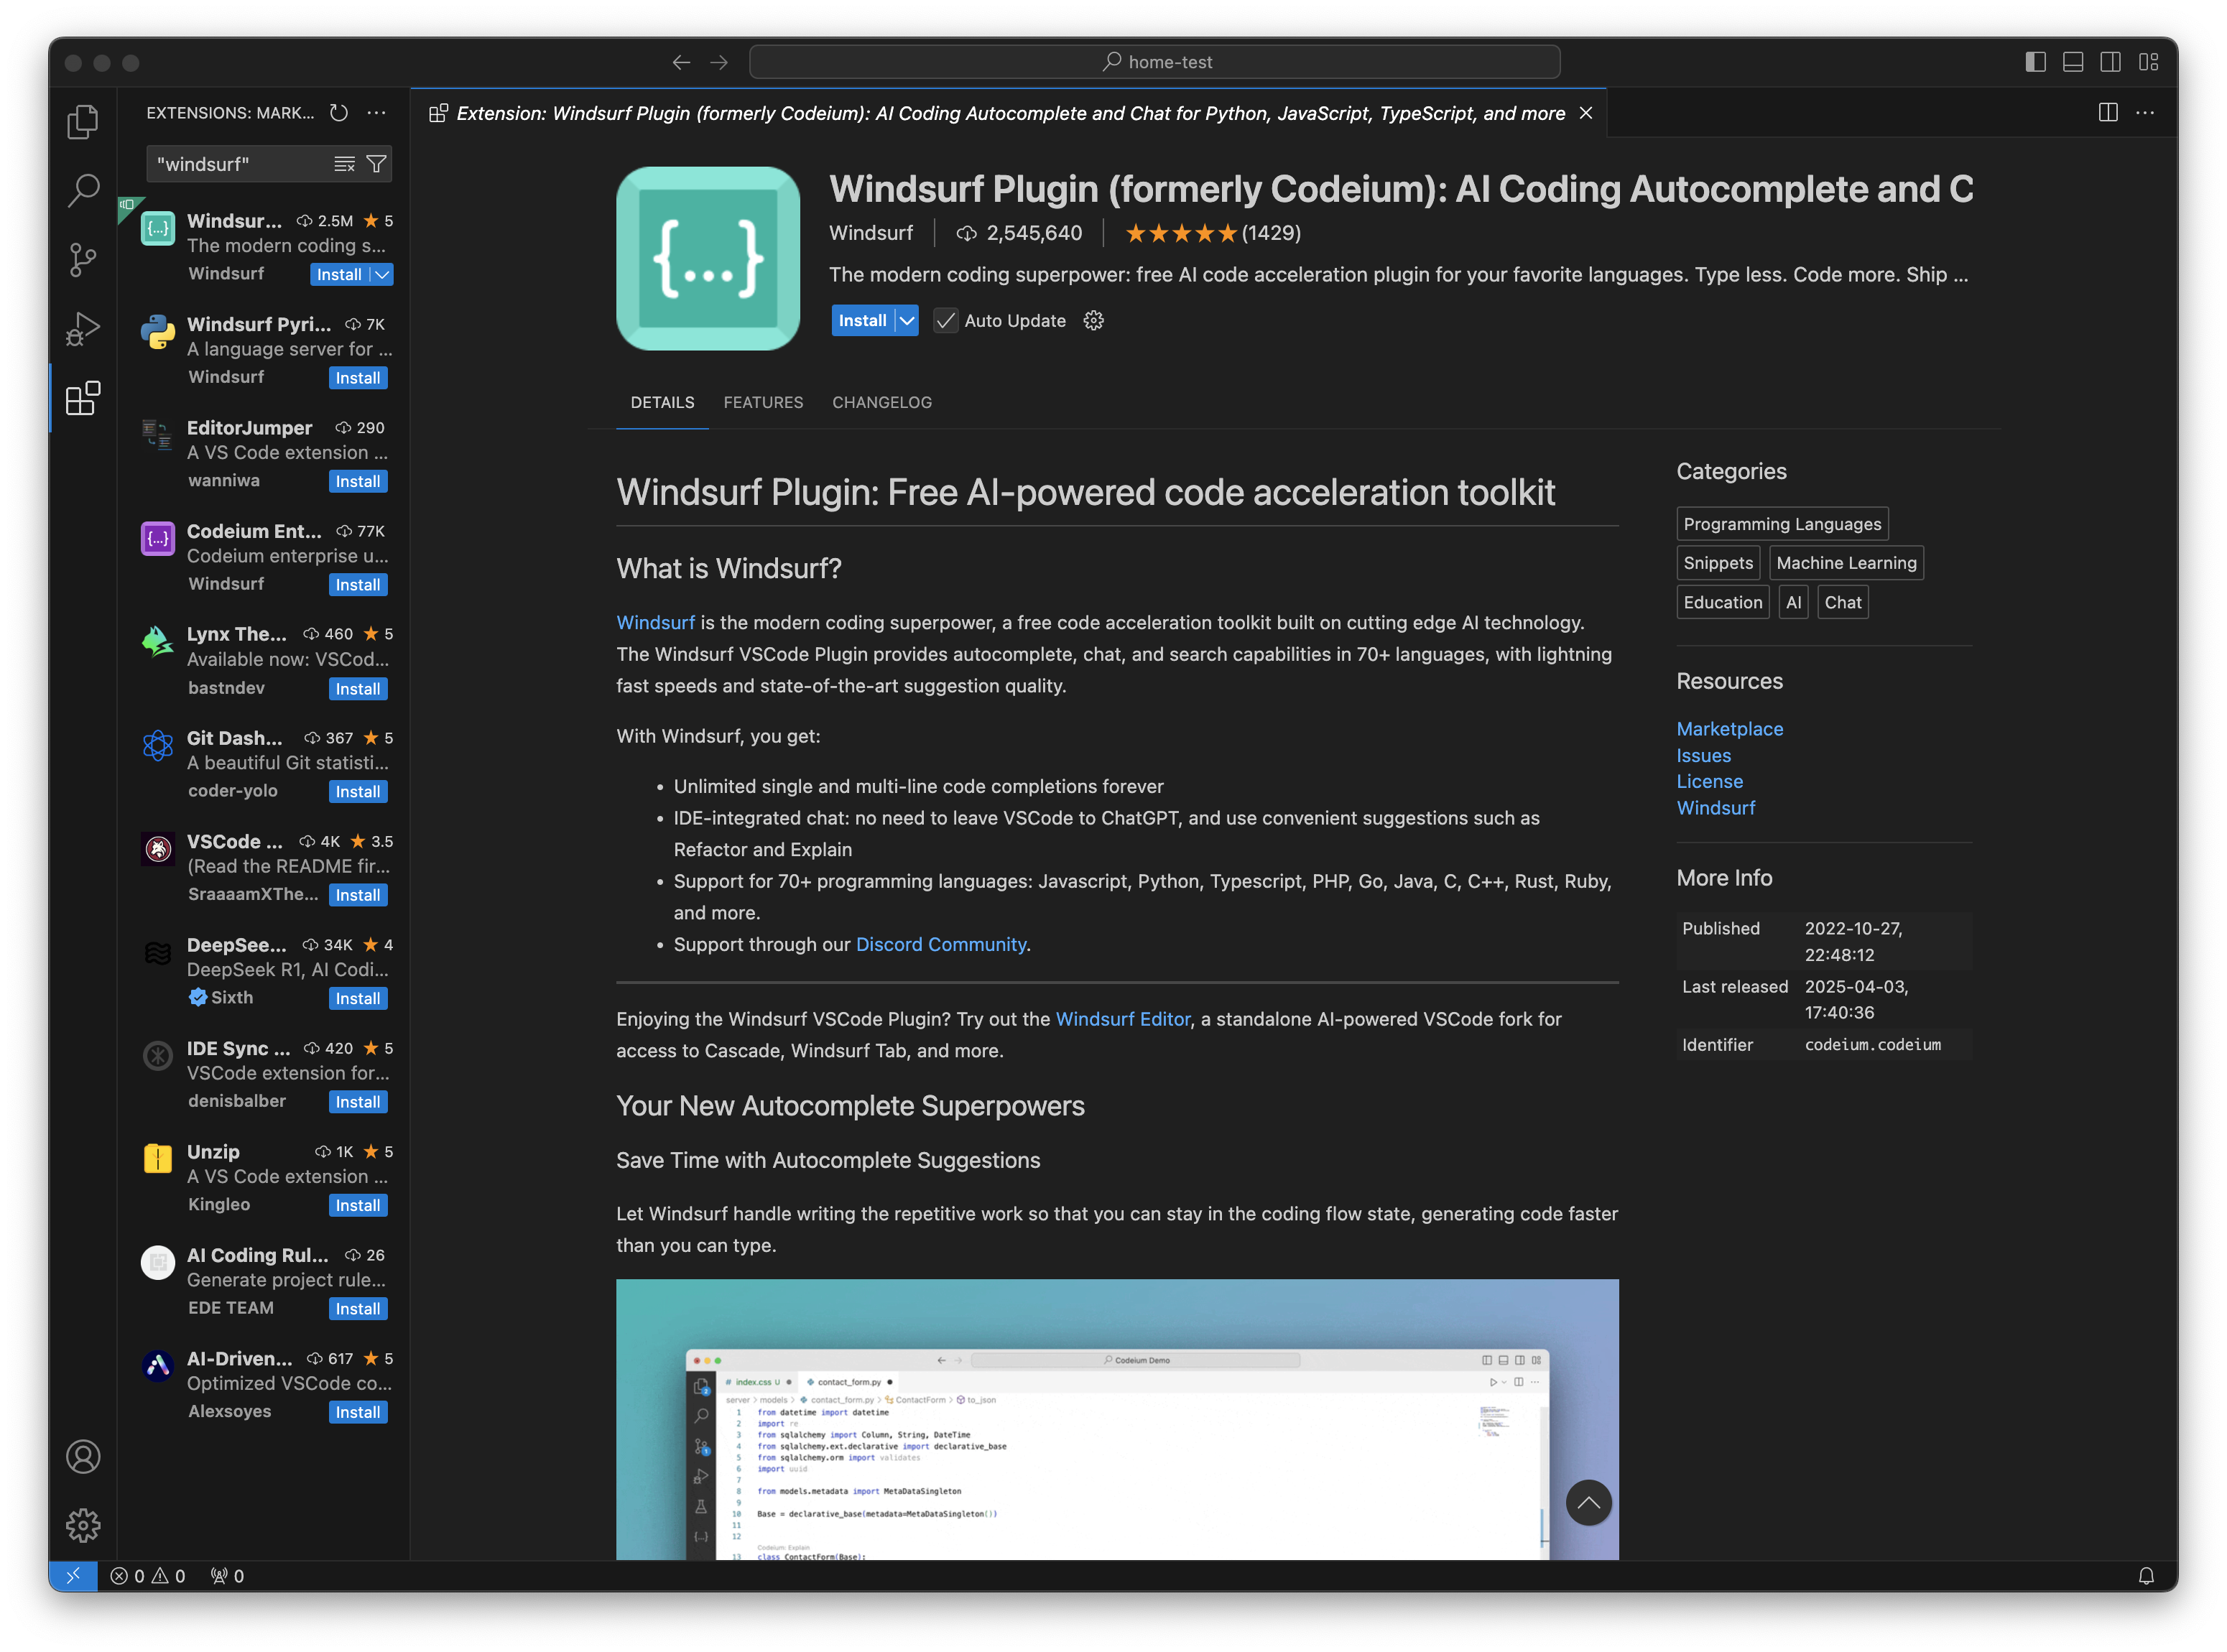

 Once you sign in, you will be redirected back to Visual Studio Code via pop-up.

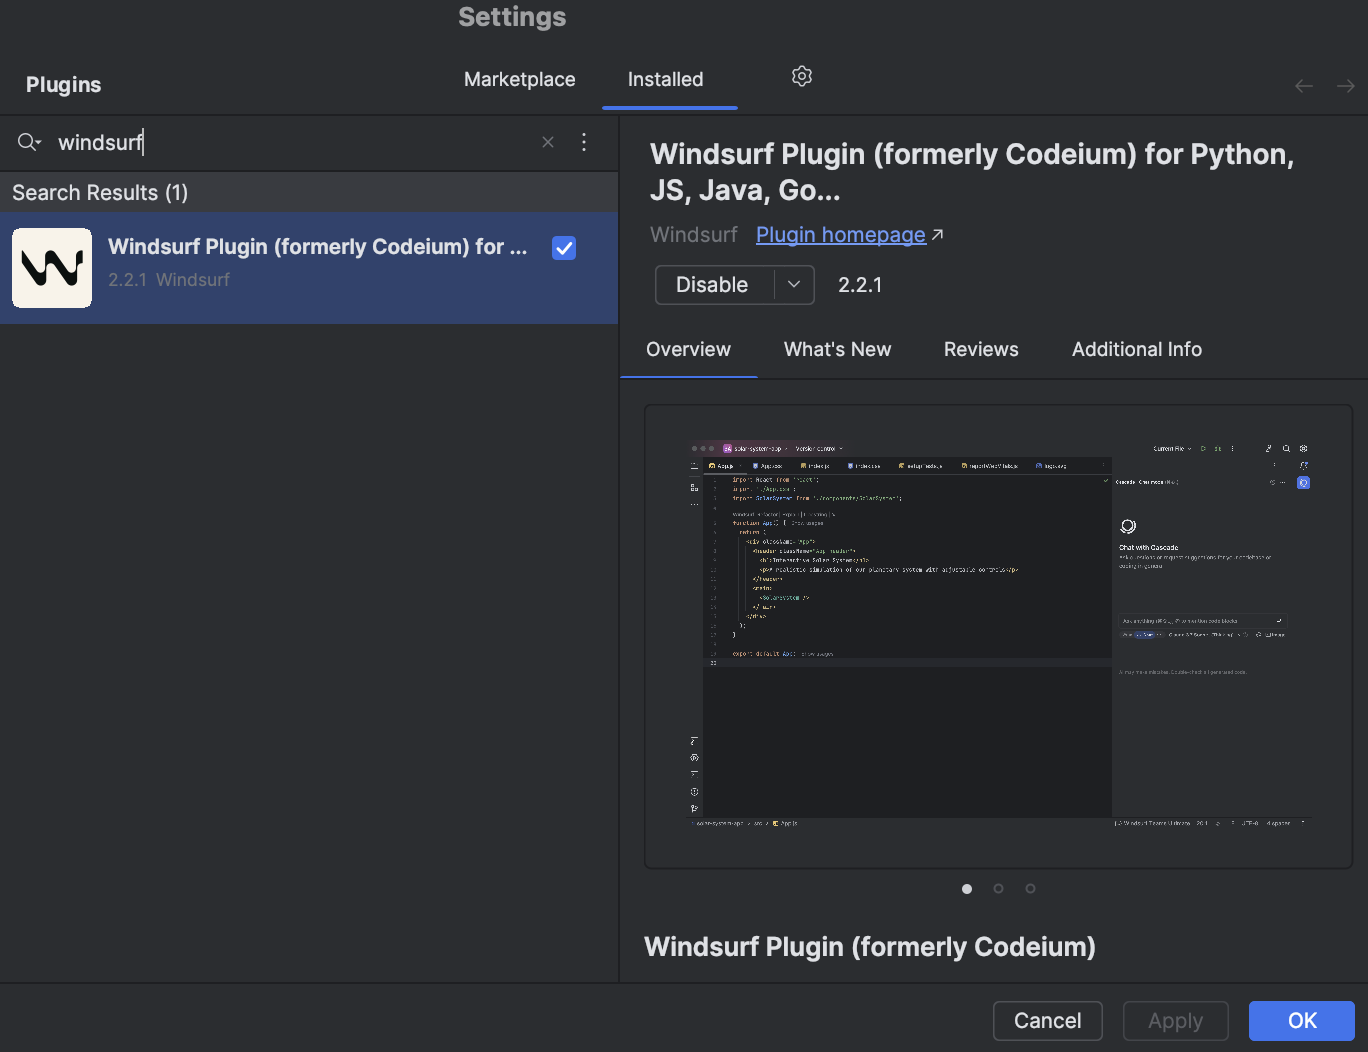
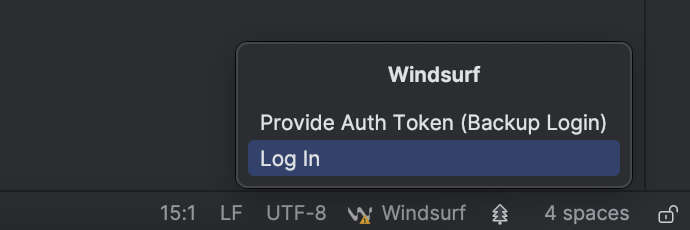 If you do not have an account or otherwise are not already logged in online, you will be prompted to login.


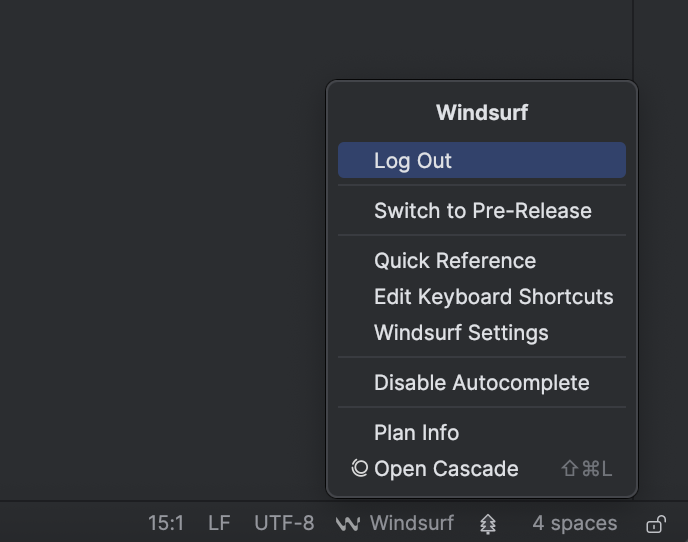
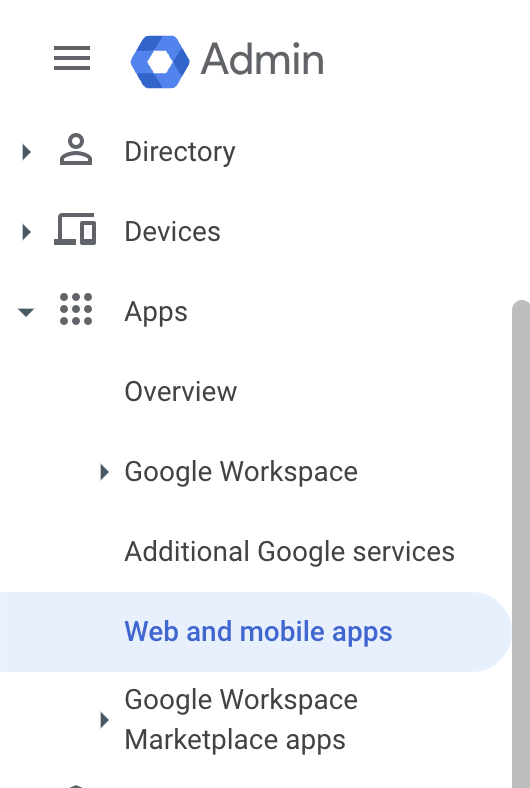 Click on **Add app**, and then **Add custom SAML app**.
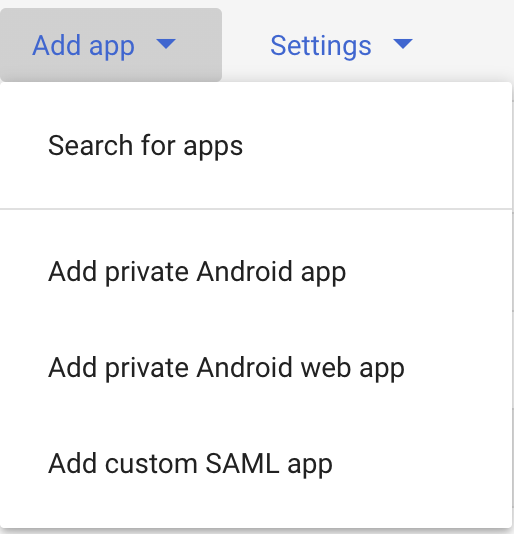 Fill out **App name** with `Codeium`, and click **Next**.
The next screen (Google Identity Provider details) on Google’s console page has data you’ll need to copy to Codeium’s SSO settings on [www.codeium.com/team/team\_settings](http://www.codeium.com/team/team_settings).
* Copy **SSO URL** from Google’s console page to Codeium’s settings under **SSO URL**
* Copy **Entity ID** from Google’s console page to Codeium’s settings under **Idp Entity ID**
* Copy **Certificate** from Google’s console page to Codeium’s settings under **X509 Certificate**
* Click **Continue** on Google’s console page
The next screen on Google’s console page requires you to copy data from Codeium’s settings page
* Copy **Callback URL** from Codeium’s settings page to Google’s console page under **ACS URL**
* Copy **SP Entity ID** from Codeium’s settings page to Google’s console page under **SP Entity ID**
* Change **Name ID** format to **EMAIL**
* Click **Continue** on Google’s console page
The next screen on Google’s console page requires some configuration
* Click on **Add Mapping**, select **First name** and set the **App attributes** to **firstName**
* Click on **Add Mapping**, select **Last name** and set the **App attributes** to **lastName**
* Click **Finish**
Fill out **App name** with `Codeium`, and click **Next**.
The next screen (Google Identity Provider details) on Google’s console page has data you’ll need to copy to Codeium’s SSO settings on [www.codeium.com/team/team\_settings](http://www.codeium.com/team/team_settings).
* Copy **SSO URL** from Google’s console page to Codeium’s settings under **SSO URL**
* Copy **Entity ID** from Google’s console page to Codeium’s settings under **Idp Entity ID**
* Copy **Certificate** from Google’s console page to Codeium’s settings under **X509 Certificate**
* Click **Continue** on Google’s console page
The next screen on Google’s console page requires you to copy data from Codeium’s settings page
* Copy **Callback URL** from Codeium’s settings page to Google’s console page under **ACS URL**
* Copy **SP Entity ID** from Codeium’s settings page to Google’s console page under **SP Entity ID**
* Change **Name ID** format to **EMAIL**
* Click **Continue** on Google’s console page
The next screen on Google’s console page requires some configuration
* Click on **Add Mapping**, select **First name** and set the **App attributes** to **firstName**
* Click on **Add Mapping**, select **Last name** and set the **App attributes** to **lastName**
* Click **Finish**
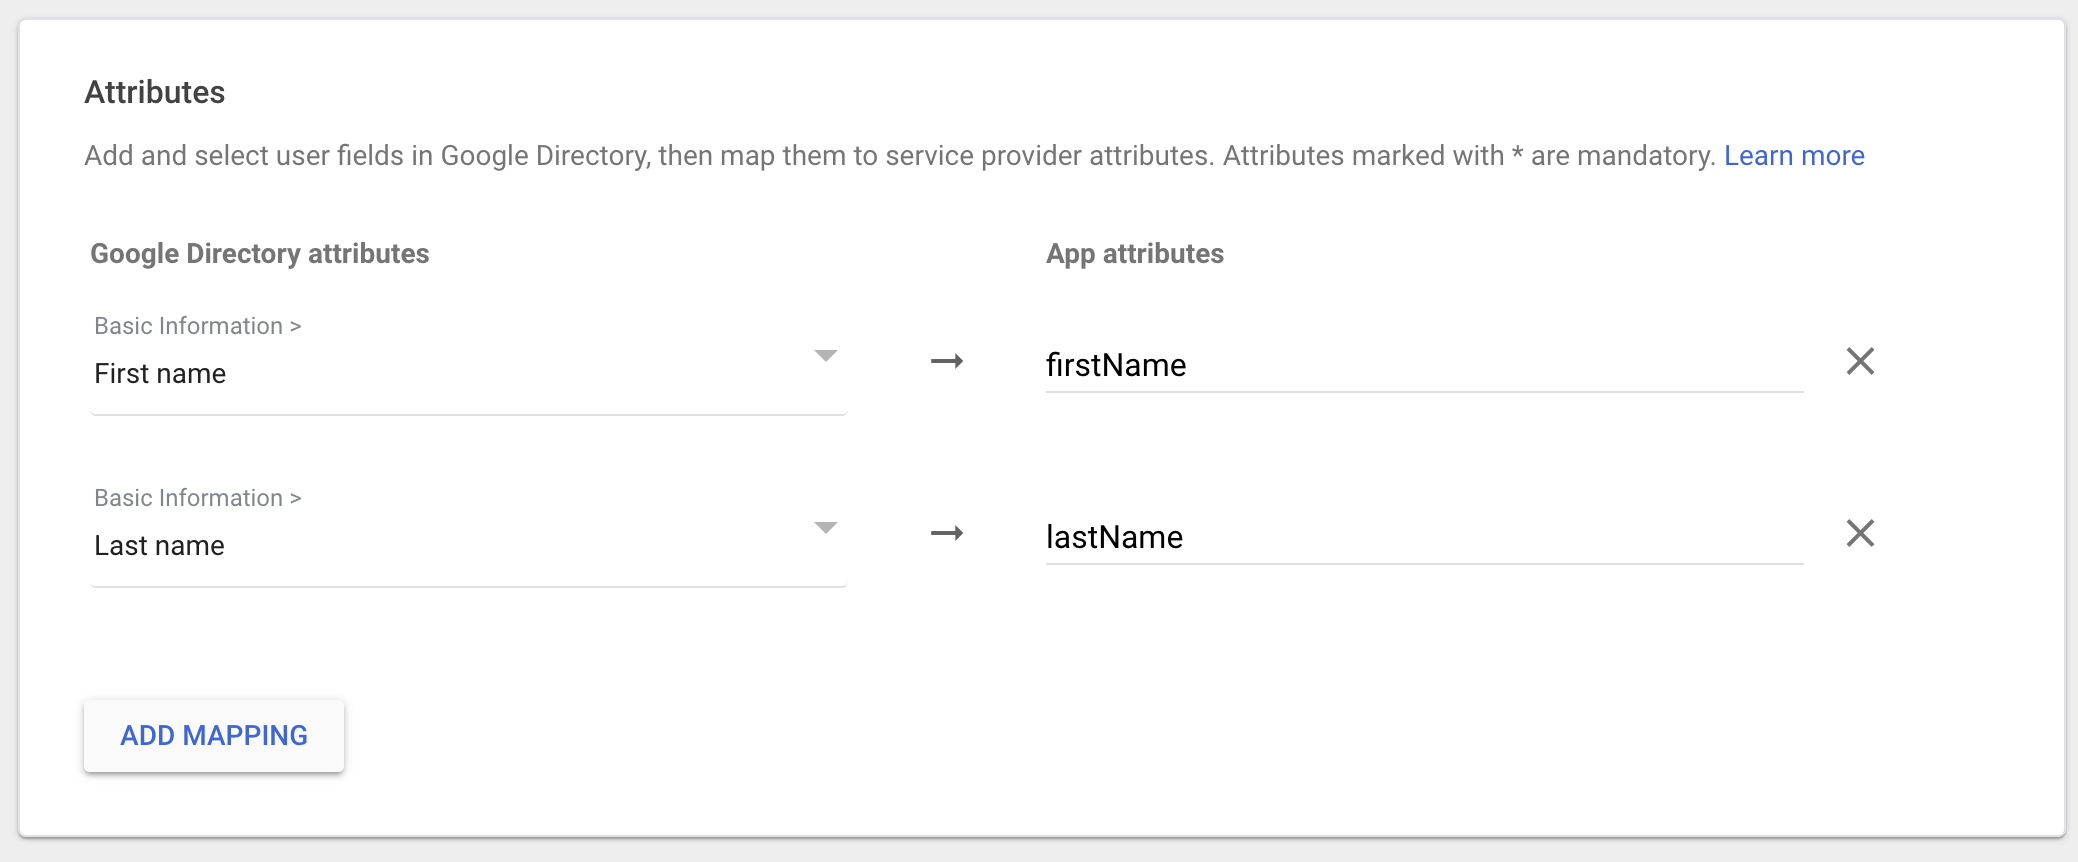 On Codeium’s settings page, click **Enable Login with SAML**, and then click **Save**. Make sure to click on **Test Login** to make sure login works as expected. All users now will have SSO login enforced.
 Click on **Create your own application**.
 Name your application **Codeium**, select *Integrate any other application you don’t find in the gallery*, and then click **Create**.
 Configure your enterprise application with SAML
* Click on Set up single sign on in the new Codeium application, and then Click on SAML
* Click on Edit under Basic SAML Configuration, and open up the Codeium Teams SSO settings at [https://www.codeium.com/team/team\_settings](https://www.codeium.com/team/team_settings)
* On Entra’s SAML configuration form and Codeium SSO settings page
* For Identifier (Entity ID), copy the SP Entity ID value in the SSO settings page
* For Reply URL (Assertion Consumer Service URL), copy the Callback URL value in the SSO settings page
* Click Save at the top
* Pick the SSO ID you want to use, which creates a login portal for your team. Note that this is not changeable after this is saved.
* Fill out IdP Entity ID in the settings page with the value in Entra ID under Set up Codeium -> Microsoft Entra Identifier
* Fill out SSO URL in the settings page with the value in Entra ID under Login URL
* Download the SAML certificate (Base64), get the text content of the file, and paste it to X509 Certificate on the Codeium settings page
* Click on Enable Login with SAML
* Click Save in the Codeium settings page
* We also need to set up name claims. This step is important in order for Codeium to know the display name of the user.
* Under Attributes & Claims under Entra ID, click on Edit
* Create 2 new claims. You can do so by clicking on Add new claim
* The first claim should have ‘firstName’ as the Name, and ‘user.givenname’ as the Source attribute
* The second claim should have ‘lastName’ as the Name, and ‘user.surname’ as the Source attribute
* At this point you should have successfully configured SSO. Under Save in the settings page, click on Test Login to make sure everything works as expected.
Configure your enterprise application with SAML
* Click on Set up single sign on in the new Codeium application, and then Click on SAML
* Click on Edit under Basic SAML Configuration, and open up the Codeium Teams SSO settings at [https://www.codeium.com/team/team\_settings](https://www.codeium.com/team/team_settings)
* On Entra’s SAML configuration form and Codeium SSO settings page
* For Identifier (Entity ID), copy the SP Entity ID value in the SSO settings page
* For Reply URL (Assertion Consumer Service URL), copy the Callback URL value in the SSO settings page
* Click Save at the top
* Pick the SSO ID you want to use, which creates a login portal for your team. Note that this is not changeable after this is saved.
* Fill out IdP Entity ID in the settings page with the value in Entra ID under Set up Codeium -> Microsoft Entra Identifier
* Fill out SSO URL in the settings page with the value in Entra ID under Login URL
* Download the SAML certificate (Base64), get the text content of the file, and paste it to X509 Certificate on the Codeium settings page
* Click on Enable Login with SAML
* Click Save in the Codeium settings page
* We also need to set up name claims. This step is important in order for Codeium to know the display name of the user.
* Under Attributes & Claims under Entra ID, click on Edit
* Create 2 new claims. You can do so by clicking on Add new claim
* The first claim should have ‘firstName’ as the Name, and ‘user.givenname’ as the Source attribute
* The second claim should have ‘lastName’ as the Name, and ‘user.surname’ as the Source attribute
* At this point you should have successfully configured SSO. Under Save in the settings page, click on Test Login to make sure everything works as expected.
 Select SAML 2.0 as the sign-in method
 Set the app name as Codeium (or to any other name), and click Next
Configure the SAML settings as
* Single sign-on URL to [https://auth.codeium.com/\_\_/auth/handler](https://auth.codeium.com/__/auth/handler)
* Audience URI (SP Entity ID) to [www.codeium.com](http://www.codeium.com)
* NameID format to EmailAddress
* Application username to Email
Configure the attribute statements as following, and then click **Next**.
Set the app name as Codeium (or to any other name), and click Next
Configure the SAML settings as
* Single sign-on URL to [https://auth.codeium.com/\_\_/auth/handler](https://auth.codeium.com/__/auth/handler)
* Audience URI (SP Entity ID) to [www.codeium.com](http://www.codeium.com)
* NameID format to EmailAddress
* Application username to Email
Configure the attribute statements as following, and then click **Next**.
 In the feedback section, select “This is an internal app that we have created”, and click **Finish**.
### Register Okta as a SAML provider
You should be redirected to the Sign on tab under your custom SAML application. Now you’ll want to take the info in this page and fill it out in Codeium’s SSO settings.
* Open [www.codeium.com/team/team\_settings](http://www.codeium.com/team/team_settings), and click on Configure SAML
* Copy the text after ‘Issuer’ in Okta’s application page and paste it under Idp Entity ID
* Copy the text after ‘Sign on URL’ in Okta’s application page and paste it under SSO URL
* Download the Signing Certificate and paste it under X509 certificate
* Check Enable Login with SAML and then click Save
* Test the login with the Test Login button. You should see a success message:
In the feedback section, select “This is an internal app that we have created”, and click **Finish**.
### Register Okta as a SAML provider
You should be redirected to the Sign on tab under your custom SAML application. Now you’ll want to take the info in this page and fill it out in Codeium’s SSO settings.
* Open [www.codeium.com/team/team\_settings](http://www.codeium.com/team/team_settings), and click on Configure SAML
* Copy the text after ‘Issuer’ in Okta’s application page and paste it under Idp Entity ID
* Copy the text after ‘Sign on URL’ in Okta’s application page and paste it under SSO URL
* Download the Signing Certificate and paste it under X509 certificate
* Check Enable Login with SAML and then click Save
* Test the login with the Test Login button. You should see a success message:
 At this point everything should have been configured, and can now add users to the new Codeium Okta application.
You should share your organization's custom Login Portal URL with your users and ask them to sign in via that link.
At this point everything should have been configured, and can now add users to the new Codeium Okta application.
You should share your organization's custom Login Portal URL with your users and ask them to sign in via that link.
 Users who login to Codeium via SSO will be auto-approved into the team.
### Caveats
Note that Codeium does not currently support IDP-initiated login flows.
We also do not yet support OIDC.
# Troubleshooting
### Login with SAML config failed: Firebase: Error (auth/operation-not-allowed)
Users who login to Codeium via SSO will be auto-approved into the team.
### Caveats
Note that Codeium does not currently support IDP-initiated login flows.
We also do not yet support OIDC.
# Troubleshooting
### Login with SAML config failed: Firebase: Error (auth/operation-not-allowed)
 This points to your an invalid SSO ID, or your SSO URL being incorrect, make sure it is alphanumeric and has no extra spaces or invalid characters. Please go over the steps in the guide again and make sure you use the correct values.
### Login with SAML config failed: Firebase: SAML Response \
This points to your an invalid SSO ID, or your SSO URL being incorrect, make sure it is alphanumeric and has no extra spaces or invalid characters. Please go over the steps in the guide again and make sure you use the correct values.
### Login with SAML config failed: Firebase: SAML Response \ This points to your IdP entity ID being invalid, please make sure you copy it correctly from the Okta portal, without any extra characters or spaces before or after the string.
### Failed to verify the signature in samlresponse
This points to an incorrect value of your X509 certificate, please make sure you copy the correct key, and that it is formatted as:
```
-----BEGIN CERTIFICATE-----
value
------END CERTIFICATE------
```
This points to your IdP entity ID being invalid, please make sure you copy it correctly from the Okta portal, without any extra characters or spaces before or after the string.
### Failed to verify the signature in samlresponse
This points to an incorrect value of your X509 certificate, please make sure you copy the correct key, and that it is formatted as:
```
-----BEGIN CERTIFICATE-----
value
------END CERTIFICATE------
```
 ## Step 2: Setup SCIM provisioning
Click on Get started under Provision User Accounts in the middle (step 3), and then click on Get started again.
## Step 2: Setup SCIM provisioning
Click on Get started under Provision User Accounts in the middle (step 3), and then click on Get started again.
 Under the Provisioning setup page, select the following options.
Provisioning Mode: Automatic
Admin Credentials > Tenant URL: [https://server.codeium.com/scim/v2](https://server.codeium.com/scim/v2)
Leave the Azure provisioning page open, now go to the Codeium enterprise portal, and click on Settings in the NavBar on the top of the page. Under SCIM, click on Add API Key. Enter any key name (such as 'Azure Provisioning Key') and click Create API Key. Copy the output key, go back to the Azure page, paste it to Secret Token.
Under the Provisioning setup page, select the following options.
Provisioning Mode: Automatic
Admin Credentials > Tenant URL: [https://server.codeium.com/scim/v2](https://server.codeium.com/scim/v2)
Leave the Azure provisioning page open, now go to the Codeium enterprise portal, and click on Settings in the NavBar on the top of the page. Under SCIM, click on Add API Key. Enter any key name (such as 'Azure Provisioning Key') and click Create API Key. Copy the output key, go back to the Azure page, paste it to Secret Token.
 (What you should see after creating the key on Codeium)
On the Provisioning page, click on Test Connection and that should have verified the SCIM connection.
Now above the Provisioning form click on Save.
## Step 3: Configure SCIM Provisioning
After clicking on Save, a new option Mappings should have appeared in the Provisioning page. Expand Mappings, and click on Provision Microsoft Entra ID Users
(What you should see after creating the key on Codeium)
On the Provisioning page, click on Test Connection and that should have verified the SCIM connection.
Now above the Provisioning form click on Save.
## Step 3: Configure SCIM Provisioning
After clicking on Save, a new option Mappings should have appeared in the Provisioning page. Expand Mappings, and click on Provision Microsoft Entra ID Users
 Under attribute Mappings, delete all fields under displayName, leaving only the fields userName, active, and displayName.
 For active, now click on Edit. Under Expression, modify the field to
```
NOT([IsSoftDeleted])
```
Then click Ok.
Your user attributes should look like
For active, now click on Edit. Under Expression, modify the field to
```
NOT([IsSoftDeleted])
```
Then click Ok.
Your user attributes should look like
 In the Attribute Mapping page, click on Save on top, and navigate back to the Provisioning page.
Now click on the same page, under Mappings click on Provision Microsoft Entra ID Groups. Now only click delete for externalId, and click Save on top. Navigate back to the Provisioning page.
In the Attribute Mapping page, click on Save on top, and navigate back to the Provisioning page.
Now click on the same page, under Mappings click on Provision Microsoft Entra ID Groups. Now only click delete for externalId, and click Save on top. Navigate back to the Provisioning page.
 On the Provisioning page at the bottom, there should also be a Provisioning Status toggle. Set that to On to enable SCIM syncing. Now every 40 minutes your users and groups for the Entra ID application will be synced to Codeium.
 Click on Save to finish, you have now enabled user and group syncing for SCIM. Only users and groups assigned to the application will be synced to Codeium. Note that removing users only disables them access to Codeium (and stops them from taking up a seat) rather than deleting users due to Azure's SCIM design.
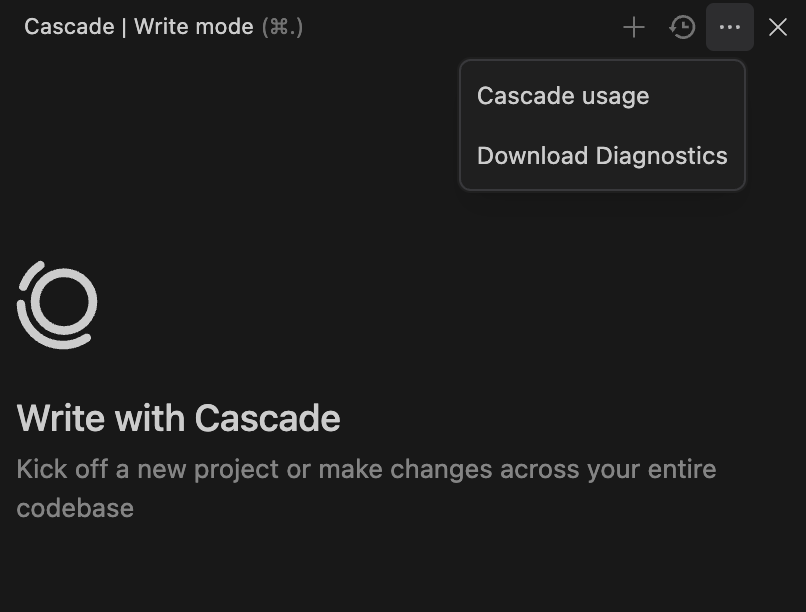
 5. Change the dropdown in the top right that reads "Extension Host" and select "Codeium"
6. Export or copy the logs
## JetBrains IDEs
Starting in extension version 1.10.0, the Chat Panel has an Extension Diagnostics button on the Settings page. This button will automatically collect relevant logs and parameters into a text file that can be downloaded.
1. Logs are written to the idea.log file. To locate this file, go to the Help > Show Log in Finder/Explorer menu option
2. Export or copy the logs
## Eclipse
In Eclipse, logs are written to the following paths:
* **Mac/Linux**: \~/.codeium/codeium.log
* **Windows**: C:\Users\
5. Change the dropdown in the top right that reads "Extension Host" and select "Codeium"
6. Export or copy the logs
## JetBrains IDEs
Starting in extension version 1.10.0, the Chat Panel has an Extension Diagnostics button on the Settings page. This button will automatically collect relevant logs and parameters into a text file that can be downloaded.
1. Logs are written to the idea.log file. To locate this file, go to the Help > Show Log in Finder/Explorer menu option
2. Export or copy the logs
## Eclipse
In Eclipse, logs are written to the following paths:
* **Mac/Linux**: \~/.codeium/codeium.log
* **Windows**: C:\Users\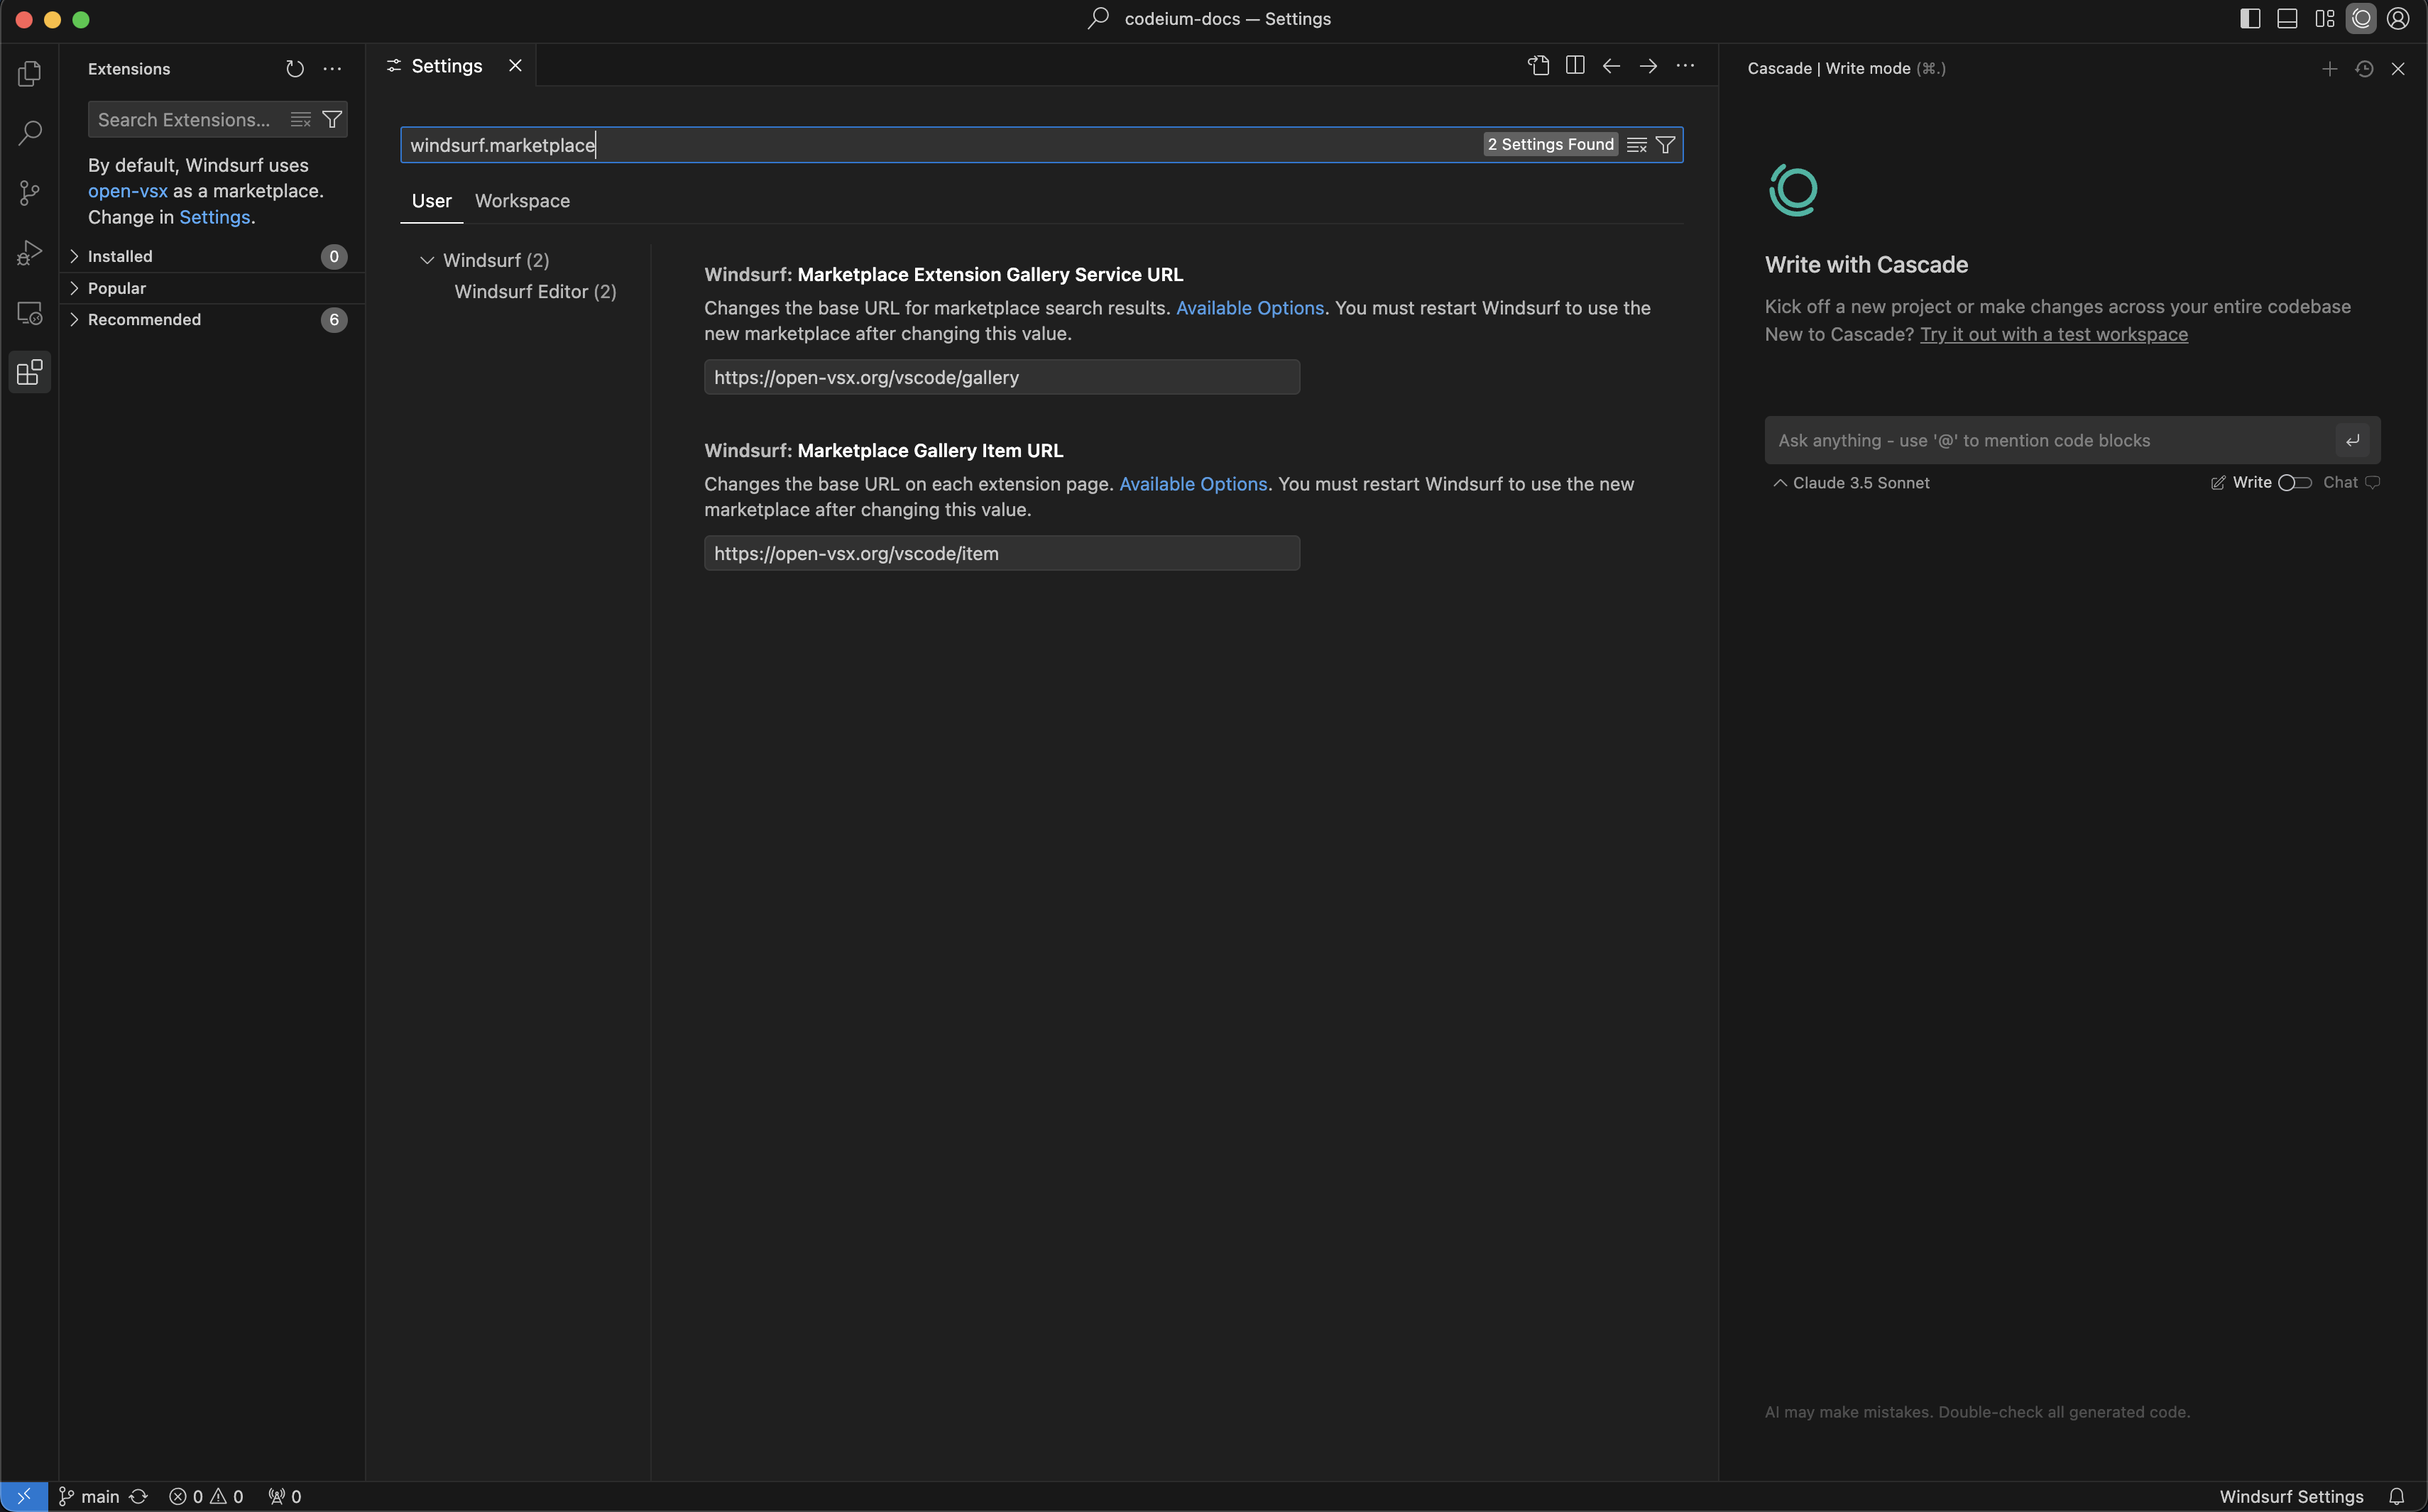 ### Windsurf Extensions
 # Send Problems to Cascade
When you have problems in your code which show up in the Problems panel at the bottom of the editor, simply click the "Send to Cascade" button to bring them into the Cascade panel as an @ mention.
# Send Problems to Cascade
When you have problems in your code which show up in the Problems panel at the bottom of the editor, simply click the "Send to Cascade" button to bring them into the Cascade panel as an @ mention.
 # Explain and Fix
For any errors that you run into from within the editor, you can simply highlight the error and click "Explain and Fix" to have Cascade fix it for you.
# Explain and Fix
For any errors that you run into from within the editor, you can simply highlight the error and click "Explain and Fix" to have Cascade fix it for you.
 # Ignoring files
If you'd like Cascade to ignore files, you can add your files to `.codeiumignore` at the root of your workspace. This will prevent Cascade from viewing, editing or creating files inside of the paths designated. You can declare the file paths in a format similar to `.gitignore`.
# Getting Started
Source: https://docs.codeium.com/windsurf/getting-started
Tomorrow's editor, today.
Windsurf is Codeium's next-generation AI IDE built to keep you in the flow. On this page, you'll find instructions on how to install Windsurf on your computer, navigate the onboarding flow, and get started with your first AI-powered project.
# Ignoring files
If you'd like Cascade to ignore files, you can add your files to `.codeiumignore` at the root of your workspace. This will prevent Cascade from viewing, editing or creating files inside of the paths designated. You can declare the file paths in a format similar to `.gitignore`.
# Getting Started
Source: https://docs.codeium.com/windsurf/getting-started
Tomorrow's editor, today.
Windsurf is Codeium's next-generation AI IDE built to keep you in the flow. On this page, you'll find instructions on how to install Windsurf on your computer, navigate the onboarding flow, and get started with your first AI-powered project.
 ### 1. Select setup flow
If you're coming from VS Code or Cursor, you can easily import your configurations. Otherwise, select "Start fresh". You can also optionally install `windsurf` in PATH such that you can run `windsurf` from your command line.
### 1. Select setup flow
If you're coming from VS Code or Cursor, you can easily import your configurations. Otherwise, select "Start fresh". You can also optionally install `windsurf` in PATH such that you can run `windsurf` from your command line.


 ### 3. Sign up / Log in
To use Windsurf, you need to use your Codeium account or create one if you don't have one. Signing up is completely free!
### 3. Sign up / Log in
To use Windsurf, you need to use your Codeium account or create one if you don't have one. Signing up is completely free!
 Once you've authenticated correctly, you should see this page. Hit "Open Windsurf" and you're good to go!
 #### Having Trouble?
If you're having trouble with this authentication flow, you can also log in and manually provide Windsurf with an authentication code.
#### Having Trouble?
If you're having trouble with this authentication flow, you can also log in and manually provide Windsurf with an authentication code.


 If you are not seeing this button, you can:
1. Click on your Profile icon dropdown > Check for Updates
2. In the Command Palette (`Cmd/Ctrl+Shift+P`) > "Check for Updates"
## Things to Try
Now that you've successfully opened Windsurf, let's try out some of the features! These are all conveniently accessible from the starting page. :)
If you are not seeing this button, you can:
1. Click on your Profile icon dropdown > Check for Updates
2. In the Command Palette (`Cmd/Ctrl+Shift+P`) > "Check for Updates"
## Things to Try
Now that you've successfully opened Windsurf, let's try out some of the features! These are all conveniently accessible from the starting page. :)
 On the right side of the IDE, you'll notice a new panel called "Cascade". This is your AI-powered code assistant! You can chat, write code, and run code with Cascade! Learn more about how it works [here](/windsurf/cascade).
 You can create brand new projects with Cascade! Click the "New Project" button to get started.
 You can open a folder or connect to a remote server via SSH or a local dev container. Learn more [here](/windsurf/advanced).
 Configure some of Windsurf's AI settings here. Want to slow down autocomplete speed or disable some features? You can do that here.
 You can open the command palette with the `⌘+⇧+P` (on Mac) or `Ctrl+Shift+P` (on Windows/Linux) shortcut. Explore the available commands!


 Clicking "Configure" will open the `mcp_config.json` file in the IDE.
Here's an example configuration, which sets up a single server for Google Maps:
```json
{
"mcpServers": {
"google-maps": {
"command": "npx",
"args": [
"-y",
"@modelcontextprotocol/server-google-maps"
],
"env": {
"GOOGLE_MAPS_API_KEY": "
Clicking "Configure" will open the `mcp_config.json` file in the IDE.
Here's an example configuration, which sets up a single server for Google Maps:
```json
{
"mcpServers": {
"google-maps": {
"command": "npx",
"args": [
"-y",
"@modelcontextprotocol/server-google-maps"
],
"env": {
"GOOGLE_MAPS_API_KEY": " See the [official MCP server reference repository](https://github.com/modelcontextprotocol/servers) or [OpenTools](https://opentools.com/) for some example servers.
## Notes
* Since MCP tool calls can invoke code written by arbitrary server implementers, we do not assume liability
for MCP tool call failures. To reiterate:
See the [official MCP server reference repository](https://github.com/modelcontextprotocol/servers) or [OpenTools](https://opentools.com/) for some example servers.
## Notes
* Since MCP tool calls can invoke code written by arbitrary server implementers, we do not assume liability
for MCP tool call failures. To reiterate:
 ### Multiple workspaces
If your window has multiple workspaces, all local rules will be used. If the total of your global rules and local rules exceed 12,000 characters, priority will be given to the global rules, followed by the workspace rules. Any rules beyond 12,000 characters will be truncated.
## Auto-generated Memories
During the course of your conversation with Cascade, Cascade will automatically generate and store memories if the context or information is determined to be useful for future conversations. Additionally, you can ask Cascade to create a memory at any time; this can be especially helpful for referencing and capturing conversational context as it happens.
When a memory is successfully generated, you will see a "Memory has been updated" notification at the bottom of Cascade's response that generated the memory. Additionally, you can click on "Manage" to open the Memories panel — your one-stop shop for all memory related content — to view and delete Cascade's memories.
### Multiple workspaces
If your window has multiple workspaces, all local rules will be used. If the total of your global rules and local rules exceed 12,000 characters, priority will be given to the global rules, followed by the workspace rules. Any rules beyond 12,000 characters will be truncated.
## Auto-generated Memories
During the course of your conversation with Cascade, Cascade will automatically generate and store memories if the context or information is determined to be useful for future conversations. Additionally, you can ask Cascade to create a memory at any time; this can be especially helpful for referencing and capturing conversational context as it happens.
When a memory is successfully generated, you will see a "Memory has been updated" notification at the bottom of Cascade's response that generated the memory. Additionally, you can click on "Manage" to open the Memories panel — your one-stop shop for all memory related content — to view and delete Cascade's memories.
 # Models
Source: https://docs.codeium.com/windsurf/models
Cascade has several different models for you to choose from.
In the Cascade panel `Ctrl/⌘ + L`, you can easily switch between different models of your choosing.
Under the text input box, you will see a model selection dropdown menu. You will see the following models available:
* GPT-4o
* Claude 3.5 Sonnet
* DeepSeek-V3
* DeepSeek-R1
* o3-mini (medium reasoning)
* Gemini 2.0 Flash
* Cascade Base ⚡ - Free!
# Premium Models
Due to the wide variation between the serving costs of each model, depending on the model you select, each of your input prompts will consume a different number of [User Prompt credits](/windsurf/usage#user-prompt-and-flow-action-credits).
Below you will find a breakdown of how many User Prompt credits you will be charged for each model:
| Model | User Prompt Credits | Free | Trial/Pro/Ultimate | Teams | Image Upload |
| :---------------: | :-----------------: | :--: | :----------------: | :---: | :----------: |
| GPT-4o | 1 | ✅ | ✅ | ✅ | ✅ |
| Claude 3.5 Sonnet | 1 | ✅ | ✅ | ✅ | ✅ |
| DeepSeek-V3 | 0.25 | ❌ | ✅ | ❌ | ❌ |
| DeepSeek-R1 | 0.5 | ❌ | ✅ | ❌ | ❌ |
| o3-mini (medium) | 1 | ❌ | ✅ | ✅ | ❌ |
| Gemini 2.0 Flash | 0.25 | ✅ | ✅ | ✅ | ❌ |
| Cascade Base ⚡ | 0 | ✅ | ✅ | ✅ | ❌ |
# Cascade Base ⚡
All users have unlimited access to Cascade Base, which does NOT consume any User Prompt OR Flow Action credits.
It is not quite as smart as the premium models, but it's fast, pretty accurate, and free.
# Terminal
Source: https://docs.codeium.com/windsurf/terminal
# Command in the terminal
Use our [Command](/command/overview) modality in the terminal (`Cmd/Ctrl+I`) to generate the proper CLI syntax from prompts in natural language.
# Models
Source: https://docs.codeium.com/windsurf/models
Cascade has several different models for you to choose from.
In the Cascade panel `Ctrl/⌘ + L`, you can easily switch between different models of your choosing.
Under the text input box, you will see a model selection dropdown menu. You will see the following models available:
* GPT-4o
* Claude 3.5 Sonnet
* DeepSeek-V3
* DeepSeek-R1
* o3-mini (medium reasoning)
* Gemini 2.0 Flash
* Cascade Base ⚡ - Free!
# Premium Models
Due to the wide variation between the serving costs of each model, depending on the model you select, each of your input prompts will consume a different number of [User Prompt credits](/windsurf/usage#user-prompt-and-flow-action-credits).
Below you will find a breakdown of how many User Prompt credits you will be charged for each model:
| Model | User Prompt Credits | Free | Trial/Pro/Ultimate | Teams | Image Upload |
| :---------------: | :-----------------: | :--: | :----------------: | :---: | :----------: |
| GPT-4o | 1 | ✅ | ✅ | ✅ | ✅ |
| Claude 3.5 Sonnet | 1 | ✅ | ✅ | ✅ | ✅ |
| DeepSeek-V3 | 0.25 | ❌ | ✅ | ❌ | ❌ |
| DeepSeek-R1 | 0.5 | ❌ | ✅ | ❌ | ❌ |
| o3-mini (medium) | 1 | ❌ | ✅ | ✅ | ❌ |
| Gemini 2.0 Flash | 0.25 | ✅ | ✅ | ✅ | ❌ |
| Cascade Base ⚡ | 0 | ✅ | ✅ | ✅ | ❌ |
# Cascade Base ⚡
All users have unlimited access to Cascade Base, which does NOT consume any User Prompt OR Flow Action credits.
It is not quite as smart as the premium models, but it's fast, pretty accurate, and free.
# Terminal
Source: https://docs.codeium.com/windsurf/terminal
# Command in the terminal
Use our [Command](/command/overview) modality in the terminal (`Cmd/Ctrl+I`) to generate the proper CLI syntax from prompts in natural language.
 # Auto-executed Cascade commands
Cascade has the ability to run terminal commands on its own with user permission. However, certain terminal commands can be accepted or rejected automatically through the Allow and Deny lists.
By enabling Auto mode, it will rely on Cascade's judgement on whether the command requires the user's permission to be executed. This feature is only available for messages sent with premium models.
### Turbo Mode
# Auto-executed Cascade commands
Cascade has the ability to run terminal commands on its own with user permission. However, certain terminal commands can be accepted or rejected automatically through the Allow and Deny lists.
By enabling Auto mode, it will rely on Cascade's judgement on whether the command requires the user's permission to be executed. This feature is only available for messages sent with premium models.
### Turbo Mode
 ### Allow list
An allow list defines a set of terminal commands that will always auto-execute. For example, if you add `git`, then Cascade will always accept `git add -A`.
The setting can be via Command Palette → Open Settings (UI) → Search for `windsurf.cascadeCommandsAllowList`.
### Allow list
An allow list defines a set of terminal commands that will always auto-execute. For example, if you add `git`, then Cascade will always accept `git add -A`.
The setting can be via Command Palette → Open Settings (UI) → Search for `windsurf.cascadeCommandsAllowList`.
 ### Deny list
A deny list defines a set of terminal commands that will never auto-execute. For example, if you add `rm`, then Cascade will always ask for permission to run `rm index.py`.
The setting can be via Command Palette → Open Settings (UI) → Search for `windsurf.cascadeCommandsDenyList`.
### Deny list
A deny list defines a set of terminal commands that will never auto-execute. For example, if you add `rm`, then Cascade will always ask for permission to run `rm index.py`.
The setting can be via Command Palette → Open Settings (UI) → Search for `windsurf.cascadeCommandsDenyList`.
 # Paid Plan and Credit Usage
Source: https://docs.codeium.com/windsurf/usage
## Getting started
To get started, [complete Windsurf's onboarding](https://docs.codeium.com/windsurf/getting-started#onboarding) and authenticate into Windsurf. Upon authenticating into Windsurf, your 2-week Free Trial starts.
User Prompt credits are consumed whenever a message is sent to Cascade with a premium model while Flow Action credits are consumed when a premium model is used by the AI in Write and Chat mode for a tool call (e.g. search, analyze, write, terminal command, etc.).
Upon using all of your credits, premium models will no longer be accessible but you will still be able to use our Cascade Base model. To resume access with premium models, upgrade to a Pro or Pro Ultimate plan.
The [Free Trial](#using-a-free-trial) includes:
* 50 User Prompt credits
* 200 Flow Action credits
The [Pro](#using-pro-plan) plan includes:
* 500 User Prompt credits
* 1500 Flow Action credits
The [Pro Ultimate](#using-pro-ultimate-plan) plan includes:
* Infinite User Prompt credits
* 3000 Flow Action credits
And the [Free](#using-a-free-plan) plan includes:
* 5 User Prompt credits
* 5 Flow Action credits
If you run out of credits on the Pro or Pro Ultimate plans, you will have the option of [purchasing additional credits](#purchasing-additional-flex-credits).
After upgrading, your paid plan will start immediately and you'll have access to premium models again. To learn more about the quotas and features per pricing plan, [click here](https://codeium.com/pricing).
## User Prompt and Flow Action credits
**User Prompt credits are usage credits that get consumed for each message sent with a premium model (e.g. Sonnet or GPT-4o). Every message sent counts as 1 user prompt credit.**
**Flow Action credits are a usage credit that get consumed for each tool call (e.g. View file, Search, Write, Terminal, etc.). Every tool call counts as 1 flow action credit.**
For Flow Action credits, depending on the prompt, Cascade might not need to take any actions (e.g. explaining a block of code), while for others, Cascade might need to take a series of actions.
### Tool calls
One of the things that makes Cascade special is its ability to use tool calls. Here's are a few examples of tool calls that are currently supported:
* **Search**: Cascade will intelligently search through your codebase for snippets relevant to the task that it's trying to accomplish.
* **Analyze**: Cascade will analyze a file to gather more context to help it accomplish the task requested.
# Paid Plan and Credit Usage
Source: https://docs.codeium.com/windsurf/usage
## Getting started
To get started, [complete Windsurf's onboarding](https://docs.codeium.com/windsurf/getting-started#onboarding) and authenticate into Windsurf. Upon authenticating into Windsurf, your 2-week Free Trial starts.
User Prompt credits are consumed whenever a message is sent to Cascade with a premium model while Flow Action credits are consumed when a premium model is used by the AI in Write and Chat mode for a tool call (e.g. search, analyze, write, terminal command, etc.).
Upon using all of your credits, premium models will no longer be accessible but you will still be able to use our Cascade Base model. To resume access with premium models, upgrade to a Pro or Pro Ultimate plan.
The [Free Trial](#using-a-free-trial) includes:
* 50 User Prompt credits
* 200 Flow Action credits
The [Pro](#using-pro-plan) plan includes:
* 500 User Prompt credits
* 1500 Flow Action credits
The [Pro Ultimate](#using-pro-ultimate-plan) plan includes:
* Infinite User Prompt credits
* 3000 Flow Action credits
And the [Free](#using-a-free-plan) plan includes:
* 5 User Prompt credits
* 5 Flow Action credits
If you run out of credits on the Pro or Pro Ultimate plans, you will have the option of [purchasing additional credits](#purchasing-additional-flex-credits).
After upgrading, your paid plan will start immediately and you'll have access to premium models again. To learn more about the quotas and features per pricing plan, [click here](https://codeium.com/pricing).
## User Prompt and Flow Action credits
**User Prompt credits are usage credits that get consumed for each message sent with a premium model (e.g. Sonnet or GPT-4o). Every message sent counts as 1 user prompt credit.**
**Flow Action credits are a usage credit that get consumed for each tool call (e.g. View file, Search, Write, Terminal, etc.). Every tool call counts as 1 flow action credit.**
For Flow Action credits, depending on the prompt, Cascade might not need to take any actions (e.g. explaining a block of code), while for others, Cascade might need to take a series of actions.
### Tool calls
One of the things that makes Cascade special is its ability to use tool calls. Here's are a few examples of tool calls that are currently supported:
* **Search**: Cascade will intelligently search through your codebase for snippets relevant to the task that it's trying to accomplish.
* **Analyze**: Cascade will analyze a file to gather more context to help it accomplish the task requested.
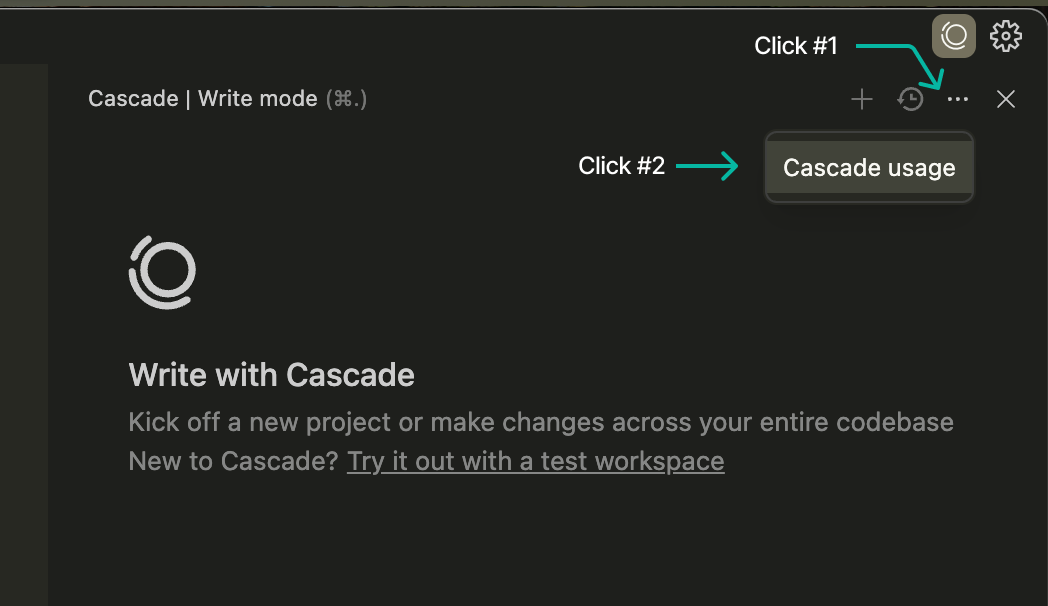 View the settings panel by clicking on "Windsurf Settings" on the status bar, followed by selecting the "Plan Info" tab.
You can also view it on your plan page at [codeium.com/plan](https://codeium.com/plan) after you're authenticated.
### Upgrading to a paid plan
To learn more about paid features or to upgrade to a paid plan, [click here](https://codeium.com/plan). Paid plans include Pro and Pro Ultimate options for individuals as well as for teams.
We accept all major credit cards, Apple Pay, Cash App Pay, Google Pay, Link, WeChat Pay, and Alipay. If you have a payment method not listed, please reach out to us at [support](https://codeium.com/support). You may need to disable your VPN to view the relevant payment methods for your region.
### What happens when you run out of premium Flow Action credits but not premium User Prompt credits?
If you no longer have premium Flow Action credits, you have three options:
* You can purchase premium Flex credits to continue using Write and Chat mode with premium model tool calls (the premium Flex credits will be used as if premium Flow Action credits)
* You can use Legacy mode to continue to use your premium User Prompt credits without any additional premium Flow Action credits (i.e. premium model usage but no tool calls)
* You can use Write or Chat mode with the Cascade Base model. Note that no premium User Prompt credits will be used when on Cascade Base model
### What happens when you run out of premium User Prompt credits but not premium Flow Action credits?
If you no longer have premium User Prompt credits, you have two options:
* You can purchase premium Flex credits to continue using Write and Chat mode (the Flex credits will be used as if premium User Prompt credits)
* You can use Write or Chat mode with the Cascade Base model for prompts. In this case, perhaps unexpectedly, no premium Flow Action credits will be used either! This is because, at a technical quality level, it actually does not make sense to use premium models for tools if the original user prompt is not handled by a premium model, so we will automatically prevent you from burning premium Flow Action credits. Another way of putting it is that there is no way to spend premium Flow Action credits without using a premium User Prompt credit, which is one of the reasons why we give significantly more premium Flow Action credits than premium User Prompt credits at every tier.
### Purchasing additional Flex credits
If you run out of User Prompt or Flow Action credits, you can purchase Flex credits in the [billing website](https://codeium.com/plan). Flex credits are a credit that can be used as both User Prompt and Flow Action credits. For example, if you run out of tool calls but still have remaining User Prompt credits, your Flex credits will be consumed as Flow Action credits. If you run out of both User Prompt and Flow Action credits, Flex credits will be consumed as both. For example, if you are out of both User Prompt credits and Flow Action credits, send a message to Cascade with a premium model, and it performs tool calls as part of the response, you would consume 5 Flex credits, the equivalent of 1 User Prompt and 4 Flow Action credits.
For Team plans, Flex credits are purchased within and treated as a pool amongst all members of the team. Please contact your Teams admin to purchase more Flex credits to increase your amount of Flex credits. For more on the cost of Flex credits, visit our [pricing page](https://codeium.com/pricing).
## Usage examples
To explain how credits work, here are a few examples.
In this first example below, the user has both User Prompt and Flow Action credits available. In the scenario illustrated, 1 User Prompt credit was consumed and 4 Flow Action credits were consumed.
View the settings panel by clicking on "Windsurf Settings" on the status bar, followed by selecting the "Plan Info" tab.
You can also view it on your plan page at [codeium.com/plan](https://codeium.com/plan) after you're authenticated.
### Upgrading to a paid plan
To learn more about paid features or to upgrade to a paid plan, [click here](https://codeium.com/plan). Paid plans include Pro and Pro Ultimate options for individuals as well as for teams.
We accept all major credit cards, Apple Pay, Cash App Pay, Google Pay, Link, WeChat Pay, and Alipay. If you have a payment method not listed, please reach out to us at [support](https://codeium.com/support). You may need to disable your VPN to view the relevant payment methods for your region.
### What happens when you run out of premium Flow Action credits but not premium User Prompt credits?
If you no longer have premium Flow Action credits, you have three options:
* You can purchase premium Flex credits to continue using Write and Chat mode with premium model tool calls (the premium Flex credits will be used as if premium Flow Action credits)
* You can use Legacy mode to continue to use your premium User Prompt credits without any additional premium Flow Action credits (i.e. premium model usage but no tool calls)
* You can use Write or Chat mode with the Cascade Base model. Note that no premium User Prompt credits will be used when on Cascade Base model
### What happens when you run out of premium User Prompt credits but not premium Flow Action credits?
If you no longer have premium User Prompt credits, you have two options:
* You can purchase premium Flex credits to continue using Write and Chat mode (the Flex credits will be used as if premium User Prompt credits)
* You can use Write or Chat mode with the Cascade Base model for prompts. In this case, perhaps unexpectedly, no premium Flow Action credits will be used either! This is because, at a technical quality level, it actually does not make sense to use premium models for tools if the original user prompt is not handled by a premium model, so we will automatically prevent you from burning premium Flow Action credits. Another way of putting it is that there is no way to spend premium Flow Action credits without using a premium User Prompt credit, which is one of the reasons why we give significantly more premium Flow Action credits than premium User Prompt credits at every tier.
### Purchasing additional Flex credits
If you run out of User Prompt or Flow Action credits, you can purchase Flex credits in the [billing website](https://codeium.com/plan). Flex credits are a credit that can be used as both User Prompt and Flow Action credits. For example, if you run out of tool calls but still have remaining User Prompt credits, your Flex credits will be consumed as Flow Action credits. If you run out of both User Prompt and Flow Action credits, Flex credits will be consumed as both. For example, if you are out of both User Prompt credits and Flow Action credits, send a message to Cascade with a premium model, and it performs tool calls as part of the response, you would consume 5 Flex credits, the equivalent of 1 User Prompt and 4 Flow Action credits.
For Team plans, Flex credits are purchased within and treated as a pool amongst all members of the team. Please contact your Teams admin to purchase more Flex credits to increase your amount of Flex credits. For more on the cost of Flex credits, visit our [pricing page](https://codeium.com/pricing).
## Usage examples
To explain how credits work, here are a few examples.
In this first example below, the user has both User Prompt and Flow Action credits available. In the scenario illustrated, 1 User Prompt credit was consumed and 4 Flow Action credits were consumed.
 In this second example below, the user has User Prompt credits but no Flow Action credits available. They purchased additional Flex credits that can be used as a backup to Flow Action credits. In the scenario illustrated, 1 user action credit was consumed and 4 Flex credits were consumed.
 ## Plan Usage
### Using a Free Trial
The Free Trial comes with:
* 50 User Prompt credits
* 200 Flow Action credits
When you're on a Free Trial, you'll be given user prompts and flow actions credits for free! To get started, ask Cascade a question. In Write and Chat mode, Cascade is optimized to fully understand your codebase and leverages tool calls to assist you. By default, all of your requests will use premium models until you run out of credits.
If you end up low on credits, you'll be warned ahead of time so that you can upgrade and have access to more credits. Upon upgrading, your credits will reset to the monthly quota of the respective paid plan.
If you run out of credits, you'll still be able to use our Cascade Base Model in Write or Chat mode while in the Free Trial. If you didn't upgrade in the 2-week Free Trial, you'll be downgraded to our Free plan.
### Using Pro Plan
The Pro plan comes with:
* 500 User Prompt credits
* 1500 Flow Action credits
While on Pro, you'll have access to a monthly quota of User Prompt and Flow Action credits. Cascade usage will consume credits. You can view how many credits you have remaining in the Windsurf Settings panel that's accessible in the status bar.
If you're running low on credits, Cascade will notify you so that you can purchase additional Flex credits. To purchase additional Flex credits, visit the billing website and select “Purchase flex credits”. The Flex credits purchased will rollover to the following usage month if there are any remaining.
If you want to reduce your usage of Flow Action credits, you have two options:
* Use Legacy mode with a premium model. This will still consume User Prompt credits but will not consume any Flow Action credits. Legacy Chat does not use any tools.
* Use Cascade Base model in Write or Chat mode. Using Cascade Base model does not consume any user prompt or Flow Action credits.
If you want to reduce your consumption of User Prompt credits, select Cascade Base model in the model selection dropdown. Using Cascade Base model does not consume any user prompt or Flow Action credits.
In addition to increased Cascade credits, Pro comes with unlimited Fast Autocomplete and unlimited premium model requests with Command.
If you'd like to have access to unlimited prompt credits, more flow actions and better Flex credit pricing, you can upgrade to the Pro Ultimate plan. Upon upgrading to Pro Ultimate, your billing cycle will reset, you'll be refunded a pro-rated amount of your payment for Pro and your monthly quota will also reset. Any Flex credits will transfer over.
### Using Pro Ultimate Plan
The Pro Ultimate plan comes with:
* Infinite User Prompt credits
* 3000 Flow Action credits
While on Pro Ultimate, you'll have access to a monthly quota of Flow Action credits and an **unlimited number of User Prompt credits**. Tool calls within Cascade will consume your Flow Action credits. You can view how many credits you have remaining in the Windsurf Settings panel that's accessible in the status bar.
If you're running low on Flow Action credits, Cascade will notify you so that you can purchase additional Flex credits. To purchase additional Flex credits, visit the billing website and select “Purchase flex credits”. The Flex credits purchased will rollover to the following usage month if there are any remaining.
If you want to reduce your usage of Flow Action credits, you have two options:
* Use Legacy Chat mode with a premium model. On Pro Ultimate, you have unlimited prompt credits so Legacy Chat usage does not consume any credits.
* Use Cascade Base model in Write or Chat mode. Using Cascade Base model also does not consume any credits.
In addition to increased Cascade credits, Pro Ultimate comes with unlimited Fast Autocomplete and unlimited premium model requests with Command.
If you'd like to downgrade to Pro, visit the billing website. Upon downgrading, you'll remain in Pro Ultimate until the end of your billing cycle. At the end of your billing cycle, your plan will change to Pro. Any Flex credits will transfer over.
### Using a Free plan
The Free plan comes with:
* 5 User Prompt credits
* 5 Flow Action credits
Windsurf can still be used for free! While in Cascade, you'll be given limited number of User Prompt and Flow Action credits and have access to our Cascade Base model in read mode to ask questions. When editing code, you'll have access to unlimited autocomplete suggestions and AI command instructions. To learn more about features in Free and in paid tiers, [click here](https://codeium.com/pricing).
### Canceling your paid plan
To cancel your paid plan, visit the billing website. Upon canceling your paid plan, you'll still have access to all of your credits from your monthly quota and Flex credits until the end of the usage month. After the usage month, all Flex credits will be expired and you'll be downgraded to the Free plan where you'll be provided a limited number of User Prompt and tool action credits. If you change your mind and decide not to cancel before the end of the usage month, you can renew your plan by visiting the billing page.
# Web Search
Source: https://docs.codeium.com/windsurf/web-search
Cascade can now intuitively parse through and chunk up web pages and documentation, providing realtime context to the models. The key way to understand this feature is that Cascade will browse the Internet as a human would. What this means is that it will ask itself the following questions:
1. Do I need to use the Internet to help you with your query? (ie. time-based question, live docs, user pasted URL, etc.)
2. Which page(s) do I need to visit to get the right information and in what priority order?
3. What parts of the page do I need to read in order to get the right information in the fastest, most efficient way possible?
Our web tools are designed in such a way that gets only the information that is necessary in order to efficiently use your credits.
## Plan Usage
### Using a Free Trial
The Free Trial comes with:
* 50 User Prompt credits
* 200 Flow Action credits
When you're on a Free Trial, you'll be given user prompts and flow actions credits for free! To get started, ask Cascade a question. In Write and Chat mode, Cascade is optimized to fully understand your codebase and leverages tool calls to assist you. By default, all of your requests will use premium models until you run out of credits.
If you end up low on credits, you'll be warned ahead of time so that you can upgrade and have access to more credits. Upon upgrading, your credits will reset to the monthly quota of the respective paid plan.
If you run out of credits, you'll still be able to use our Cascade Base Model in Write or Chat mode while in the Free Trial. If you didn't upgrade in the 2-week Free Trial, you'll be downgraded to our Free plan.
### Using Pro Plan
The Pro plan comes with:
* 500 User Prompt credits
* 1500 Flow Action credits
While on Pro, you'll have access to a monthly quota of User Prompt and Flow Action credits. Cascade usage will consume credits. You can view how many credits you have remaining in the Windsurf Settings panel that's accessible in the status bar.
If you're running low on credits, Cascade will notify you so that you can purchase additional Flex credits. To purchase additional Flex credits, visit the billing website and select “Purchase flex credits”. The Flex credits purchased will rollover to the following usage month if there are any remaining.
If you want to reduce your usage of Flow Action credits, you have two options:
* Use Legacy mode with a premium model. This will still consume User Prompt credits but will not consume any Flow Action credits. Legacy Chat does not use any tools.
* Use Cascade Base model in Write or Chat mode. Using Cascade Base model does not consume any user prompt or Flow Action credits.
If you want to reduce your consumption of User Prompt credits, select Cascade Base model in the model selection dropdown. Using Cascade Base model does not consume any user prompt or Flow Action credits.
In addition to increased Cascade credits, Pro comes with unlimited Fast Autocomplete and unlimited premium model requests with Command.
If you'd like to have access to unlimited prompt credits, more flow actions and better Flex credit pricing, you can upgrade to the Pro Ultimate plan. Upon upgrading to Pro Ultimate, your billing cycle will reset, you'll be refunded a pro-rated amount of your payment for Pro and your monthly quota will also reset. Any Flex credits will transfer over.
### Using Pro Ultimate Plan
The Pro Ultimate plan comes with:
* Infinite User Prompt credits
* 3000 Flow Action credits
While on Pro Ultimate, you'll have access to a monthly quota of Flow Action credits and an **unlimited number of User Prompt credits**. Tool calls within Cascade will consume your Flow Action credits. You can view how many credits you have remaining in the Windsurf Settings panel that's accessible in the status bar.
If you're running low on Flow Action credits, Cascade will notify you so that you can purchase additional Flex credits. To purchase additional Flex credits, visit the billing website and select “Purchase flex credits”. The Flex credits purchased will rollover to the following usage month if there are any remaining.
If you want to reduce your usage of Flow Action credits, you have two options:
* Use Legacy Chat mode with a premium model. On Pro Ultimate, you have unlimited prompt credits so Legacy Chat usage does not consume any credits.
* Use Cascade Base model in Write or Chat mode. Using Cascade Base model also does not consume any credits.
In addition to increased Cascade credits, Pro Ultimate comes with unlimited Fast Autocomplete and unlimited premium model requests with Command.
If you'd like to downgrade to Pro, visit the billing website. Upon downgrading, you'll remain in Pro Ultimate until the end of your billing cycle. At the end of your billing cycle, your plan will change to Pro. Any Flex credits will transfer over.
### Using a Free plan
The Free plan comes with:
* 5 User Prompt credits
* 5 Flow Action credits
Windsurf can still be used for free! While in Cascade, you'll be given limited number of User Prompt and Flow Action credits and have access to our Cascade Base model in read mode to ask questions. When editing code, you'll have access to unlimited autocomplete suggestions and AI command instructions. To learn more about features in Free and in paid tiers, [click here](https://codeium.com/pricing).
### Canceling your paid plan
To cancel your paid plan, visit the billing website. Upon canceling your paid plan, you'll still have access to all of your credits from your monthly quota and Flex credits until the end of the usage month. After the usage month, all Flex credits will be expired and you'll be downgraded to the Free plan where you'll be provided a limited number of User Prompt and tool action credits. If you change your mind and decide not to cancel before the end of the usage month, you can renew your plan by visiting the billing page.
# Web Search
Source: https://docs.codeium.com/windsurf/web-search
Cascade can now intuitively parse through and chunk up web pages and documentation, providing realtime context to the models. The key way to understand this feature is that Cascade will browse the Internet as a human would. What this means is that it will ask itself the following questions:
1. Do I need to use the Internet to help you with your query? (ie. time-based question, live docs, user pasted URL, etc.)
2. Which page(s) do I need to visit to get the right information and in what priority order?
3. What parts of the page do I need to read in order to get the right information in the fastest, most efficient way possible?
Our web tools are designed in such a way that gets only the information that is necessary in order to efficiently use your credits.
 ## Reading Pages
Cascade can read individual pages for things like documentation, blog posts, and GitHub files. The page reads happen entirely on your device within your network so if you're using a VPN you shouldn't have any problems.
Pages are picked up either from web search results, inferred based on the conversation, or from URLs pasted directly into your message.
We break pages up into multiple chunks to efficiently use your Flow Action credits. It's very similar to how a human would read a page: for a long page we skim to the section we want then read the text that's relevant. This is how Cascade operates as well.
## Reading Pages
Cascade can read individual pages for things like documentation, blog posts, and GitHub files. The page reads happen entirely on your device within your network so if you're using a VPN you shouldn't have any problems.
Pages are picked up either from web search results, inferred based on the conversation, or from URLs pasted directly into your message.
We break pages up into multiple chunks to efficiently use your Flow Action credits. It's very similar to how a human would read a page: for a long page we skim to the section we want then read the text that's relevant. This is how Cascade operates as well.
 It's worth noting that not all pages can be parsed. We are actively working on improving the quality of our website reading. If you have specific sites you'd like us to handle better, feel free to file a feature request!
## Credit Usage with Web tools
Web Search uses 1 credit per search. It does not open up the search results, simply returns up to 5 links to consider reading.
Web URL reads use at least 1 credit each. If a page is long, we will break it up into chunks and present an outline to Cascade. If a section is deemed relevant, we will read that section. We try to merge chunks together as much as possible to reduce credit usage. For example, if there are 3 short neighboring chunks, we'll merge them together so that you only use one credit to read the chunks.
For a detailed explanation of credit usage, see [our video explanation](https://youtu.be/moIySJ4d0UY).
It's worth noting that not all pages can be parsed. We are actively working on improving the quality of our website reading. If you have specific sites you'd like us to handle better, feel free to file a feature request!
## Credit Usage with Web tools
Web Search uses 1 credit per search. It does not open up the search results, simply returns up to 5 links to consider reading.
Web URL reads use at least 1 credit each. If a page is long, we will break it up into chunks and present an outline to Cascade. If a section is deemed relevant, we will read that section. We try to merge chunks together as much as possible to reduce credit usage. For example, if there are 3 short neighboring chunks, we'll merge them together so that you only use one credit to read the chunks.
For a detailed explanation of credit usage, see [our video explanation](https://youtu.be/moIySJ4d0UY).